DIY Frame Wood: Stunning Ideas to Transform Your Space Quickly
Are you looking to add a personal touch to your home decor without spending a fortune? Making your own wood frame might be easier than you think.
With simple tools and a bit of creativity, you can create a beautiful, custom frame that shows off your style. Whether you want to highlight a favorite photo, artwork, or mirror, this DIY project lets you take control and make something truly unique.
Ready to get started? Let’s dive into how you can craft your own wood frame step by step.
Choosing The Right Wood
Choosing the right wood is key to making a strong and beautiful frame. The wood affects the frame’s look and how long it lasts. Picking the right type helps your project succeed and saves you time and money. Focus on the wood’s type, quality, and impact on nature.
Types Of Wood For Frames
Hardwoods like oak and maple offer strength and a nice finish. Softwoods such as pine are easier to cut and good for beginners. Each wood type has unique colors and grain patterns. Choose wood that fits your style and project needs.
Wood Quality And Durability
Look for wood without cracks or knots. Smooth, straight grain wood is easier to work with. Durable wood resists dents and scratches. This ensures your frame stays strong and looks good for years.
Sustainable Wood Options
Using sustainable wood helps protect forests. Look for wood certified by organizations like FSC. Bamboo is a fast-growing and eco-friendly choice. Choose wood that supports a healthy environment and lasts long.
Essential Tools And Materials
Building a wooden frame yourself is a rewarding project. Having the right tools and materials makes the job easier. This section covers what you need to get started. It helps you work safely and efficiently.
Basic Tools Needed
Start with a measuring tape to get exact lengths. A saw is essential to cut wood pieces. Choose a handsaw or a power saw based on your comfort. A hammer helps to join parts with nails. Use a screwdriver for screws. A square tool keeps corners perfect. Sandpaper smooths rough edges for a clean finish.
Safety Equipment
Wear safety glasses to protect your eyes from dust and wood chips. Gloves protect your hands from splinters and cuts. Use ear protection if you use loud power tools. A dust mask prevents inhaling sawdust. Always keep a first aid kit nearby for small injuries.
Additional Supplies
Wood glue strengthens joints and keeps the frame sturdy. Nails and screws hold the wood together securely. Wood filler covers small holes or cracks. Paint or wood stain gives your frame a nice look. Brushes or rags help apply finishes evenly. Clamps hold pieces in place while glue dries.
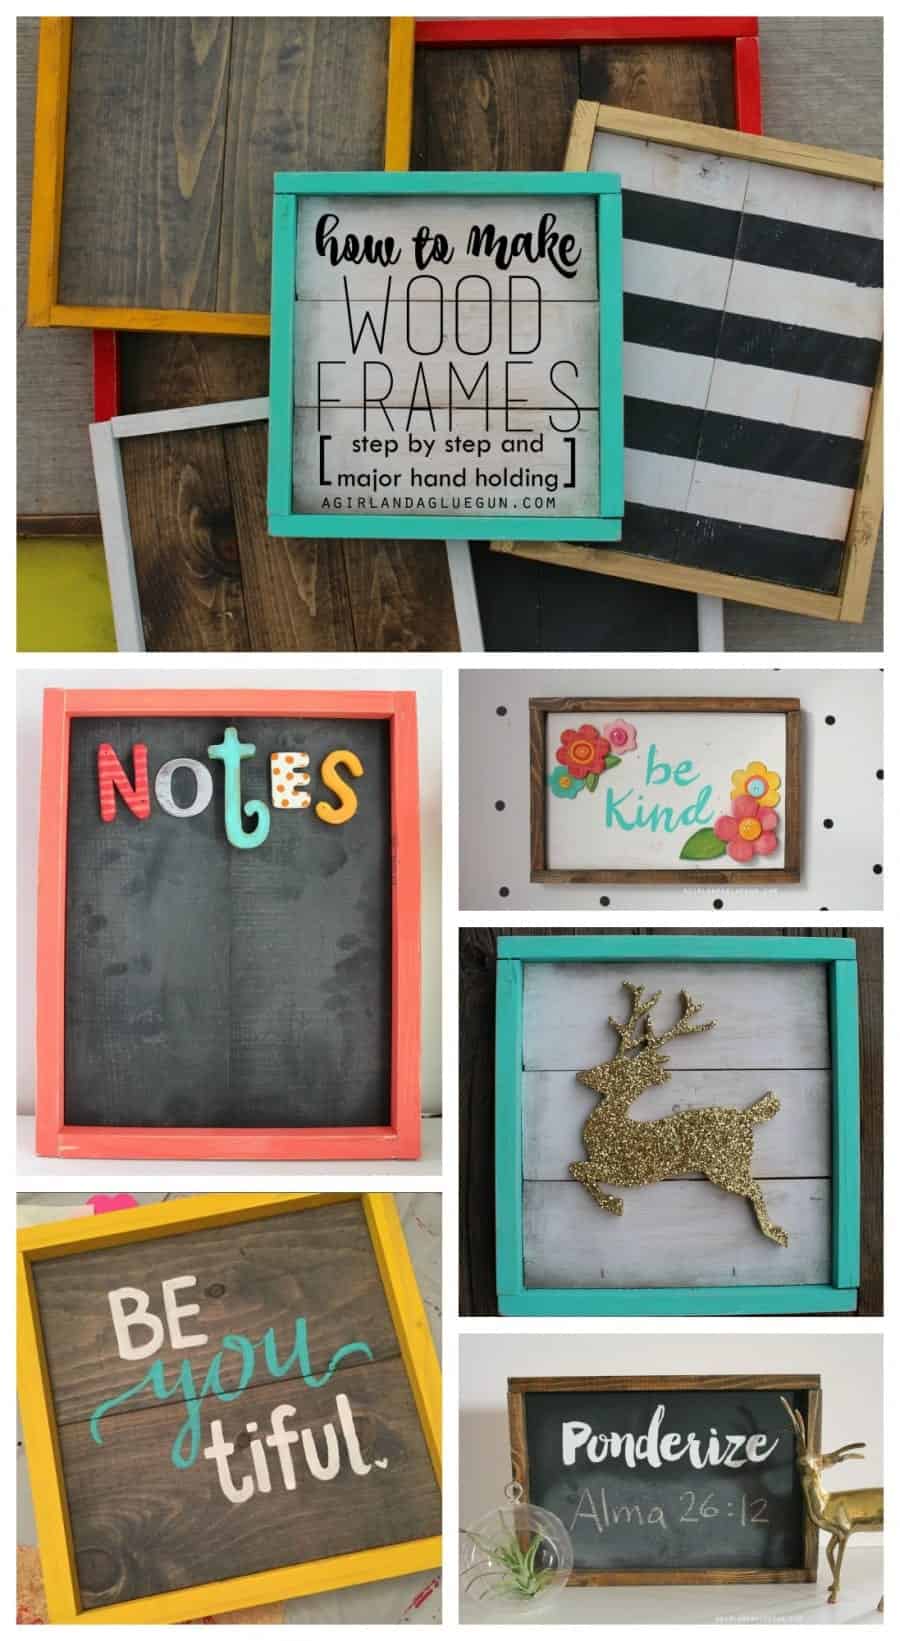
Simple Frame Designs
Simple frame designs make DIY wood framing easy and fun. They focus on clean lines and basic shapes. This style fits many home decors and is perfect for beginners. Using wood, you can create beautiful frames that highlight your photos or art without extra work.
These frames use common tools and basic skills. Each design has its own charm and style. Choose one that matches your taste and space.
Classic Rectangular Frames
Classic rectangular frames are the most popular. They suit any picture or artwork size. Straight cuts and right angles keep the design simple. Use smooth wood like pine or oak for a clean look. You can paint or stain the wood to match your room. These frames fit walls, shelves, or desks easily.
Rustic Pallet Frames
Rustic pallet frames use reclaimed wood for a natural look. They have rough edges and a weathered feel. This style adds warmth and character to any space. Pallet wood is cheap and easy to find. Sand it lightly to avoid splinters but keep the texture. These frames work well with vintage photos or nature prints.
Modern Minimalist Frames
Modern minimalist frames focus on simplicity and function. They use thin wood strips and little decoration. The goal is to keep attention on the artwork. Choose light woods like birch or maple for brightness. These frames often have a floating effect with space between the frame and art. Perfect for contemporary homes and offices.
Creative Finishing Techniques
Creative finishing techniques bring your DIY wood frame to life. These methods add personality and style. They make simple wood frames unique and eye-catching. Experimenting with finishes can transform plain wood into art. This section covers easy ways to finish your frame with flair.
Painting And Staining Tips
Choose the right paint or stain for your wood type. Use light coats to avoid drips and uneven color. Sand the wood lightly before applying paint or stain. This helps the finish stick better. Let each coat dry completely before adding the next. Use a brush or sponge for smooth, even coverage. Experiment with colors that match your room’s decor.
Distressing For Vintage Looks
Distressing gives wood an aged, rustic feel. Start by sanding edges and corners gently. Use sandpaper or steel wool for natural wear spots. Add small dents or scratches with a hammer or screwdriver. Wipe the wood with a damp cloth to soften sharp edges. This technique adds charm and character to your frame. Perfect for farmhouse or shabby chic styles.
Adding Decorative Elements
Decorative touches make your frame stand out. Attach small wooden shapes or metal corners for detail. Use glue or tiny nails to secure decorations firmly. Try adding beads, shells, or buttons for a fun look. Paint decorations in contrasting colors for more impact. These elements add texture and interest to plain frames. Customize your frame to suit your personal taste.
Step-by-step Frame Assembly
Building a wood frame by yourself can be fun and rewarding. This step-by-step guide helps you create a strong, neat frame. Follow each step carefully to get the best results. Your DIY wood frame will look great and last long.
Measuring And Cutting Wood
Start by measuring the wood pieces for your frame. Use a tape measure for accuracy. Mark the wood clearly with a pencil. Cut the wood using a saw along the marks. Cut slowly to keep straight edges. Check each piece after cutting to ensure it fits well.
Joining Frame Pieces
Place the wood pieces in the shape of your frame. Use wood glue on the edges to join them. Hold the corners tightly for a few minutes. For better hold, use nails or screws at the corners. Make sure the corners are square before the glue dries.
Securing And Reinforcing
Strengthen your frame by adding corner braces or brackets. Attach these inside each corner with screws. This stops the frame from bending or coming apart. Sand any rough edges for a smooth finish. Let the glue and screws dry fully before use.
Displaying Your Frames
Displaying your DIY wood frames can change a room’s look. Frames do more than hold pictures. They add style and personality to your space. Choosing how to display them is key. The right display makes your frames stand out and enhances your decor.
Wall Mounting Ideas
Mounting frames on the wall saves space and creates a gallery feel. Arrange frames in a grid for a clean look. Or try a random pattern for a casual vibe. Use hooks or nails that fit your frame size. Consider mixing frame sizes for variety. Keep frames at eye level for best viewing.
Using Frames As Shelves
Frames can become small shelves with a simple twist. Attach a wooden plank inside a large frame. Use it to hold small plants or books. This adds function and charm to your walls. Secure the plank well to avoid accidents. Painted frames work well as colorful shelves.
Incorporating Frames Into Decor
Frames fit into many decor styles easily. Use rustic wood frames for a cozy, warm look. Sleek, painted frames suit modern rooms. Group frames with other decor like candles or vases. Frames can also highlight mirrors or fabric art. Think beyond photos to make your space unique.
Troubleshooting Common Issues
Building a wooden frame yourself can be very rewarding. Yet, common problems often arise during the process. Knowing how to fix these issues saves time and frustration. This section helps you deal with typical troubles in DIY wood framing. Follow these tips for a smoother project and better results.
Fixing Uneven Corners
Uneven corners make frames look unprofessional. Start by checking the angles with a carpenter’s square. Use clamps to hold the pieces tightly. Sand down any rough edges for a clean fit. If corners still don’t match, add small wooden shims to balance gaps. Always measure twice before cutting to reduce errors.
Preventing Wood Splitting
Wood splits when nails or screws go in without care. Drill pilot holes first to protect the wood. Use screws instead of nails for stronger hold. Choose the right size fasteners to avoid putting too much pressure. Apply wood glue along joints for extra strength. Keep the wood dry to prevent cracks over time.
Maintaining Frame Stability
Stable frames last longer and hold pictures well. Attach corner braces inside the frame for support. Use strong wood glue along all joints. Make sure all screws are tight but not overdone. Store the frame flat while drying to keep shape. Check the frame regularly and tighten any loose parts.

Frequently Asked Questions
What Tools Do I Need For A Diy Wood Frame?
You need a saw, measuring tape, wood glue, clamps, sandpaper, and a drill. These tools help cut, shape, and assemble the wood frame accurately and securely.
Which Wood Type Is Best For Diy Frames?
Pine, oak, and cedar are ideal for DIY frames. Pine is affordable and easy to work with. Oak offers durability, while cedar resists moisture and insects.
How Do I Measure Wood For A Picture Frame?
Measure the picture size first, then add the desired frame width. Cut wood pieces to these lengths for a perfect fit. Always double-check measurements before cutting.
What Finish Should I Use On A Wood Frame?
Use varnish, stain, or paint to protect and enhance the wood. Varnish adds shine, stain highlights grain, and paint offers color variety. Choose based on your style and frame use.
Conclusion
Creating a DIY wood frame brings joy and a sense of pride. It saves money and lets you customize your style. The process is simple and fun for all skill levels. With basic tools, you can make a beautiful frame in no time.
Try different woods and finishes to match your space. Enjoy the feeling of crafting something with your own hands. A wooden frame adds warmth and charm to any room. Start your project today and see how rewarding it feels.