DIY Garment Rack Wood: Easy Steps for Stylish Storage Solutions
Are you tired of cluttered closets and clothes piled everywhere? A DIY garment rack made of wood could be the perfect solution for your space.
Imagine having a stylish, sturdy rack that fits your room perfectly and shows off your favorite outfits. Building it yourself means you get exactly what you want without paying high store prices. You’ll discover simple steps to create your own wooden garment rack, plus tips to make it strong and beautiful.
Ready to transform your space and organize your wardrobe? Keep reading—you’re just a few easy steps away from your dream garment rack.
Choosing The Right Wood
Choosing the right wood is key to building a strong and beautiful garment rack. The wood type affects how long the rack lasts and how it looks in your space. Picking the right wood helps the rack hold weight without bending or breaking. It also makes the project easier and more enjoyable.
Types Of Wood For Durability
Hardwoods like oak, maple, and walnut are strong and last long. These woods resist dents and scratches. Softwoods such as pine and cedar are easier to work with. They are lighter but might not hold very heavy clothes well. Choose wood that fits your budget and how much weight the rack needs to support.
Eco-friendly Wood Options
Bamboo is a fast-growing wood that is very eco-friendly. It is strong and looks modern. Reclaimed wood is another good choice. This wood is recycled from old furniture or buildings. Using reclaimed wood helps reduce waste and adds character to your rack. Look for wood certified by the Forest Stewardship Council (FSC) for sustainable options.
Wood Finishes And Treatments
Applying a finish protects the wood from moisture and dirt. You can use oil, wax, or varnish. Oil brings out the wood’s natural color and texture. Varnish adds a hard, shiny surface that lasts long. Sand the wood before finishing for a smooth feel. Finishing makes the rack easier to clean and keeps it looking new.

Tools And Materials Needed
Building a DIY garment rack from wood requires some basic tools and materials. Preparing these items before starting saves time and effort. Having the right tools makes the project smoother and safer. Quality materials also ensure your rack is sturdy and lasts longer.
Essential Tools List
- Measuring tape for accurate dimensions
- Hand saw or circular saw for cutting wood
- Drill with drill bits for making holes
- Screwdriver or power driver to fasten screws
- Sandpaper or sanding block for smooth edges
- Clamps to hold pieces in place
- Carpenter’s square for right angles
- Pencil for marking measurements
Hardware And Accessories
- Wood screws to join pieces securely
- Wood glue for added strength
- Metal rods or pipes for hanging clothes
- Brackets or hooks for extra support
- Wood finish or paint to protect and decorate
- Casters or wheels if you want mobility
Safety Gear Recommendations
- Safety glasses to protect your eyes
- Work gloves to avoid splinters and cuts
- Dust mask to prevent inhaling sawdust
- Ear protection if using loud power tools
- Wear closed-toe shoes for foot safety
Design Ideas For Garment Racks
Designing your own wooden garment rack is a fun way to add style and function. A good design fits your space and personal taste. Wood offers warmth and a natural look that suits many decor styles.
Explore different design ideas to find the perfect look for your rack. Choose a style that matches your room and clothes. Here are some popular design ideas for wooden garment racks.
Minimalist Styles
Minimalist garment racks focus on clean lines and simple shapes. Use light-colored wood like pine or birch for a fresh look. Keep the rack slim and avoid extra decorations. This style works well in small spaces.
Use thin wooden rods and basic joints. This style keeps your clothes organized without clutter. Minimalist racks blend easily with most room designs.
Rustic And Vintage Looks
Rustic racks highlight natural wood textures and knots. Choose reclaimed or rough-cut wood for an authentic feel. Add metal hooks or vintage-style wheels for charm. This style adds warmth and character to any room.
Let the wood’s natural color and grain shine. You can stain or leave the wood raw for a true rustic look. Perfect for cozy bedrooms or farmhouse interiors.
Modern And Industrial Designs
Modern racks combine wood with metal parts for a bold look. Use dark-stained wood with black or silver metal pipes. The mix of materials creates an edgy, urban style.
Keep the design simple but strong. This style suits loft apartments or modern homes. The industrial look is practical and stylish for daily use.

Step-by-step Building Process
Building a DIY garment rack from wood is easier than it looks. Follow these clear steps to create a strong, stylish rack. Each step focuses on simple tasks that anyone can do. This guide helps you build with confidence and get great results.
Measuring And Cutting Wood
Start by measuring the wood pieces carefully. Use a tape measure for accuracy. Cut the wood to the sizes needed for your rack. Make straight cuts with a saw. Smooth any rough edges with sandpaper. Accurate cuts ensure the rack fits together well.
Assembling The Frame
Put the cut wood pieces together to form the frame. Use wood screws or nails to join them. Check the corners to keep them square. Tighten all connections so the frame feels solid. A well-assembled frame is the base for your rack.
Adding Support And Stability
Add extra wood pieces for support inside the frame. These keep the rack steady and strong. Attach braces or crossbars at key points. Make sure the rack stands firm and does not wobble. Good support makes the rack safe to use.
Finishing Touches
Finishing touches give your DIY wood garment rack a polished look. They protect the wood and improve its durability. These steps help your rack last longer and look great in any room. Paying attention to details adds charm and function.
Sanding And Smoothing
Start by sanding all wooden surfaces with fine-grit sandpaper. This removes rough spots and splinters. Sand in the direction of the wood grain for best results. Use a sanding block for even pressure and smooth finish. Wipe away dust with a damp cloth before the next step.
Painting And Staining Tips
Choose paint or stain that fits your room’s style. Use a brush or cloth to apply thin, even coats. Let each layer dry fully before adding another. Paint gives color and protection, while stain highlights the wood’s natural texture. Seal the finish with clear varnish for extra durability.
Adding Hooks And Accessories
Install hooks on the sides or bottom for bags and scarves. Choose sturdy hooks that match your rack’s style. Attach small shelves or baskets for extra storage. Accessories add convenience and keep your items organized. They make the rack more useful every day.
Maintaining Your Wood Rack
Maintaining your wood garment rack is key to keeping it strong and good-looking. Wood needs care to avoid damage from dust, moisture, and daily use. Taking simple steps will help your rack last longer and stay safe for your clothes.
Cleaning And Care
Dust your wood rack regularly with a soft cloth. Use a damp cloth for sticky spots, then dry it quickly. Avoid harsh chemicals that can harm the wood’s finish. Keep the rack away from direct sunlight to prevent fading. Use a wood polish occasionally to keep the surface smooth and shiny.
Repairing Minor Damages
Small scratches and dents happen over time. Lightly sand damaged areas with fine sandpaper. Apply wood filler for deeper dents, then sand smooth once dry. Match the color with a wood stain or marker. Tighten loose screws and joints to keep the rack stable. Fixing minor problems early stops bigger issues later.
Extending Longevity
Place your wood rack on a flat, dry surface to avoid warping. Avoid overloading with heavy clothes to prevent stress on joints. Use felt pads under the legs to protect floors and wood from moisture. Store the rack in a cool, dry place to reduce wood swelling. Regular checks and care will keep your rack durable for years.
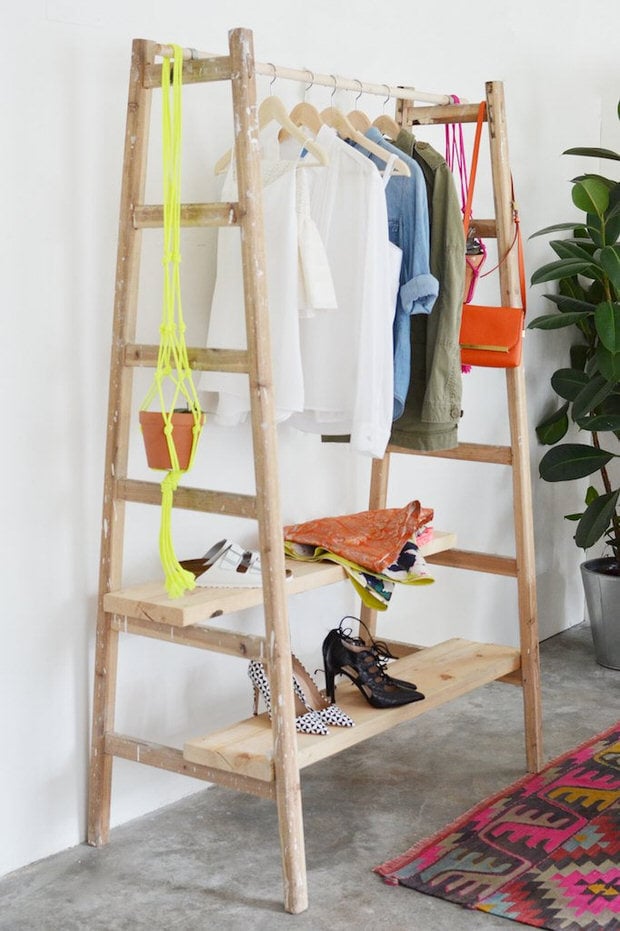
Creative Storage Enhancements
Creative storage enhancements make your DIY garment rack wood more useful. They help organize clothes and accessories neatly. These ideas save space and keep your room tidy. Simple additions can transform a basic rack into a smart storage solution.
Incorporating Shelves
Shelves add extra space for folded clothes or shoes. Wooden planks fit well with the rack’s frame. Adjust shelf height to fit different items. This keeps everything visible and easy to reach. Shelves also add stability to the rack’s structure.
Using Baskets And Boxes
Baskets and boxes store small items like scarves or belts. They keep clutter out of sight but easy to find. Choose baskets that match the wood for a clean look. Boxes with lids protect delicate items from dust. These containers make your rack more organized and neat.
Customizing With Fabric Covers
Fabric covers protect clothes from dust and dirt. Use simple cotton or canvas for a natural look. Covers can have zippers or ties for easy access. Choose light colors to brighten your space. Custom covers give the rack a polished and finished appearance.
Frequently Asked Questions
What Materials Are Best For A Diy Wood Garment Rack?
The best materials include sturdy hardwood like oak or maple. These woods ensure durability and a polished look. Also, use quality screws and brackets for stability. Sand the wood smooth to avoid splinters. Finishing with a sealant protects against moisture and wear.
How Do I Build A Sturdy Wooden Garment Rack?
Start by measuring your space and cutting wood to size. Assemble a solid base with crossbars for support. Use strong joints like dowels or screws. Sand all surfaces for a smooth finish. Finally, apply a protective coat to increase longevity.
What Tools Are Needed For A Diy Wood Garment Rack?
Essential tools include a saw for cutting wood, a drill for screws, and sandpaper for smoothing. A measuring tape and level ensure accuracy. Clamps help hold pieces in place during assembly. A paintbrush is useful for finishing touches.
How Much Does It Cost To Make A Wood Garment Rack?
Costs vary based on wood type and size. Basic racks range from $30 to $100. Hardwood and custom designs increase expenses. Budget for tools if you don’t have them. DIY racks save money compared to store-bought options.
Conclusion
Building a DIY garment rack with wood is simple and rewarding. You save money and get a sturdy rack that fits your space. Using basic tools and materials makes the project easy for anyone. Plus, you can customize the size and style to match your room.
This project adds function and charm to your home. Give it a try and enjoy your new wooden garment rack every day.