Does Tung Oil Darken Wood: Essential Guide
Yes, tung oil does darken wood. It enhances the natural color of the wood, making it appear richer and deeper, especially on lighter-toned woods. The darkening effect is permanent and increases with the number of coats applied.
Working with wood is a journey of discovery, and one of the first things many DIYers wonder about is how different finishes will change their project. You’ve picked out the perfect piece of wood, maybe for a new table or a custom shelf, and now you’re looking at finishes. Tung oil is a popular choice, known for its natural beauty and protective qualities. But, a common question pops up: Will tung oil change the color of my wood?
It’s a great question because we all want our projects to look just right. Sometimes, we want to emphasize the wood’s natural grain, and other times, we might be aiming for a slightly warmer tone. Understanding how tung oil behaves is key to achieving the look you desire. Don’t worry, it’s simpler than you might think! In this guide, we’ll break down exactly how tung oil affects wood color, what to expect, and how to get the best results for your projects. We’ll cover everything from the science behind it to practical tips for application, ensuring your woodworking dreams become a beautiful reality.
Does Tung Oil Darken Wood? The Simple Answer
To put it plainly, yes, tung oil darkens wood. Think of it like adding a clear, rich glaze to your wood. It penetrates the wood fibers, revealing the wood’s natural undertones and enhancing its inherent color. This effect is more pronounced on lighter-colored woods, making them appear warmer and deeper. For darker woods, tung oil typically adds a subtle richness without dramatically altering the shade. This is a permanent change, so it’s a decision to consider before you start applying.
Understanding How Tung Oil Works
Tung oil, also known as China oil, doesn’t just sit on the surface of the wood like some varnishes. Instead, it’s a drying oil that soaks into the wood’s pores. As it cures, it polymerizes, forming a hard, durable, and water-resistant finish within the wood itself.
Here’s a simplified breakdown of what happens:
Penetration: When you apply tung oil, the liquid oil seeps into the wood’s cellular structure.
Oxidation: When exposed to air, the oil undergoes a chemical reaction called oxidation. This process causes the oil molecules to link together.
Polymerization: Through a continued reaction, these linked molecules harden and cross-link, creating a protective film within the wood.
Color Enhancement: During this process, the oil interacts with the natural compounds and pigments within the wood. This interaction deepens the existing colors and brings out richer undertones, leading to the darkening effect you see.
This penetration and curing process is what gives tung oil its distinctive look and feel – that “in the wood” finish rather than a thick coating on top.
Natural Tung Oil vs. Polymerized Tung Oil
It’s worth noting that there are different types of tung oil products available:
100% Pure Tung Oil: This is the most natural form. It will darken wood and offers excellent protection, but it takes longer to cure and may require more coats for premium durability.
“Tung Oil Finish” or Blends: Many products labeled simply as “Tung Oil Finish” are actually blends of tung oil with other oils (like linseed oil), solvents, and drying agents. These often cure faster and can be easier to apply. However, their darkening effect might be slightly different, and they may not offer the same level of oil-only penetration. Always check the product label to understand what you’re using.
While both darken wood, 100% pure tung oil often provides a more natural, gradual deepening of color over multiple applications.
How Much Does Tung Oil Darken Wood? Factors to Consider
The degree to which tung oil darkens wood isn’t a one-size-fits-all answer. Several factors influence the final appearance:
Wood Species: This is the most significant factor.
Light woods like pine, maple, ash, and birch will show a more noticeable darkening, often taking on a warmer, honey-like or amber tone.
Medium woods like oak, cherry, and walnut will also deepen in color, appearing richer and more saturated.
Very dark woods like ebony or wenge may show less dramatic color change, perhaps just a slight sheen or enhanced grain definition.
Number of Coats: Each additional coat of tung oil will deepen the color and the oil penetration into the wood. So, the more coats you apply, the more pronounced the darkening effect will be.
Wood Porosity and Grain: Denser woods with tighter grains might absorb less oil initially, leading to a subtler color change compared to more open-grained woods.
Surface Preparation: A smoothly sanded surface will absorb oil more evenly, contributing to a consistent color enhancement.
Visualizing the Darkening Effect
To give you a better idea, let’s look at how different wood types might appear after tung oil application:
| Wood Type | Before Tung Oil (Typical Appearance) | After Tung Oil (Typical Appearance) | Notes |
| :———— | :———————————– | :——————————————————————- | :————————————————————- |
| Pine | Pale yellow to light brown | Warm honey blonde to light amber, with enhanced grain lines. | Shows a significant warming effect. |
| Maple | Creamy white to pale tan | Soft golden hue to light amber, grains become more visible. | Becomes noticeably warmer, especially prominent maple figure. |
| Oak | Light to medium brown, tan | Richer tan to light brown, grain patterns appear deeper and more defined. | Enhances natural tones and depth of grain. |
| Cherry | Pinkish-brown to reddish-brown | Deeper reddish-brown, with a richer, more mature glow. | Emphasizes its natural warm, rosy undertones. |
| Walnut | Medium to dark brown | Deeper, more intense brown, with subtle reddish or purplish undertones. | Adds a luxurious depth to its already rich color. |
| Ash | Pale greyish-white to light brown | Warm beige to light tan, grain contrast becomes more apparent. | Similar to maple, gains warmth and grain definition. |
This table provides a general guide, but remember that actual results can vary based on the specific cut of the wood and its natural color variations.
How to Test Tung Oil’s Effect Before You Commit
This is where everyone’s favorite woodworking tip comes in: Test it first! Before you slather tung oil all over your beautiful project piece, always test it on a scrap piece of the exact same wood.
Here’s how to do it:
1. Prepare Your Scrap: Sand your scrap piece to the same grit you plan to use for your main project.
2. Apply a Single Coat: Apply one coat of your chosen tung oil according to the product’s instructions. Let it cure for the recommended time (this might be 24 hours or more, especially for pure tung oil).
3. Evaluate: Once dry, hold it next to an unfinished piece to see the color change. You can even apply a second coat to see how it builds up.
4. Compare: If you have different types of wood, test on samples of each to see how the oil interacts with their unique properties.
This simple step can save you a lot of potential disappointment and ensures you’re happy with the final look before applying it to your main project. Many woodworking stores offer small sample cans of finishes for this very purpose.
Applying Tung Oil for the Best Results
Getting the perfect finish with tung oil is a rewarding process. It’s all about patience and proper application. Here are the general steps:
Tools and Materials You’ll Need
Tung Oil: Pure tung oil or a tung oil finish.
Clean, Lint-Free Cloths: For application and wiping off excess.
Fine-Grit Sandpaper: (e.g., 220-320 grit) for final surface preparation.
Tack Cloth: For removing dust before application.
Gloves: To protect your hands.
Safety Glasses: Always important in the workshop.
A well-ventilated area.
Step-by-Step Application Guide
1. Prepare the Wood Surface:
Ensure your wood is smooth and free of dust.
Sand your project thoroughly. A common progression might be 120 grit, then 180 grit, and finish with 220 or 320 grit for a smooth surface.
Use a tack cloth to wipe away all sanding dust. A clean surface ensures even oil penetration and a beautiful finish.
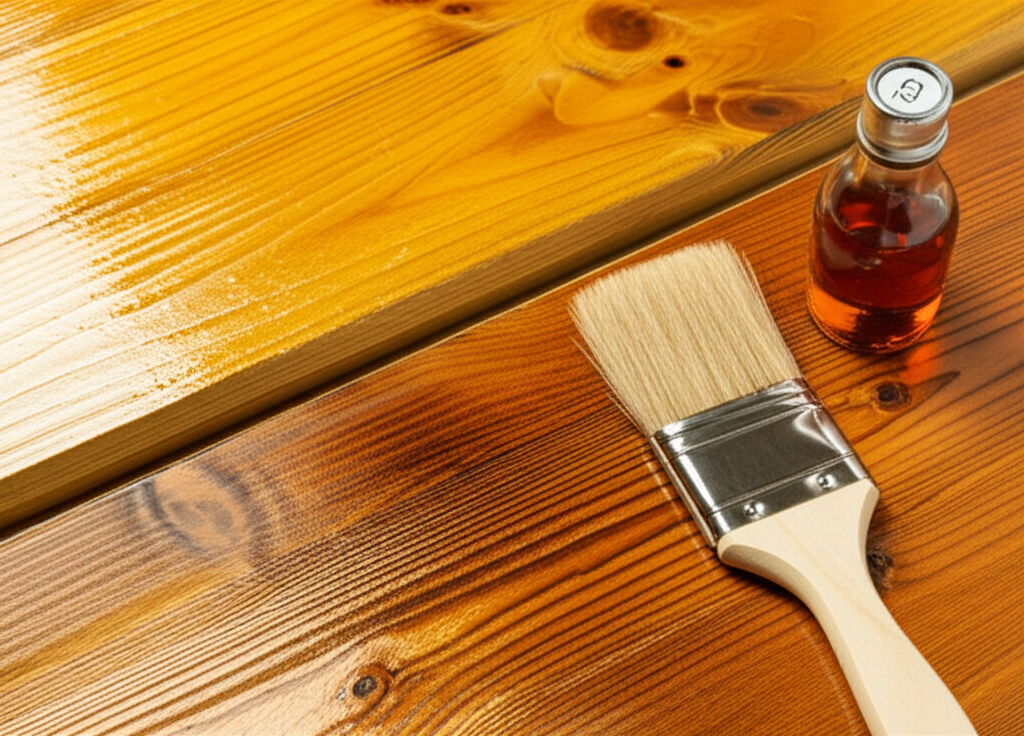
2. Apply the First Coat:
Dampen a clean, lint-free cloth with tung oil. Don’t drench it; you want to apply a thin, even layer.
Wipe the oil onto the wood surface, working in the direction of the grain.
Ensure you cover all surfaces evenly. For smaller projects, you can also use a good quality brush.
3. Allow Oil to Penetrate (The “Wet In” Phase):
Let the oil soak into the wood for about 15-30 minutes for the first coat. This allows it to penetrate deeply.
Wipe off any excess oil that has not soaked into the wood. This is crucial for a smooth, non-sticky finish. Use a clean, dry cloth and wipe firmly, again, with the grain.
4. Drying/Curing Time:
This is where patience is key! Allow the first coat to cure completely. This can take anywhere from 12 to 48 hours, depending on the type of tung oil, temperature, and humidity. Pure tung oil typically takes longer.
You’ll know it’s dry when the surface no longer feels tacky and doesn’t impart any oil residue to your hand.
5. Apply Subsequent Coats:
Once the previous coat is dry, lightly scuff the surface. You can use very fine sandpaper (400-600 grit) or fine steel wool (0000 grade) if you want a smoother finish between coats.
Wipe the surface with a tack cloth to remove any dust.
Apply another thin coat of tung oil, following steps 2 through 4.
Subsequent coats usually don’t require the extended “wet in” period. Just apply, let it penetrate for a few minutes, and wipe off the excess.
The time between coats will depend on the product and drying conditions. Follow the manufacturer’s recommendations.
6. Building the Finish:
You can apply as many coats as you desire to achieve your desired depth and protection. Typically, 3-5 coats are sufficient for good durability, but more can be applied for a richer, more protected finish.
The wood will gradually darken and its grain will become more pronounced with each coat.
Important Safety Note: Spontaneous Combustion
This is a critical safety warning that cannot be stressed enough: Rags soaked with tung oil, linseed oil, and other drying oils can spontaneously combust!
Never leave oily rags bunched up or in a pile.
Always lay rags flat to dry them outdoors, or preferably, soak them in water and seal them in a metal container with a tight-fitting lid before disposing of them properly. Check with your local waste disposal authority for best practices.
Work in a well-ventilated area when applying oil finishes.
This simple precaution is a lifesaver and a fundamental aspect of safe woodworking practices. For more information on workshop safety, resources like the FEMA Fire Prevention section offer general advice.
Tung Oil vs. Other Wood Finishes: How They Darken Wood
It’s helpful to compare tung oil’s color-changing properties with other common wood finshes:
| Finish Type | How it Affects Wood Color | Durability | Ease of Application | Typical Use |
| :——————– | :—————————————————————- | :——— | :—————— | :———————————————- |
| Tung Oil | Darkens wood, enhances natural tones, adds warmth. | High | Moderate | Furniture, cutting boards, outdoor wood. |
| Linseed Oil | Yellows wood slightly over time, darkens more than tung oil. | Moderate | Moderate | General woodworking, sometimes for a vintage look. |
| Polyurethane | Generally clear, can add a slight amber tint (water-based is clearer). | Very High | Easy to Moderate | Tables, chairs, floors, trim. |
| Varnish (Alkyd) | Adds a distinct amber or honey tone, noticeably darkens most woods. | High | Moderate | Outdoor furniture, boats, high-traffic areas. |
| Lacquer | Typically clear, dries very fast, can be sprayed. | Moderate | Moderate (requires spray equipment) | Furniture, cabinets, musical instruments. |
| Wax | Minimal color change, adds a soft sheen and protection. | Low | Easy | Interior decorative items, light-duty surfaces. |
As you can see, tung oil offers a distinct natural darkening effect that is often very desirable for enhancing wood’s inherent beauty. Many other finishes, like varnishes, tend to add a more pronounced amber color.
Pros and Cons of Tung Oil’s Darkening Effect
Like any finish, the way tung oil alters wood color has its advantages and disadvantages.
Pros:
Enhances Natural Beauty: It makes the wood grain pop and brings out richer, deeper tones, giving projects a more luxurious and finished look.
Warming Effect: It imparts a pleasant warmth to lighter woods, making them appear more inviting.
Customizable Depth: You can control the intensity of the darkening by applying more or fewer coats.
Natural Appearance: The finish is often described as “in the wood,” providing a matte to satin sheen that looks very natural.
Cons:
Permanent Change: Once applied, you can’t easily remove the darkening effect if you decide you don’t like it.
Inconsistency on Mixed Woods: If your project uses different wood species or even different cuts of the same species, the darkening may not be uniform across the entire piece.
* Yellowing Over Time: While not as prone to yellowing as traditional linseed oil, some tung oil finishes can develop a slight ambering over very long periods, especially if exposed to UV light.
Understanding these points helps you make an informed decision about whether tung oil is the right choice for your specific project’s aesthetic goals.
Frequently Asked Questions about Tung Oil and Wood Color
Q1: Will pure tung oil make my light-colored wood look orange?
Pure tung oil typically adds a warm, honey-like or amber tone, rather than an orange hue. The extent of this warmth depends on the wood species. For example, pine might become a lovely golden blonde, while maple could take on a soft, creamy amber. Testing on a scrap piece is always the best way to know for sure what effect it will have on your specific wood.
Q2: How many coats of tung oil should I apply if I want a noticeable darkening?
For a noticeable darkening, especially on lighter woods, aim for at least 3 to 5 coats. Each coat builds the color depth. Some enthusiasts apply even more, up to 8-10 thin coats, for a very rich, deep finish and maximum protection. Remember to allow adequate drying time between each coat.
Q3: Can I use tung oil on stained wood?
Yes, you can. Tung oil can be applied over a stain. It will act as a protective topcoat and can slightly deepen the color of the stain. Always ensure the stain is completely dry and cured according to the manufacturer’s instructions before applying tung oil. Test on a scrap to see how the oil modifies the stained color.
Q4: How does tung oil affect plywood?
Tung oil will darken plywood and enhance the natural color of the wood veneer. However, the appearance can be somewhat unpredictable, especially with lower-quality plywood where the core layers might not be made of desirable wood species. The grain pattern of the veneer will be the primary focus, and the oil will deepen its color and provide a degree of protection.
Q5: Is there a way to reverse the darkening effect of tung oil?
No, once tung oil has cured and polymerized within the wood, the darkening effect is permanent. You cannot easily reverse it. If you’re unhappy with the result, your options would be to sand the wood down to bare wood and start over, or to apply a different finish that might alter the color perception, though this won’t remove the oil.
Q6: Does tung oil darken the wood the same way mineral oil does?
No. Mineral oil is a non-drying oil, meaning it doesn’t polymerize or harden like tung oil. Mineral oil will darken wood by saturating the fibers and making them appear more translucent and richer, but this effect is temporary and will lighten as the mineral oil evaporates or is absorbed by contact. Tung oil’s darkening effect is permanent because it becomes part of the wood’s structure.
Q7: Can I use tung oil on