How To Identify Wood Types: Your Beginner’s Guide to Unlocking Wood’s Secrets
Knowing how to identify wood types is a game-changer for any project. Start by observing the grain pattern, feeling its texture, and checking its weight. Then, look closely at the color, give it a sniff, and gently test its hardness. These simple steps will quickly guide you to confidently recognize different woods, making your woodworking journey much smoother and more successful.
Ever stared at a piece of lumber, wondering exactly what kind of wood it was? You’re not alone! Figuring out wood types can feel like a mystery, especially when you’re just starting out in woodworking or tackling home projects. It’s a common hurdle, but it doesn’t have to be frustrating.I’m Apollo Radar, and I’m here to simplify things. In this guide, I’ll walk you through a clear, step-by-step process to confidently identify various wood types. We’ll cover everything from simple observations to practical tests, empowering you to make the best choices for your next build. Get ready to unlock the secrets of wood!
Understanding the wood you’re working with is fundamental to successful woodworking. Different wood types have unique properties – some are strong and durable, perfect for furniture, while others are light and easy to carve. Knowing these differences will save you time, money, and frustration, ensuring your projects stand the test of time.
Let’s dive into the practical steps that will teach you how to identify wood types with confidence.
Step-by-Step: How To Identify Wood Types Like a Pro (Even if You’re Just Starting Out)
You don’t need fancy equipment or years of experience to start recognizing wood. Just a keen eye and a systematic approach will get you far. Here’s my go-to method:
Step 1: Observe the Grain Pattern
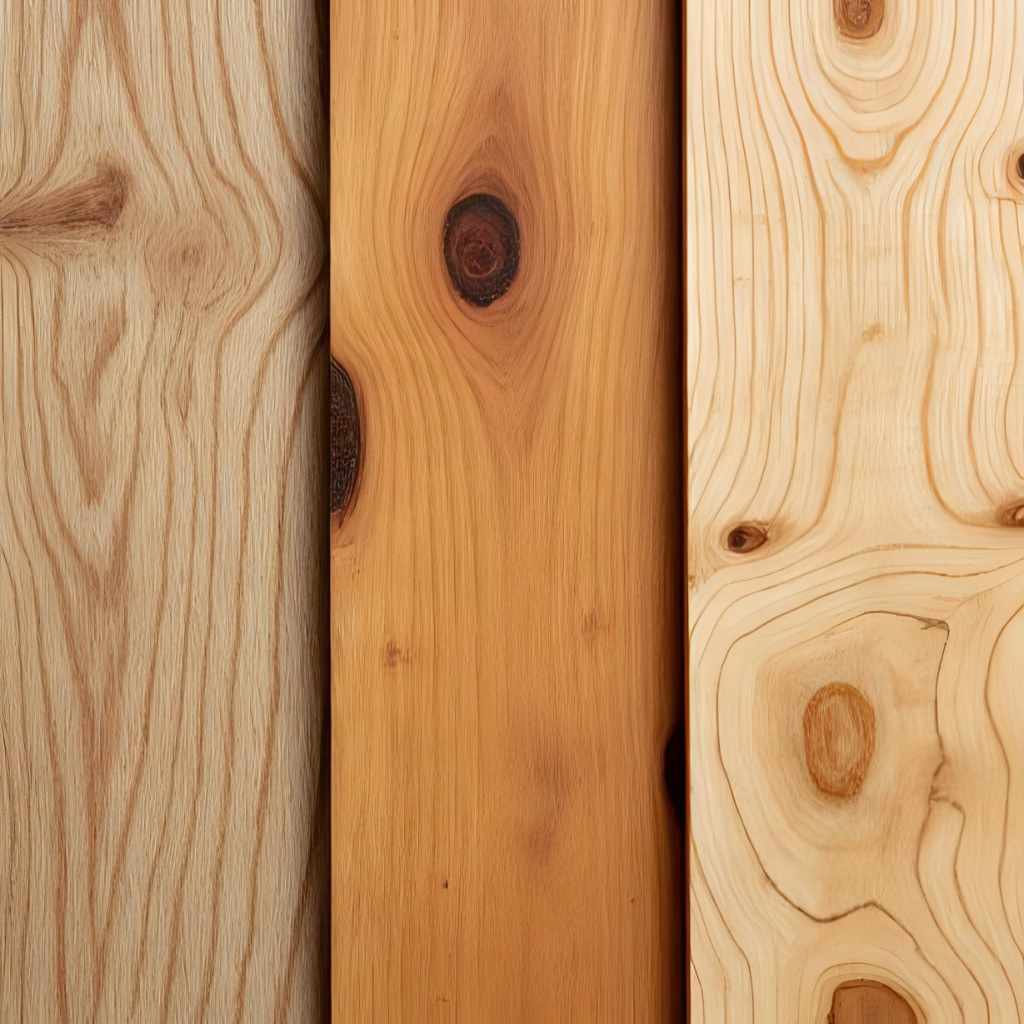
The grain is like a wood’s fingerprint. It’s the arrangement of the wood fibers, and it tells you a lot.
* **Look closely at the lines and swirls.** Do they run straight and parallel, or are they wild and wavy?
* **Open grain** has visible pores (like oak or ash), while **closed grain** appears smoother (like maple or cherry).
* Hardwoods often have more complex or distinctive grain patterns, while many softwoods show simpler, straighter grains.
* *Safety Tip: When handling rough lumber, always wear gloves to protect against splinters, especially when feeling the grain.*
Step 2: Feel the Texture and Porosity
After looking, it’s time to touch. The texture can reveal a lot about the wood’s density and how it will work under your tools.
* **Run your hand along the surface.** Does it feel smooth and silky, or rough and coarse?
* **Is it oily or dry?** Some woods, like teak, have a naturally oily feel.
* **Examine the end grain.** This cross-section is crucial. Can you see tiny dots or pores? These are vessels that carried water when the tree was alive.
* **Ring-porous woods** (like oak, ash, elm) have large, distinct pores in the earlywood (spring growth).
* **Diffuse-porous woods** (like maple, cherry, birch) have pores that are more evenly distributed and often smaller.
Step 3: Assess the Weight and Density
This is a simple, yet surprisingly effective, test. Pick up the piece of wood.
* **How heavy does it feel for its size?** Denser woods (generally hardwoods) will feel noticeably heavier.
* Lighter woods (typically softwoods) will feel less substantial.
* For example, a piece of oak will feel much heavier than a similarly sized piece of pine. This is a great indicator of its density and strength.
Step 4: Examine the Color and Luster
While color can be misleading due to stains or age, it’s still an important clue.
* **Look at the natural color of the wood.** This is best observed on a freshly cut surface. Is it light, dark, reddish, yellowish, or brown?
* **Distinguish between heartwood and sapwood.** Heartwood is the older, inner wood, often darker. Sapwood is the younger, outer wood, usually lighter.
* **Observe the luster.** Does the wood have a natural sheen or glow, or does it appear dull? Some woods, like satinwood, are known for their high luster.
* *Remember: Always consider that wood can be stained, painted, or aged, which changes its surface color. Don’t rely on color alone!*
Step 5: Take a Whiff: The Smell Test
Many woods have a distinctive aroma, especially when freshly cut or sanded.
* **Bring the wood close to your nose.** Does it have a strong, sweet, spicy, or resinous smell?
* Cedar is famous for its distinct, aromatic scent. Pine has a strong, resinous smell. Oak can have a somewhat sour or tannic smell.
* Some woods have very little smell at all, which is also a clue!
* *Safety Tip: While smelling wood is generally safe, always wear a dust mask when sanding or cutting to avoid inhaling fine wood particles, which can be irritating or harmful.*
Step 6: Test the Hardness (Carefully!)
This test gives you a direct measure of how resistant the wood is to denting or scratching.
* **The Fingernail Test:** Try to indent an inconspicuous part of the wood with your fingernail. If it dents easily, it’s likely a softer wood. If it resists, it’s harder.
* **The Dent Test:** For a slightly more aggressive test, use a small, blunt object (like the back of a screwdriver handle) and press firmly into an unseen area. A harder wood will resist denting more.
* **The Janka Hardness Scale** is a standardized measurement, but for practical purposes, these simple tests are very useful.
* *Safety Tip: If you’re using a sharp tool to expose fresh wood for testing, always cut away from your body and wear appropriate hand and eye protection.*

Essential Tools and Methods for Accurate Wood Identification
While your senses are your primary tools, a few simple aids can greatly improve your accuracy when learning how to identify wood types.
- Magnifying Glass (10x Loupe): This is incredibly useful for examining the end grain. It helps you see the size, distribution, and arrangement of pores, which are key identifiers for many hardwoods.
- Sharp Knife or Chisel: Sometimes you need to expose a fresh, clean surface to truly see the wood’s natural color, grain, and smell. A small, sharp knife or chisel can help you shave off a thin layer from an inconspicuous spot.
- Moisture Meter: While not directly identifying the species, a moisture meter helps ensure consistent testing conditions. Wood density and weight can vary significantly with moisture content. Knowing the wood’s moisture level helps you compare it more accurately to reference data.
- Reference Books and Online Databases: These are invaluable resources. Sites like The Wood Database (https://www.wood-database.com/) offer detailed information, photos, and comparison tools for hundreds of wood species. A good field guide for local woods is also a fantastic investment.
Here’s a quick overview of some common wood types and their general characteristics to get you started:
| Wood Type | Hardwood/Softwood | Key Grain Feature | Typical Color | Common Use |
|---|---|---|---|---|
| Oak (Red/White) | Hardwood | Prominent, open, ring-porous grain | Light to medium brown (Red), Light to medium brown/tan (White) | Furniture, flooring, cabinetry, barrels |
| Maple | Hardwood | Fine, closed, diffuse-porous grain, sometimes figured | Creamy white to light reddish-brown | Furniture, flooring, cutting boards, musical instruments |
| Cherry | Hardwood | Fine, closed, diffuse-porous grain, subtle figure | Light pinkish-brown to rich reddish-brown (darkens with age) | Fine furniture, cabinetry, decorative items |
| Walnut | Hardwood | Moderately open, straight grain, sometimes wavy | Light pale brown to dark chocolate brown | Fine furniture, gunstocks, veneer, carving |
| Pine | Softwood | Straight, prominent grain, visible knots | Creamy white to yellowish-brown | Construction, framing, rustic furniture, shelving |
| Cedar (Aromatic) | Softwood | Straight grain, distinct knots, often thin growth rings | Reddish-brown with light streaks | Closets, chests, outdoor furniture, shingles |
| Fir (Douglas Fir) | Softwood | Straight, distinct grain, often coarse texture | Light brown with reddish or yellowish tint | Construction, framing, plywood, flooring |
Pro Tips for Confidently Identifying Wood Types
As you practice how to identify wood types, these pointers will help you hone your skills and make more accurate assessments.
- Always Clean the Surface First: Dirt, dust, and old finishes can obscure the wood’s true characteristics. A quick wipe or light sanding on a small area can reveal a lot.
- Look at the End Grain: I can’t stress this enough. The end grain is where you’ll find the most definitive clues about pore structure and growth rings, which are vital for distinguishing many species.
- Compare with Known Samples: If you have a piece of wood you’re sure about (like a leftover from a pine project), use it as a comparison. Side-by-side comparison is a powerful learning tool.
- Consider the Source and Application: Where did you get the wood? Was it construction lumber, an old piece of furniture, or firewood? This context can narrow down the possibilities significantly. For example, most framing lumber in North America is softwood like pine, fir, or spruce.
- Be Patient and Systematic: Don’t rush. Go through each step – grain, texture, weight, color, smell, hardness – systematically. The more clues you gather, the more confident your identification will be.
- Utilize Authoritative Resources: For in-depth learning, resources like the U.S. Forest Service provide excellent information on wood properties and identification (https://www.fs.usda.gov/).
Common Mistakes to Avoid When Trying To Identify Wood Types
Even experienced woodworkers can make misidentifications, but beginners are especially prone to a few common pitfalls. Knowing these can save you a lot of headache.
Relying Solely on Color
This is perhaps the biggest mistake. Wood color can be incredibly deceptive. It changes with age, exposure to light, and especially with stains and finishes. A dark-stained pine can easily be mistaken for a darker hardwood if you only look at the color.
* **Why it matters:** Building a project with a softwood mistaken for hardwood will lead to durability issues and an unsatisfactory result.
* **How to prevent it:** Always look beyond color. Focus on grain pattern, texture, and hardness as primary identifiers. If possible, examine a freshly cut surface.
Ignoring the End Grain
Many beginners focus only on the face grain, which is the broad, flat surface. While important, the end grain (the cross-section of the log) reveals the internal structure, especially the pores, which are critical for identification.
* **Why it matters:** The arrangement and size of pores on the end grain are often definitive characteristics for distinguishing between hardwoods, particularly ring-porous versus diffuse-porous species.
* **How to prevent it:** Make examining the end grain a mandatory step. Use a magnifying glass to see the details clearly.
Not Considering the Context
Where did the wood come from? What was its original purpose? These questions provide valuable context that can help narrow down possibilities. For example, if you’re looking at an old barn beam, it’s likely a durable, locally available species like oak or pine, not an exotic imported wood.
* **Why it matters:** Context helps you make educated guesses and prioritize certain species in your mental checklist.
* **How to prevent it:** Always ask yourself about the wood’s history and typical uses for different species.
Rushing the Process
Wood identification is a skill that improves with practice. Trying to quickly guess a wood type often leads to errors.
* **Why it matters:** A wrong identification can lead to using the wrong tools, finishes, or even choosing a wood unsuitable for your project’s intended use.
* **How to prevent it:** Take your time. Go through each identification step systematically. The more you practice, the faster and more accurate you’ll become.
Hardwood vs. Softwood: A Closer Look
One of the most fundamental distinctions in wood identification is whether a piece is hardwood or softwood. While the names might suggest hardness, it’s actually a botanical classification.
| Feature | Hardwood | Softwood |
|---|---|---|
| Botanical Origin | From deciduous trees (lose leaves annually), e.g., Oak, Maple, Cherry. | From coniferous trees (evergreens), e.g., Pine, Cedar, Fir. |
| Density | Generally denser and heavier. (Though some softwoods are harder than some hardwoods, e.g., Balsa is a hardwood). | Generally less dense and lighter. |
| Durability | Typically more durable, resistant to dents and scratches. | Generally less durable, more prone to dents and wear. |
| Growth Rate | Slower growing. | Faster growing. |
| Cost (General) | Often more expensive due to slower growth and higher demand for specific uses. | Generally more affordable, widely available. |
| Common Uses | Fine furniture, cabinetry, flooring, musical instruments, decorative items. | Construction lumber, framing, paper pulp, rustic furniture, outdoor projects. |
| Grain/Pores | Often have visible pores (ring-porous or diffuse-porous) on end grain. More complex grain patterns. | Usually no visible pores (tracheids instead of vessels). Simpler, straighter grain patterns. |
FAQ: Your Questions About Identifying Wood Types Answered
Q1: Why is it important to identify wood types for my projects?
Identifying wood types is crucial for choosing the right material for your project. Different woods have varying strengths, densities, and workability. Knowing your wood ensures durability, the correct finish application, and helps you select appropriate tools and techniques, ultimately leading to a successful and safe build.
Q2: Can I identify wood just by looking at its color?
No, relying solely on color is a common mistake. Wood color can change significantly with age, exposure to light, and especially with stains or finishes. Always use color as one clue among many, but prioritize grain pattern, texture, density, and hardness for accurate identification.
Q3: What’s the biggest difference between hardwood and softwood?
The biggest difference is botanical: hardwoods come from deciduous trees (leaf-shedding), and softwoods come from coniferous trees (evergreens). While hardwoods are generally denser and more durable, the terms don’t strictly refer to actual hardness. For example, balsa is a hardwood but very soft, and some softwoods like Douglas Fir can be quite hard.
Q4: Do I need special tools to identify wood?
Not necessarily! You can do a lot with just your senses: sight, touch, and smell. However, a 10x magnifying glass is incredibly helpful for examining end grain details, and a sharp knife can expose fresh wood. These simple additions can greatly improve your accuracy.
Q5: How does moisture content affect wood identification?
Moisture content can affect a wood’s weight and even slightly alter its appearance or feel. A wet piece of wood will be heavier than a dry one, potentially misleading you about its density. For consistent identification, it’s best to work with wood that has reached equilibrium moisture content, or at least be aware of its moisture level.
Q6: Is it safe to smell all wood types?
Generally, smelling wood is safe. However, some woods have strong aromas that can be irritating, and fine wood dust from any species can be harmful if inhaled. Always wear a dust mask when cutting or sanding to protect your respiratory system, regardless of the wood type.
Q7: Where can I find reliable resources for learning more about wood identification?
Excellent question! The Wood Database (https://www.wood-database.com/) is a fantastic online resource with detailed profiles and photos. University extension programs, like those from Purdue University (https://extension.purdue.edu/extmedia/FNR/FNR-262-W.pdf) often offer educational materials. Also, investing in a good field guide for local tree species can be invaluable.
Conclusion
There you have it! Learning how to identify wood types might seem daunting at first, but by following these simple, systematic steps, you’ll quickly build your confidence and expertise. Remember, it’s all about observation, touch, and a bit of detective work.
Don’t be afraid to get hands-on, use your senses, and consult reliable resources. Every piece of wood has a story, and with a little practice, you’ll be able to read it. This skill will not only enhance your woodworking projects but also deepen your appreciation for the natural world. So grab a piece of wood, start exploring, and build something amazing – safely and skillfully!