
How To Prevent Wood From Rotting The Ground: A Beginner’s Guide to Lasting Projects
To prevent wood from rotting in the ground, choose rot-resistant wood, apply a high-quality wood preservative or sealant, ensure proper drainage around the post, and consider using a concrete collar or gravel base. Regular inspection and re-treatment are key for long-lasting protection against moisture and decay.
Have you ever started a project, like building a fence or a mailbox post, only to worry about the wood rotting away in the ground? It’s a common concern for many of us, and honestly, it can feel a bit frustrating trying to figure out the best way to make your hard work last. You’re not alone! The good news is, preventing wood from rotting in the ground isn’t a mystery. With the right steps and a little know-how, you can build projects that stand strong for years. I’m here to show you exactly how to tackle this challenge, step by step, so your outdoor wood projects endure.
Building with wood outdoors is incredibly rewarding, but it comes with a unique challenge: protecting your lumber from the elements, especially when it’s buried in the ground. Wood and soil are a natural match for decay, leading to rot that can compromise your entire project. But don’t worry, my friend! With a few smart strategies, you can significantly extend the life of your wooden posts and structures. Let’s dive into how to prevent wood from rotting in the ground, ensuring your creations stand the test of time.
Understanding Why Wood Rots in the Ground
Before we jump into solutions, it helps to understand the enemy: wood rot. Wood rot is primarily caused by fungi that thrive in specific conditions. When wood is in direct contact with the ground, it creates a perfect storm for these fungi to flourish.
Here’s what wood rot needs to get started:
- Moisture: This is the big one. Soil holds moisture, and wood absorbs it like a sponge. Constant dampness is a rot fungus’s best friend.
- Oxygen: Fungi are living organisms and need oxygen to grow. There’s plenty of it in the soil.
- Warmth: While rot can occur in cooler temperatures, it accelerates in warmer conditions, common in soil during spring and summer.
- Food Source: The wood itself is the food!
Remove or significantly reduce any of these elements, and you’re well on your way to preventing wood from rotting in the ground. Our goal is to make the environment as unwelcoming as possible for these pesky fungi.
Choosing the Right Wood: Your First Line of Defense
The very first step in how to prevent wood from rotting in the ground starts before you even dig a hole. Selecting the right type of wood can make a massive difference in your project’s longevity. You have two main paths here: naturally rot-resistant wood or chemically treated wood.
Naturally Rot-Resistant Wood Options
Some wood species have natural defenses against decay thanks to their inherent oils and compounds. These can be a beautiful and environmentally friendly choice, though often more expensive.
Here are some top contenders:
- Cedar: A popular choice for outdoor projects, cedar contains natural oils that deter insects and fungi. It’s lighter and easier to work with than many hardwoods.
- Redwood: Similar to cedar, redwood boasts excellent natural resistance to rot and insects. It’s known for its beautiful color and durability.
- Black Locust: This hardwood is incredibly dense and naturally resistant to rot, making it one of the most durable choices for ground contact. It can be harder to find and work with, but its longevity is unmatched.
- White Oak: While not as naturally resistant as cedar or redwood, white oak has a closed cellular structure that makes it more resistant to moisture absorption than many other oaks.
Keep in mind that even naturally resistant woods benefit from additional protection when buried.
The Power of Pressure-Treated Wood
For most DIY enthusiasts, pressure-treated wood is the go-to solution for ground contact. This wood has been chemically treated to resist rot, fungi, and insect infestation. It’s designed specifically for demanding outdoor applications.
Understanding pressure-treated wood:
- Chemicals: Modern pressure-treated wood often uses alkaline copper quaternary (ACQ), micronized copper azole (MCA), or copper azole (CA). These copper-based preservatives are effective and safer than older treatments like CCA (chromated copper arsenate), which is no longer available for residential use.
- Ground Contact Ratings: This is crucial! Always look for wood rated for “Ground Contact” (UC4A or UC4B). Wood rated only for “Above Ground” (UC3B) will not hold up when buried. The rating will be stamped on a tag attached to the lumber.
When working with pressure-treated wood, remember to wear gloves, a dust mask, and eye protection, especially when cutting. Dispose of sawdust and scraps properly. You can find more information on safe handling practices from the Environmental Protection Agency (EPA).
Preparing Your Wood for Ground Contact
Even with the right wood, a little preparation goes a long way in how to prevent wood from rotting in the ground. These steps are simple but incredibly effective.
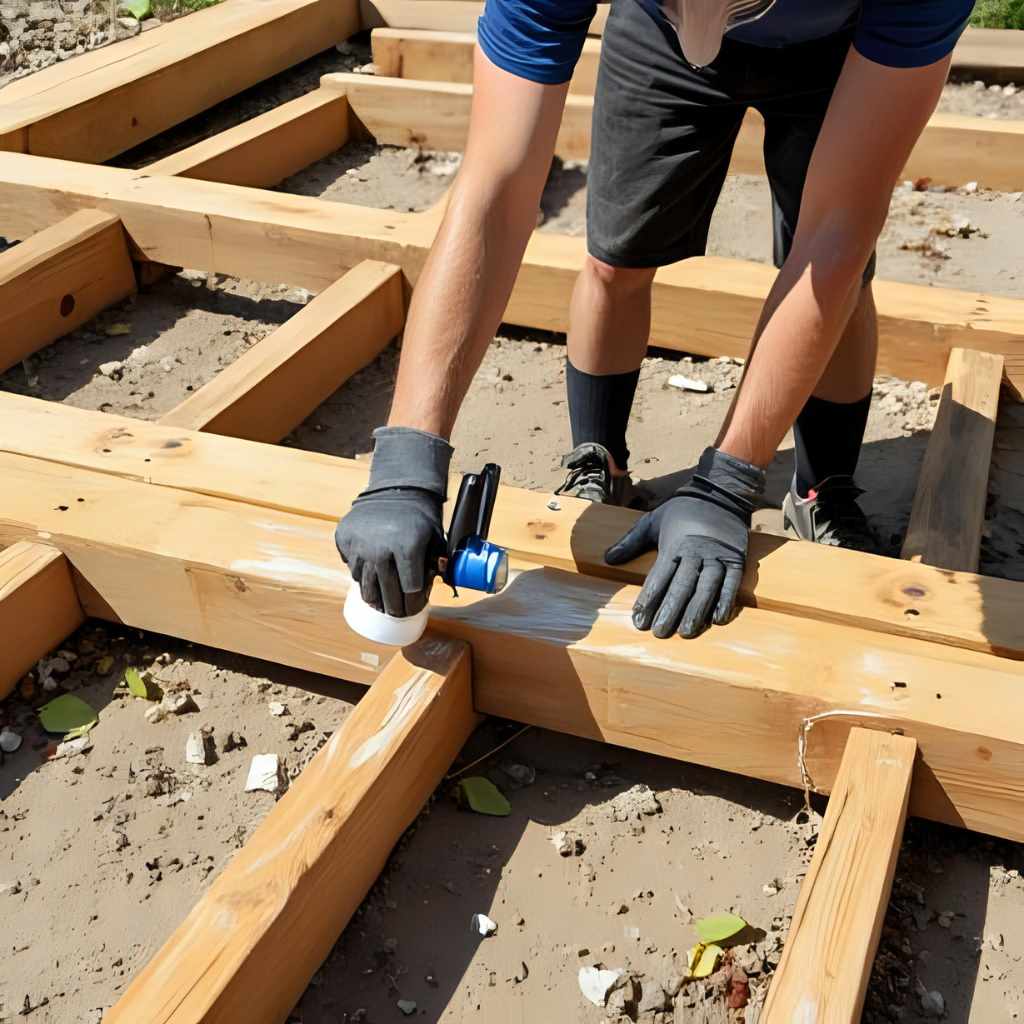
Cutting and Sealing Fresh Cuts
When you cut pressure-treated lumber, you expose the untreated interior of the wood. This is a common oversight that can lead to early rot.
Here’s how to handle it:
- Measure and Cut: Make all your necessary cuts before applying any extra sealant.
- Apply End-Grain Sealer: Use a brush-on wood preservative specifically designed for cut ends of pressure-treated lumber. These products typically contain copper naphthenate or similar compounds. Apply generously to all cut ends, holes, and notches.
- Allow to Dry: Let the sealer dry completely according to the manufacturer’s instructions before installation.
This step is critical for protecting the most vulnerable parts of your post. Don’t skip it!
Ensuring Wood is Dry
While you might buy pressure-treated wood that feels damp, it’s best to let it dry out a bit if possible before installation and certainly before applying any additional coatings. Wood that’s too wet won’t absorb sealants or paints effectively. If your lumber feels heavy and visibly wet, stack it with spacers (stickers) in a well-ventilated area for a few weeks to allow it to “season” or dry out.
Applying Wood Preservatives and Sealants
Adding an extra layer of protection, even to pressure-treated wood, significantly boosts its lifespan, especially for ground contact. This is a core strategy in how to prevent wood from rotting in the ground.
Types of Wood Preservatives
There’s a variety of products designed to protect wood. Each has its strengths.
- Copper Naphthenate: This is a popular, brush-on preservative that’s often green or brown. It’s effective against fungi and insects and is generally safe for residential use. It’s excellent for those cut ends!
- Borate-based Preservatives: Borates are odorless, colorless, and highly effective against fungi and insects. They penetrate deeply into the wood. They are often used as a pre-treatment for untreated wood or as a supplement for treated wood.
- Water Sealants: While not true preservatives, heavy-duty water sealants (like those with silicone or wax) can help repel moisture, which is the root cause of rot. They work best in conjunction with a preservative.
- Bituminous Coatings (Tar/Asphalt Emulsion): These thick, black coatings create a waterproof barrier around the wood. They are very effective at preventing moisture from reaching the wood surface.
Application Techniques for Maximum Protection
How you apply the preservative matters. A thorough application ensures the best defense.
- Clean the Wood: Make sure the wood is clean and free of dirt, sawdust, or grease.
- Ensure Dryness: The wood should be dry for optimal absorption.
- Apply Generously: Use a brush, roller, or sprayer to apply the preservative. For ground contact, focus heavily on the section that will be buried and extend a good 6-12 inches above the ground line.
- Multiple Coats: Many products recommend two or more coats for ground contact applications. Follow the manufacturer’s instructions for drying times between coats.
- Dipping (Optional): For maximum penetration, especially for smaller posts, you can dip the entire section that will be buried into a bucket of preservative. Let it soak for several hours or even overnight, then allow it to dry.
Here’s a quick comparison of common wood preservation methods for ground contact:
| Method/Product | Pros | Cons | Best For |
|---|---|---|---|
| Pressure-Treated Wood (Ground Contact Rated) | Highly effective, long-lasting, widely available, built-in protection. | Can be more expensive, requires careful handling (PPE), limited aesthetic options. | Most outdoor structural posts, fences, decks. |
| Copper Naphthenate Preservative | Effective, easy brush-on application, good for cut ends, relatively safe. | Can leave a green/brown tint, requires reapplication over time. | Sealing cut ends, adding extra protection to treated or naturally resistant wood. |
| Bituminous Coating (Tar/Asphalt) | Excellent waterproof barrier, very durable, flexible. | Messy to apply, black color may not be desired, requires full drying. | Lower sections of posts, creating a moisture barrier. |
| Borate Treatment | Deep penetration, non-toxic once dry, effective against fungi/insects. | Requires application to untreated wood, not a standalone water barrier. | Pre-treatment for untreated wood, supplementing pressure-treated wood. |
Smart Installation Techniques to Prevent Wood From Rotting The Ground
Beyond treating the wood itself, how you install your post is incredibly important. Proper installation can create an environment that actively works against rot. This is a critical part of how to prevent wood from rotting in the ground.
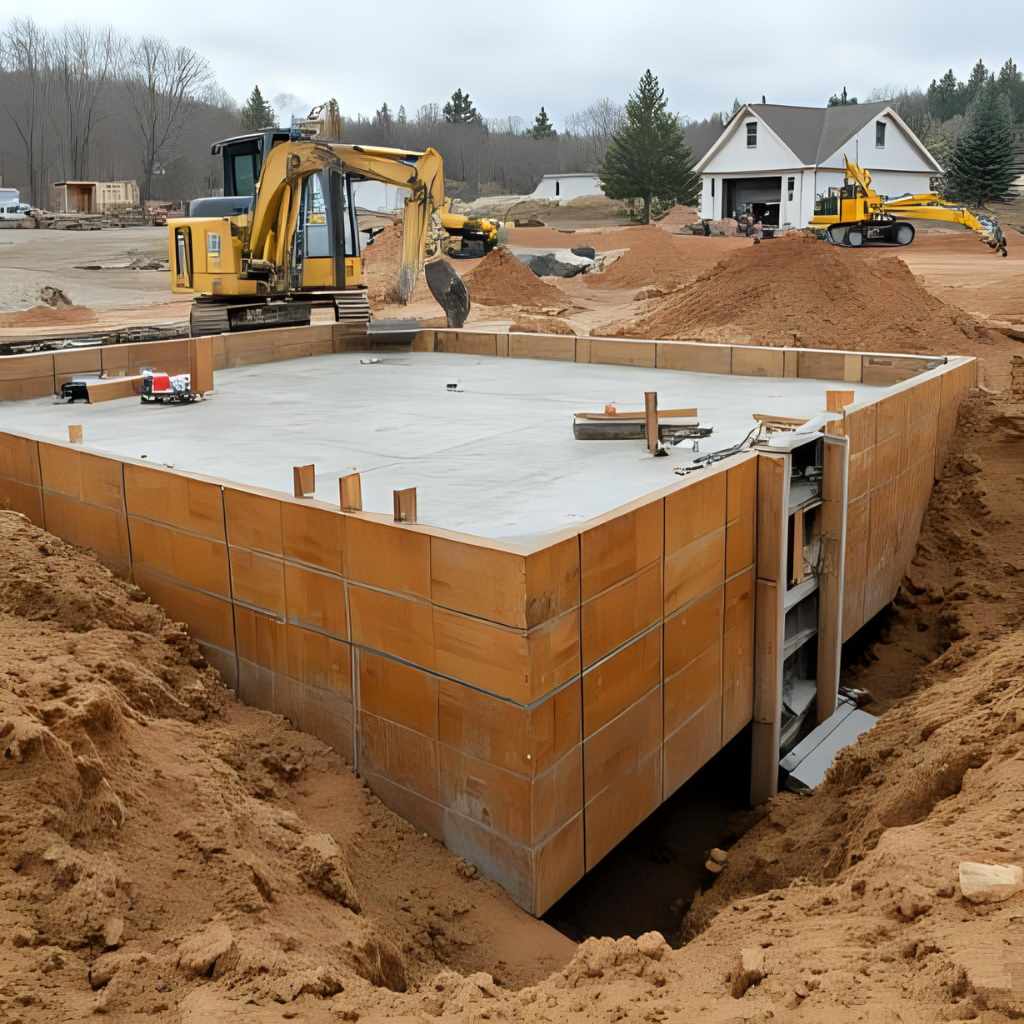
Creating a Drainage-Friendly Base
Moisture is the enemy, so let’s get rid of it! Improving drainage around your post can significantly reduce the amount of time the wood is exposed to standing water.
- Gravel Bed: Dig your post hole deeper than needed (e.g., an extra 6 inches). Fill the bottom 6 inches with coarse gravel or crushed stone. This creates a drainage layer that allows water to seep away from the base of the post.
- Concrete Collar (Above Ground Line): Instead of burying the wood directly in concrete, which can trap moisture, create a concrete collar that extends above the ground line. Set your post on a gravel bed, then pour concrete around it, ensuring the concrete slopes away from the post at the top. The concrete should stop a few inches below the ground line, and the remaining space should be filled with gravel to allow for drainage. The goal is to keep the wood from touching the soil.
Using Post Sleeves and Barriers
Physical barriers are an excellent way to separate your wood from direct soil contact.
- Plastic or Composite Post Sleeves: These are specially designed sleeves that encase the bottom portion of your wooden post. They create an impenetrable barrier against moisture and soil. Simply slide the sleeve over the part of the post that will be buried. Ensure the sleeve extends a few inches above the ground line.
- Bituminous Wraps/Coatings: As mentioned before, thick tar or asphalt-based coatings can be painted or wrapped around the buried section of the post. These create a waterproof, flexible barrier. Make sure to apply it thoroughly and extend it above the ground line.
Avoiding Direct Soil Contact
The less your wood touches the soil, the better. Consider these options for maximum protection:
- Post Anchors/Standoffs: For decks, pergolas, or other structures where the post doesn’t need to be buried for structural support, use metal post anchors or standoffs. These are typically set into concrete footings and hold the wooden post several inches above the ground, completely isolating it from moisture. This method is highly effective for preventing wood from rotting in the ground.
- Concrete Piers: Similar to post anchors, you can pour a concrete pier that extends above the ground. The wooden post is then bolted or attached to the top of the pier, preventing any soil contact. This is a robust solution for permanent structures.
Remember, the goal is to create a “dry zone” around your wood where moisture can’t linger.
Maintenance and Inspection for Long-Term Durability
Even with the best initial prevention, ongoing care is vital. Think of it like taking care of your car – regular check-ups keep it running smoothly. This proactive approach ensures your efforts to prevent wood from rotting in the ground continue to pay off.
Regular Checks for Signs of Rot
Make it a habit to inspect your outdoor wooden structures at least once a year, especially after heavy rain or during seasonal changes.
Look for these warning signs:
- Soft Spots: Probe the wood near the ground line with a screwdriver or awl. If it feels soft or spongy, or if the tool easily penetrates the wood, you likely have rot.
- Discoloration: Dark, stained, or unusually discolored areas can indicate fungal growth.
- Fungal Growth: Visible mushrooms, conks, or fuzzy growth on the wood are clear signs of rot.
- Cracks or Shrinkage: While not direct signs of rot, these can create entry points for moisture and fungi.
- Insect Activity: Termites and other wood-boring insects can also contribute to the breakdown of wood.
Re-applying Protection
Over time, even the best treatments can wear down. Reapplying protection can significantly extend the life of your posts.
When and how often:
- Manufacturer Guidelines: Always follow the recommendations of the preservative or sealant manufacturer.
- Visual Cues: If you notice the wood looking dry, faded, or if water is no longer beading on the surface, it’s time for reapplication.
- Spot Treatments: For areas showing early signs of wear or where the ground contact is most intense, consider spot treatments with a brush-on preservative.
- Full Reapplication: For a thorough job, clean the wood surface, allow it to dry, and then reapply your chosen preservative or sealant to the entire exposed section of the post, paying extra attention to the ground line.
Consistent maintenance is your best friend in the fight against rot.
Common Mistakes to Avoid When Preventing Wood Rot
Even with the best intentions, it’s easy to make small mistakes that can undermine your efforts. Let’s make sure you avoid these common pitfalls when learning how to prevent wood from rotting in the ground.
- Not Sealing Cut Ends: This is perhaps the most common and critical mistake. As we discussed, any fresh cut exposes untreated wood, creating a direct pathway for moisture and fungi. Always use an end-grain sealer!
- Ignoring Drainage: Simply burying a post without considering how water will move around it is a recipe for disaster. Standing water is the enemy. Always incorporate a gravel base or ensure proper grading.
- Using “Above Ground” Rated Treated Wood for Ground Contact: This is a big one. Not all pressure-treated wood is created equal. Always check the tag for “Ground Contact” or “UC4A/UC4B” rating when the wood will be buried.
- Insufficient Coating Application: A thin, single coat of preservative or sealant might look good, but it won’t provide the deep, lasting protection needed for ground contact. Be generous, apply multiple coats, and ensure thorough coverage, especially around the ground line.
- Burying Concrete Directly Around the Wood: While concrete seems like a good barrier, if it surrounds the wood entirely below ground, it can actually trap moisture against the wood, accelerating rot. Instead, use a concrete collar that slopes away from the post and extends above ground, or set the post on a gravel base within the concrete.
- Not Allowing Wood to Dry Before Treatment: If the wood is too wet, it won’t properly absorb the preservatives or sealants, making your efforts less effective. Let new lumber “season” if it feels damp.
- Forgetting About the “Ground Line”: The point where the wood meets the soil is the most vulnerable area. Ensure your protection (preservative, sleeve, concrete collar) extends at least 6-12 inches above the ground line to protect against splash-back and consistent moisture.
By being mindful of these mistakes, you’ll greatly improve your chances of building a durable, rot-free project.
FAQ: Your Questions Answered About Preventing Wood Rot
You’ve got questions, and I’ve got answers! Let’s tackle some common queries you might have about how to prevent wood from rotting in the ground.
How long does treated wood last when buried in the ground?
Properly installed, ground-contact rated pressure-treated wood can last 20 to 40 years, or even longer. Factors like soil type, climate, and additional preventative measures (like sleeves or sealants) can extend or shorten this lifespan.
Is it safe to work with treated wood?
Yes, with proper precautions. Modern pressure-treated wood (ACQ, MCA, CA) is considered safe for residential use. Always wear gloves, eye protection, and a dust mask when cutting or sanding. Avoid burning treated wood, as the smoke can be toxic. Wash your hands thoroughly after handling.
Can I paint or stain treated wood?
Absolutely! It’s generally recommended to let newly treated wood dry out for a few weeks or months before painting or staining to ensure proper adhesion. This also allows the preservative chemicals to fully “fix” in the wood. Always use exterior-grade paints or stains.
What’s the most budget-friendly option for preventing wood rot?
Using ground-contact rated pressure-treated lumber is usually the most cost-effective solution for long-term ground contact. Supplementing it with a brush-on end-grain sealer and a gravel base provides excellent protection without breaking the bank.
How often should I re-treat wood in the ground?
For wood directly in the ground, it’s a good idea to inspect it annually. You might re-apply a brush-on preservative to the ground-line area every 3-5 years, or when you notice signs of wear or reduced water repellency. Follow the product manufacturer’s recommendations.
Can I use concrete directly around the wood post?
It’s generally not recommended to completely encase wood in concrete below ground. Concrete can trap moisture against the wood, ironically accelerating rot. Instead, set the post on a gravel bed and pour concrete around it, ensuring the concrete slopes away from the post and stops a few inches below the final ground line, filling the rest with gravel. Or, use post anchors set in concrete.
What if I already have a rotting post? Can I fix it?
If the rot is extensive, replacing the post is usually the best and safest option. For very minor, superficial rot, you might be able to clean out the decayed wood, apply a wood hardener, and then fill with an epoxy wood filler, followed by a strong preservative. However, this is often a temporary fix for ground-contact situations.
Conclusion: Build with Confidence, Build to Last
Well, there you have it, my friend! You’re now equipped with a clear understanding of how to prevent wood from rotting in the ground. It might seem like a lot of steps, but each one is simple and plays a crucial role in the longevity of your outdoor projects. From choosing the right wood and preparing it meticulously, to smart installation techniques and consistent maintenance, you have the power to build structures that stand strong against time and the elements.
Remember, every project is an opportunity to learn and grow your skills. Don’t be afraid to get your hands a little dirty, and always prioritize safety in your workshop. With these tips and a bit of practice, you’ll be creating beautiful, durable outdoor pieces that you can be proud of for years to come. Go forth and build with confidence!


