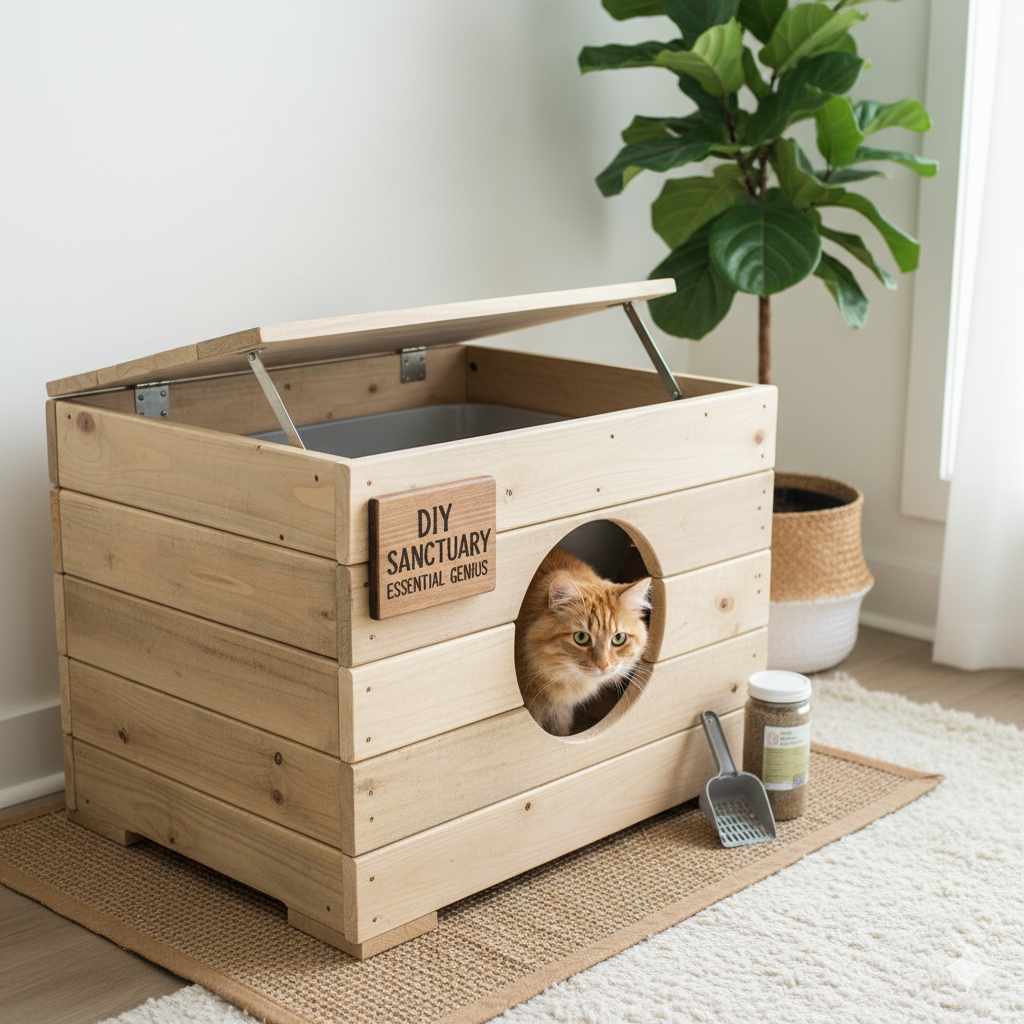
DIY Cat Litter Box Wood: Essential Genius
Build a DIY cat litter box enclosure from wood for a stylish, hidden solution. This guide offers simple steps, tool advice, and design ideas for beginners, transforming a common eyesore into a functional piece of furniture.
Tired of seeing that unsightly litter box? Many cat owners dream of a tidier, more attractive home without sacrificing their feline friend’s comfort. Traditional litter boxes can be a pain to hide, and buying stylish enclosures can be surprisingly expensive. But what if you could build one yourself? This guide is here to show you just how easy and rewarding it can be to create a beautiful DIY cat litter box enclosure using wood. We’ll walk through everything from choosing the right materials to putting the finishing touches on your custom piece.
Why Build a DIY Cat Litter Box Enclosure?
Creating your own wooden cat litter box enclosure offers a fantastic blend of practicality and personalization. For starters, it’s often much more budget-friendly than purchasing a pre-made designer unit. You get to control the dimensions, ensuring a perfect fit for your space and your cat’s needs. Plus, you can select materials and finishes that perfectly match your home décor, turning a necessary item into a subtle, integrated piece of furniture. It’s a rewarding project that’s easily achievable for beginners.
A Better Look for Your Home
Let’s be honest, most standard litter boxes aren’t exactly a conversation starter in a good way. A DIY wooden enclosure can seamlessly blend into your living room, bedroom, or hallway. Imagine it looking like a charming side table or a decorative bench, completely concealing the litter box within. This not only improves the aesthetics of your home but can also help contain litter scatter and reduce odors.
Customization is Key
Every home and every cat is unique. A DIY project allows you to tailor the enclosure precisely. Need it to fit into a specific corner? Want a ventilation system? Looking for a specific height? You have the power to design and build it exactly how you envision. This level of customization is hard to find in store-bought options.
Cost-Effective Solution
While there’s an initial investment in wood and hardware, building your own enclosure is typically less expensive than buying a high-end, furniture-style cat litter box. You can find affordable lumber and use basic tools you might already own, making it a great way to achieve a custom look without breaking the bank.

Essential Tools and Materials for Your Project
Don’t let a long tool list intimidate you! For a basic wooden litter box enclosure, you don’t need a professional workshop. We’ll focus on the essentials to keep things simple and safe for beginners. Remember, always prioritize safety when working with tools.
Basic Tool Kit
Here’s what you’ll likely need to get started:
- Measuring Tape: For accurate measurements of your space and lumber.
- Pencil: To mark cut lines on your wood.
- Saw: A handsaw is perfectly fine for beginners, or consider a jigsaw or circular saw for faster cuts. Ensure you know how to use it safely. Check out this guide on how to use a circular saw from Popular Mechanics for safety tips.
- Drill with Drill Bits: For pre-drilling holes (prevents wood splitting) and driving screws.
- Screwdriver Bits: To match the screws you’ll be using.
- Sandpaper or Sanding Block: For smoothing rough edges. Start with a medium grit (around 120) and finish with a finer grit (180-220).
- Safety Glasses: Absolutely essential to protect your eyes.
- Work Gloves: To protect your hands.
- Clamps (Optional but Recommended): To hold pieces together while you fasten them.
Wood and Hardware
Choosing the right wood is important for durability and aesthetics. For beginners, common pine boards are a great choice – they’re affordable, easy to work with, and readily available.
- Wood Boards: Look for common board sizes like 1×4, 1×6, or 1×8 pine. The exact dimensions will depend on your design. Plywood is also an option for larger panels.
- Wood Screws: Choose screws appropriate for the thickness of your wood (e.g., 1 1/4-inch or 1 1/2-inch screws for 3/4-inch thick boards).
- Wood Glue (Optional but Recommended): Adds extra strength to your joints.
- Wood Finish: Paint, stain, or a clear sealant to protect the wood and give it a finished look. Ensure any finish is non-toxic and pet-safe once cured.
Planning Your DIY Cat Litter Box Enclosure
Before you cut a single piece of wood, a little planning goes a long way. This is where you decide on the style, size, and basic structure of your enclosure. Think about your cat’s needs and your home’s layout.
Consider Your Litter Box Size
Measure your existing litter box (or the one you plan to buy). You’ll want the internal dimensions of the enclosure to be at least 1.5 times larger than your cat’s current box, both in width and length. This gives your cat plenty of space to turn around and dig comfortably. Height is also important; aim for at least 6–8 inches of clearance above the litter level.
Design Styles for Beginners
Here are a few straightforward design ideas that are perfect for your first woodworking project:
- Simple Box with Entrance: Essentially a wooden box with a hole on one side, large enough for your cat to enter and exit. This is the easiest design.
- Table Style: A more sophisticated look where the enclosure resembles a small side table. It might have a solid top and an opening on the side.
- Bench Style: A longer enclosure designed to look like a bench, perfect for hiding multiple boxes or one large one.
Dimensions and Cut List – A Sample
Let’s plan a simple, box-style enclosure that can fit a standard medium-sized litter box. This is a common beginner-friendly design. The dimensions below are internal. You’ll add the thickness of your wood to these for the external dimensions.
Assume we are using 3/4-inch thick pine boards.
Sample Enclosure Dimensions (Internal):
- Width: 20 inches
- Depth: 26 inches
- Height: 18 inches
Sample Cut List (for 3/4-inch thick boards):
| Part | Quantity | Dimensions (Width x Length) | Purpose |
|---|---|---|---|
| Front Panel | 1 | 21.5 inches x 18 inches | Includes entrance hole. (20″ internal + 0.75″ side + 0.75″ side = 21.5″ external width) |
| Back Panel | 1 | 21.5 inches x 18 inches | Solid back panel. |
| Side Panels | 2 | 27.5 inches x 18 inches | (26″ internal depth + 0.75″ front + 0.75″ back = 27.5″ external depth) |
| Bottom Panel | 1 | 20 inches x 26 inches | Reinforced for weight, can be omitted if attaching directly to a floor, but recommended. |
| Top Panel (Optional, if making a table style) | 1 | 23 inches x 29 inches | Add overhang for aesthetic. (21.5″ external width + 0.75″ overhang on each side = 23″ width. 27.5″ external depth + 0.75″ overhang on each side = 29″ depth) |
Note: Adjust these dimensions based on your litter box size and desired overhang for the top panel. Always measure twice, cut once!
Entrance Hole Placement
The entrance hole should be large enough for your cat but not so large that it defeats the purpose of hiding the box. A diameter of 6–8 inches is usually sufficient. Position it towards one side of the front panel, about 4–6 inches from the bottom, to allow for litter depth and prevent scatter.
Step-by-Step: Building Your DIY Cat Litter Box Enclosure
Let’s get building! We’ll assume you’ve chosen our simple box design. Remember to wear your safety glasses throughout this process.
Step 1: Cut Your Wood
Using your dimensions from the cut list, carefully measure and mark your wood. Double-check your measurements before making any cuts. If you’re new to sawing, take your time and practice on scrap wood first. A straight edge or a speed square can help you achieve nice, square cuts.
Step 2: Cut the Entrance Hole
On your front panel, mark the center point for your entrance hole. You can use a compass or a large circular object to trace the outline. For cutting a circle, you can drill a pilot hole inside the circle, then use a jigsaw to carefully cut along the line. Alternatively, you can purchase round wood cutouts if you prefer not to cut the hole yourself.
Step 3: Sand All Pieces
Before assembly, it’s much easier to sand all the individual pieces. Smooth out any rough edges or splinters, especially around the entrance hole. This makes the enclosure safer for your cat and gives it a more professional finish.
Step 4: Assemble the Box
This is where your enclosure starts to take shape. We’ll assemble it using wood glue and screws for maximum strength.
- Attach Side Panels to the Back Panel: Apply a bead of wood glue along the edges of the back panel where the side panels will attach. Align one side panel so its edge is flush with the back panel’s edge. Pre-drill pilot holes through the side panel into the edge of the back panel to prevent splitting. Drive in screws—typically two to three per seam. Repeat for the other side panel.
- Attach the Front Panel: Similarly, apply glue to the front edges of the side panels. Align the front panel and pre-drill pilot holes before screwing it to the side panels.
- Attach the Bottom Panel: Flip the assembled sides and front/back over. Apply glue to the bottom edges of the structure. Carefully place the bottom panel, ensuring it’s flush with the outer edges. Pre-drill pilot holes up through the bottom panel into the sides, front, and back, then secure with screws. Reinforcing the bottom is especially important as the litter box can be quite heavy when full.
Tip: If you have clamps, use them to hold the pieces in place while you drill and screw. This ensures tighter joints.
Step 5: Add the Top Panel (if applicable)
If you’re building a table-style enclosure, now is the time to add the top. You can attach it directly with screws from underneath (pre-drilling through the side panels into the top is recommended), or attach it using pocket holes for a cleaner look if you have a pocket hole jig.
Step 6: Finishing Touches
Once the main structure is assembled and the glue is dry, it’s time for the final details.
- Final Sanding: Do a light final sanding with finer grit sandpaper to smooth any imperfections.
- Apply Finish: Clean off all dust. Apply your chosen paint, stain, or sealant. Ensure you use pet-safe products and allow them to cure completely according to the manufacturer’s instructions. Good ventilation is important during this stage, both for you and for ensuring the finish is safe for your cat. Learn more about Volatile Organic Compounds (VOCs) and their impact on indoor air quality from the EPA.
- Optional: Add Legs or Decorative Trim.
- Optional: Install Ventilation. Small drilled holes or a small, battery-operated computer fan can help with air circulation if odor is a concern.
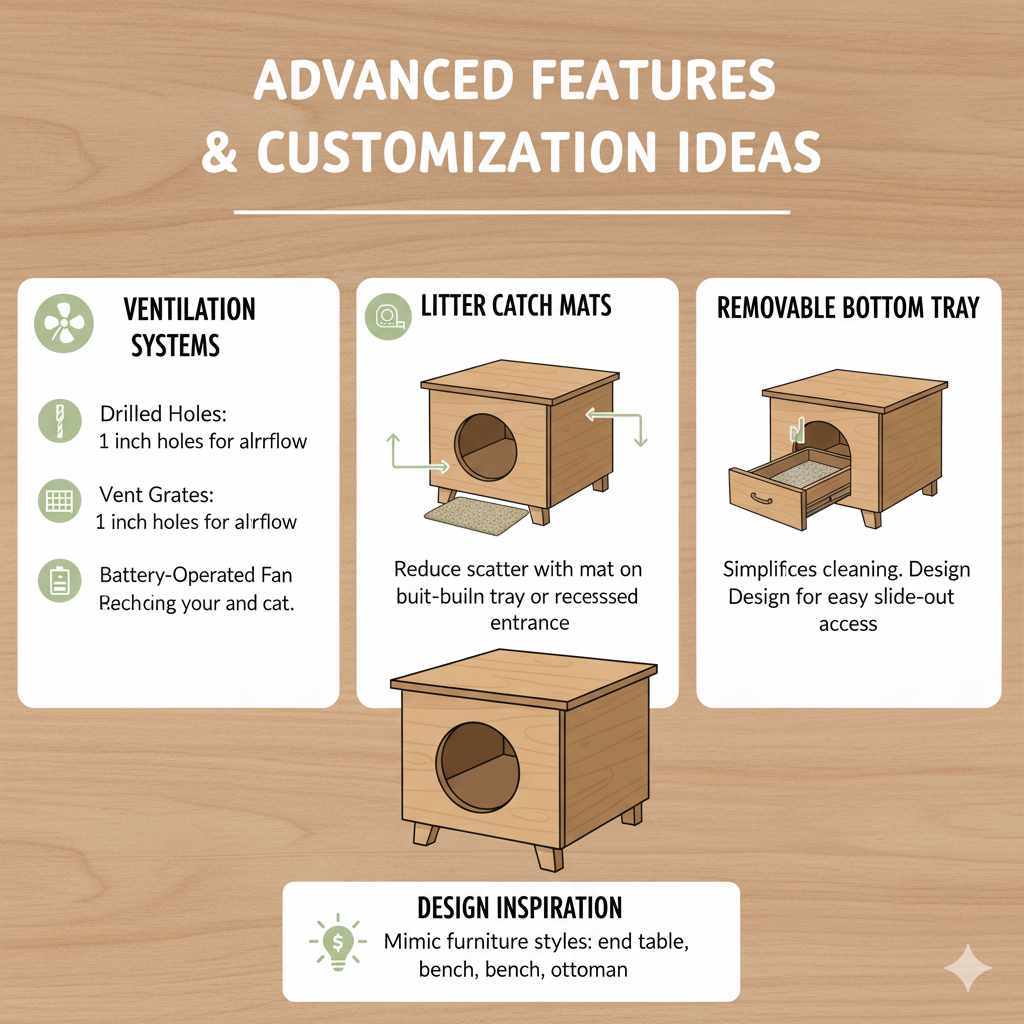
Advanced Features and Customization Ideas
Once you’ve mastered the basic enclosure, you might want to add some extra features to elevate your DIY skills and your litter box solution.
Ventilation Systems
Poor ventilation can lead to lingering odors. Here are a few beginner-friendly ventilation ideas:
- Drilled Holes: Simply drill several 1-inch holes in the back or sides of the enclosure, preferably high up.
- Vent Grates: Cut out small sections in the panels and install decorative wooden or metal vent grates.
- Battery-Operated Fan: Mount a small, low-noise computer fan powered by batteries in an inconspicuous spot to circulate air.
Litter Catch Mats
To combat litter scatter, consider adding a lip around the entrance or recessing the opening slightly. You can also build a small tray or platform just outside the entrance where you can place a litter-trapping mat.
Removable Bottom Tray
For easier cleaning, you could design the bottom so it slides out like a drawer or is held in place with simple latches. This requires a bit more precision but can significantly simplify litter box duty.
Design Inspiration
Look at existing furniture for inspiration! Can you mimic the style of a bookshelf, an end table, or a storage ottoman? The possibilities are endless. Search online for “hidden litter box furniture” or “cat litter box cabinet” for visual ideas.
Frequently Asked Questions (FAQs)
Here are some common questions beginners have about building their own cat litter box enclosures.
What is the best type of wood for a DIY cat litter box enclosure?
For beginners, pine is an excellent choice due to its affordability and ease of working with. Plywood can also be used for larger panels. Ensure any wood you choose is untreated and free of strong odors. Always use pet-safe sealants or paints once built.
How do I ensure the enclosure is safe for my cat?
Use untreated wood, sand all edges smooth to prevent splinters, and ensure any finishes applied are non-toxic and fully cured. The entrance hole should be large enough for your cat to easily enter and exit, and there should be adequate ventilation. Avoid any small parts that could be chewed off and ingested.
How do I clean a wooden litter box enclosure?
Regular cleaning involves scooping the litter as usual. For deeper cleaning, you can remove the litter box itself. Wipe down the interior of the wooden enclosure with a mild, pet-safe disinfectant solution and a damp cloth. Ensure the wood is thoroughly dried to prevent moisture damage. Some people line the interior with a thick plastic sheeting for an extra layer of protection.
Will the wood absorb odors?
Untreated wood can eventually absorb odors. To minimize this, ensure good ventilation, use a high-quality litter, and clean regularly. Applying a pet-safe sealant or a thick coat of paint can create a barrier. Some owners also opt to place a layer of plastic sheeting or a custom-cut liner inside the enclosure for added protection.
How large should the entrance hole be?
The entrance hole should be large enough for your cat to comfortably walk through, typically around 6 to 8 inches in diameter or a 6×6 inch square. Consider your cat’s size; a larger cat might need a bigger opening. Place the hole a few inches from the bottom to help contain litter.
What if my cat is scared of the new enclosure?
Introduce the enclosure gradually. Leave the front panel off for a day or two so your cat can investigate. Once assembled, place their familiar litter box inside and don’t force them to use it. Put some of their favorite treats or catnip inside to encourage positive association. It may take some time for them to get used to the new space.
Conclusion
Building your own DIY cat litter box enclosure is a wonderfully achievable project that brings immense satisfaction. You’ve learned about selecting the right tools and materials, planning your design, and assembling the pieces with clear, step-by-step instructions. By creating this functional piece of furniture, you’re not only enhancing your home’s appearance but also providing a more discreet and comfortable space for your feline companion. Remember, woodworking is a journey of learning and building confidence with each project. So, grab your tools, embrace the process, and enjoy the rewarding experience of crafting something beautiful and useful for your beloved pet. Happy building!