DIY Accent Wall Wood: A Genius Essential
Create a stunning DIY accent wall using wood for an affordable, high-impact home update. This guide provides simple, beginner-friendly steps for choosing materials, planning your design, and easily installing a beautiful wooden accent wall that adds warmth and character to any room. Achieve professional results with confidence!
Feeling like your living room or bedroom needs a little something special? You’re not alone! Many of us stare at blank walls, wishing for a touch of personality and style. Sometimes, a fresh coat of paint just doesn’t cut it. You want that “wow” factor, something that truly transforms a space. Wood accent walls are a fantastic way to achieve this. They bring natural warmth, texture, and a sense of custom design that’s both inviting and incredibly stylish. But the thought of a woodworking project can feel a bit daunting, right? Especially if you’re new to DIY. Don’t worry! This guide is here to show you just how accessible and rewarding building your own DIY accent wall wood can be. We’ll break down everything you need, step-by-step, so you can confidently create a beautiful feature wall you’ll love.
Why Choose a Wood Accent Wall? The Beautiful Benefits
Adding a wood accent wall is more than just a decorating choice; it’s an investment in your home’s style and feel. Wood brings a natural beauty that’s hard to replicate with other materials. Think about it: the rich grains, the subtle variations in color, the way light plays off the textured surface. It instantly adds depth and character, making a room feel cozier and more sophisticated. And the best part? You can tailor it to your exact taste. Whether you love the rustic charm of reclaimed wood, the clean lines of modern planks, or the geometric interest of geometric patterns, wood offers endless possibilities. It’s a timeless material that pairs well with almost any decor style, from farmhouse and bohemian to mid-century modern and minimalist.
For those of us who love a good DIY project, a wood accent wall is a fantastic way to build confidence and learn new skills without needing advanced carpentry expertise. It’s an achievable project that delivers big impact. Plus, compared to other dramatic renovations, a DIY wood accent wall can be surprisingly budget-friendly, especially when you plan smart and choose your materials wisely.
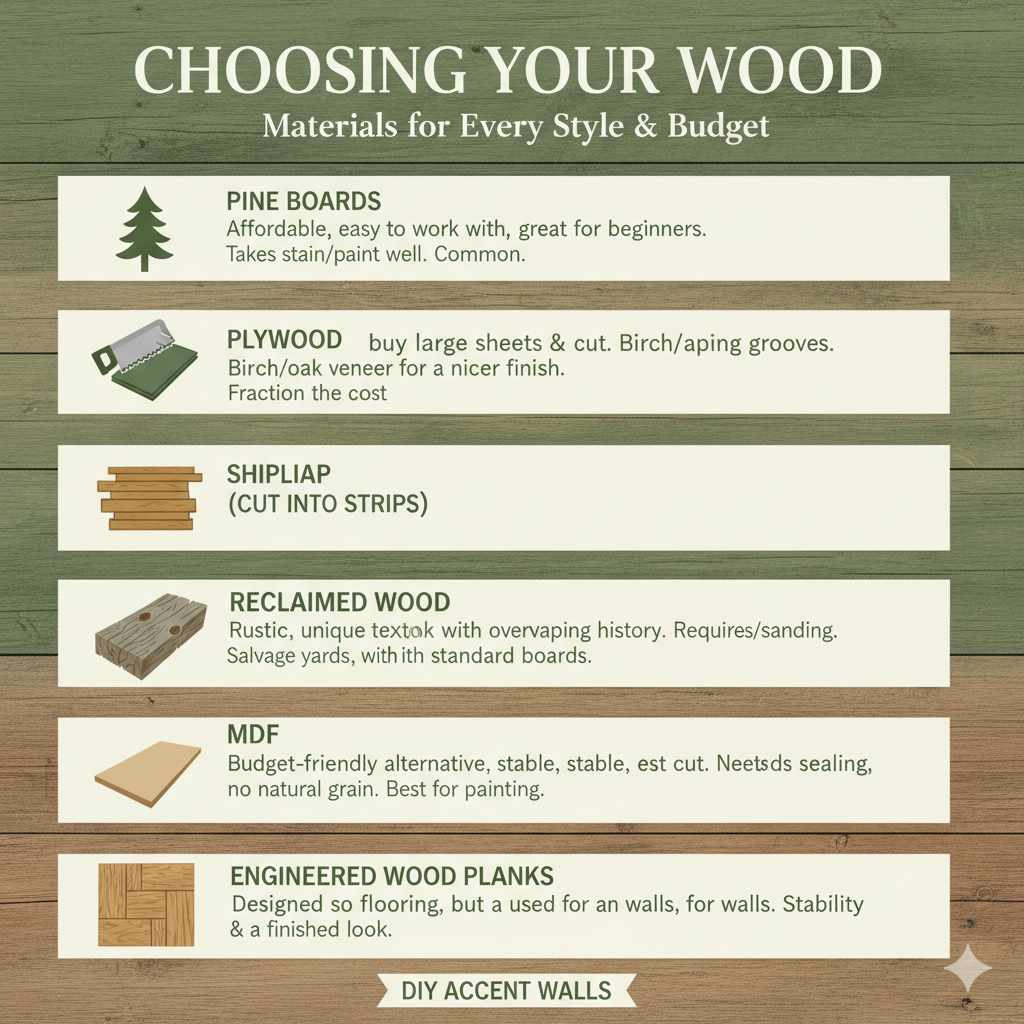
Choosing Your Wood: Materials for Every Style and Budget
The type of wood you choose will significantly impact the look, feel, and cost of your accent wall. Don’t stress about finding rare or expensive lumber; there are great options for every budget and skill level. Let’s explore some popular choices:
- Pine Boards: Often found at your local lumber yard or home improvement store, pine is affordable, easy to work with, and takes stain or paint beautifully. It’s a go-to for beginners.
- Plywood (Cut into Strips): This is a very economical option. You can buy large sheets of plywood (like birch or oak veneer for a nicer finish) and cut them into the desired plank width. This gives you the look of wood planks at a fraction of the cost.
- Shiplap: Traditionally used for exterior siding, shiplap boards have a distinctive groove that allows them to overlap, creating a clean, classic look. You can buy pre-cut shiplap or create a similar effect with standard boards.
- Reclaimed Wood: For a truly rustic and unique vibe, consider reclaimed wood. You can find it at salvage yards, specialty stores, or even online marketplaces. It adds incredible texture and history but might require more prep work (like cleaning and sanding).
- MDF (Medium-Density Fiberboard): While not technically wood, MDF can be a very budget-friendly alternative, especially if you plan to paint your accent wall. It’s stable and easy to cut but doesn’t have the natural grain of real wood and needs to be sealed properly.
- Engineered Wood Planks: These are designed for flooring but can sometimes be used for walls. They offer stability and a finished look.
When selecting your wood, also consider its thickness and weight. Thicker boards will add more dimension, while lighter options might be easier to handle if you’re working alone or on a less sturdy wall. Always inspect boards for warping or significant damage before purchasing.
Understanding Wood Finishes: Stain vs. Paint
Once you have your wood, you’ll need to decide on a finish. This is where you can really personalize your accent wall.
- Stain: Stains soak into the wood, enhancing its natural grain and color. They come in a huge range of shades, from light natural tones to deep, rich hues. Stains offer a more natural wood look.
- Paint: Painting your wood can create a solid color statement. White or grey paints are popular for a modern farmhouse look, while darker colors add drama. You can also use limewash or chalk paint for a textured, matte finish.
- Sealers/Topcoats: Regardless of whether you stain or paint, applying a topcoat (like polyurethane or a clear wax) is crucial. This protects the wood from moisture, scuffs, and dirt, making your accent wall durable and easy to clean. For high-traffic areas or bathrooms, a water-based polyurethane is a great choice. For more information on finishing wood, check out resources from the U.S. Forest Products Laboratory.
Planning Your DIY Wood Accent Wall: Design & Measurements
Before you pick up a saw, good planning is your best friend! This stage prevents costly mistakes and ensures a professional result.
Step 1: Measure Your Wall
Accurately measure the width and height of the wall where you want to install your accent. This will help you calculate how much wood you’ll need. It’s always a good idea to add about 10-15% extra to account for cuts, mistakes, and waste. For example, if your wall is 10 feet wide by 8 feet high, you’d calculate the area (80 sq ft) and then add your buffer.
Step 2: Choose Your Wood Orientation and Pattern
How will your wood planks be laid? Common options include:
| Pattern | Description | Best For |
|---|---|---|
| Horizontal | Planks run across the width of the wall. This can make a room feel wider. | Smaller rooms, creating a sense of spaciousness. |
| Vertical | Planks run from floor to ceiling. This draws the eye upward, making a room feel taller. | Rooms with lower ceilings, adding a sense of grandeur. |
| Herringbone/Chevron | Diagonal patterns that create a dynamic, eye-catching look. | Feature walls, adding sophisticated texture. (Can be more time-consuming). |
| Random Width | Using planks of varying widths for a more eclectic, rustic feel. | Farmhouse or bohemian styles. |
Consider the scale of your room and furniture when deciding. For a beginner, straight horizontal or vertical planks are the easiest to install.
Step 3: Mark Your Layout
If you’re using thin planks or shiplap, you might want to draw faint pencil lines on your wall to keep your rows straight as you work. Use a level to ensure these lines are perfectly horizontal or vertical.
Step 4: Plan for Outlets and Switches
Carefully mark the locations of any electrical outlets or light switches on your wall. You’ll either need to cut holes in your wood planks to accommodate them or plan your layout so that your planks fall between them. It’s crucial to turn off power to these outlets at your circuit breaker before you begin working near them.
Essential Tools and Materials for Your Project
Gathering your supplies beforehand will make the installation process much smoother. Here’s a list of what you’ll likely need:
Tools:
- Measuring Tape: For accurate measurements.
- Pencil: For marking.
- Level: Crucial for ensuring straight planks (a 2-foot or 4-foot level is ideal).
- Miter Saw or Circular Saw: For cutting your wood to size. A miter saw is preferred for precise, clean angle cuts, but a circular saw with a guide can also work.
- Nail Gun (Brad Nailer or Finish Nailer) and Air Compressor: This is the fastest and easiest way to attach planks.
- Hammer: If you don’t have a nail gun, you’ll need this, along with finishing nails.
- Stud Finder: Essential for locating wall studs to ensure a secure installation.
- Utility Knife: For cutting caulk or scoring.
- Safety Glasses: Always wear these when cutting or nailing.
- Hearing Protection: Recommended when using power tools.
- Gloves: To protect your hands.
- Sanding Block or Orbital Sander: For smoothing edges or surfaces if needed.
- Paintbrush or Roller: For applying finish.
- Caulk Gun and Paintable Caulk: For filling gaps.
- Putty Knife: For applying wood filler.
Materials:
- Your chosen wood planks or material.
- Wood Screws or Nails: Appropriate length for your wood thickness and for securely fastening to studs.
- Wood Filler: To fill nail holes if desired.
- Paintable Caulk: For sealing edges and gaps.
- Primer (if painting).
- Paint or Stain.
- Sealer/Topcoat (Polyurethane, etc.).
- Construction Adhesive (optional, but recommended for extra hold on heavier materials).
- Painter’s Tape.
Step-by-Step Installation: Bringing Your Wood Wall to Life
Now for the fun part! Follow these steps to build your DIY wood accent wall.
Step 1: Prepare the Wall
Start by clearing the area. Remove any wall hangings, pictures, or furniture that might be in the way. If your wall has significant imperfections, you may want to patch and sand them first. Clean the wall surface to remove dust and grime.
Step 2: Turn Off Power
Safety First! Locate your electrical panel and turn off the power to the room you’re working in, specifically the circuits for any outlets or switches on your accent wall. Double-check with a voltage tester to ensure the power is off.
Step 3: Locate Wall Studs
Use your stud finder to locate and mark the center of the wall studs. You’ll want to drive your nails or screws directly into these studs for the most secure attachment. Mark these stud locations lightly with a pencil every 16-24 inches horizontally along the wall.
Step 4: Start the First Row
Begin at the bottom or side of the wall, depending on your chosen pattern. Ensure your first plank is perfectly level. If you’re installing horizontally, place your first board along the floor or a few inches above it (to avoid moisture issues with flooring). For vertical planks, start in a corner, ensuring the plank is plumb (perfectly vertical) using your level. If your floor or ceiling isn’t perfectly straight, you might need to scribe the first board to match the contour, or use a thin shims to get it level/plumb.
Step 5: Attach the Planks
Apply a thin bead of construction adhesive to the back of the plank (optional, but adds strength) or directly to the wall. Position the plank against the wall, making sure it’s level/plumb. Use your nail gun to drive nails through the plank and into the studs. Aim for two nails per stud crossing. If you’re not using a nail gun, pre-drilling pilot holes can prevent wood splitting, then hammer in finishing nails. For shiplap, nail through the “land” of the groove to hide the fasteners.
Beginner Tip: Leave a small gap (about 1/8 inch) between the planks and the ceiling, floor, and side walls. This gap can be covered by baseboards, crown molding, or trim later, and it allows for wood expansion and contraction.
Step 6: Cut for Outlets and Switches
When you reach an outlet or switch, measure carefully and mark the location on your plank. You can use your miter saw or circular saw to cut out the necessary rectangle or square. Remember the power is off! You can also use a jigsaw for more intricate cuts.
Step 7: Continue Installing Planks
Work your way across or up the wall, plank by plank. For a more realistic wood look, stagger your joints between rows. This means the end of one plank shouldn’t line up with the end of the plank above or below it. Cut your last plank in a row to fit the remaining space. Make sure to nail into studs whenever possible.
Step 8: Finish Up and Fill
Once all planks are installed, assess any small gaps or imperfections. Use paintable caulk to fill gaps along the edges of the wall, around outlets, and any small cracks between planks. Fill nail holes with wood filler if you plan to paint. Once the filler is dry, lightly sand it smooth.
Step 9: Sand and Clean
If your wood isn’t pre-finished, lightly sand any rough edges or surfaces to prepare for finishing. Afterwards, clean the entire wall thoroughly with a tack cloth or slightly damp microfiber cloth to remove all sawdust. This is crucial for a smooth finish.
Step 10: Apply Your Finish
If painting, apply a coat of primer first, especially if you’re painting over a dark wood or working with MDF. Then, apply your chosen paint color in thin, even coats, allowing adequate drying time between coats. If staining, apply your stain according to the manufacturer’s instructions, wiping off excess for the desired depth of color. Once the stain is dry, apply 1-3 coats of your chosen sealer, such as polyurethane, for durability and protection. Always follow the drying times recommended on the product labels.
Step 11: Reinstall Fixtures and Add Trim (Optional)
Once the finish is completely dry and cured, carefully turn the power back on at your circuit breaker. Reinstall any outlet covers or switch plates. You can also add trim or molding around the edges of the wall, ceiling, or baseboards for a more polished, built-in look.
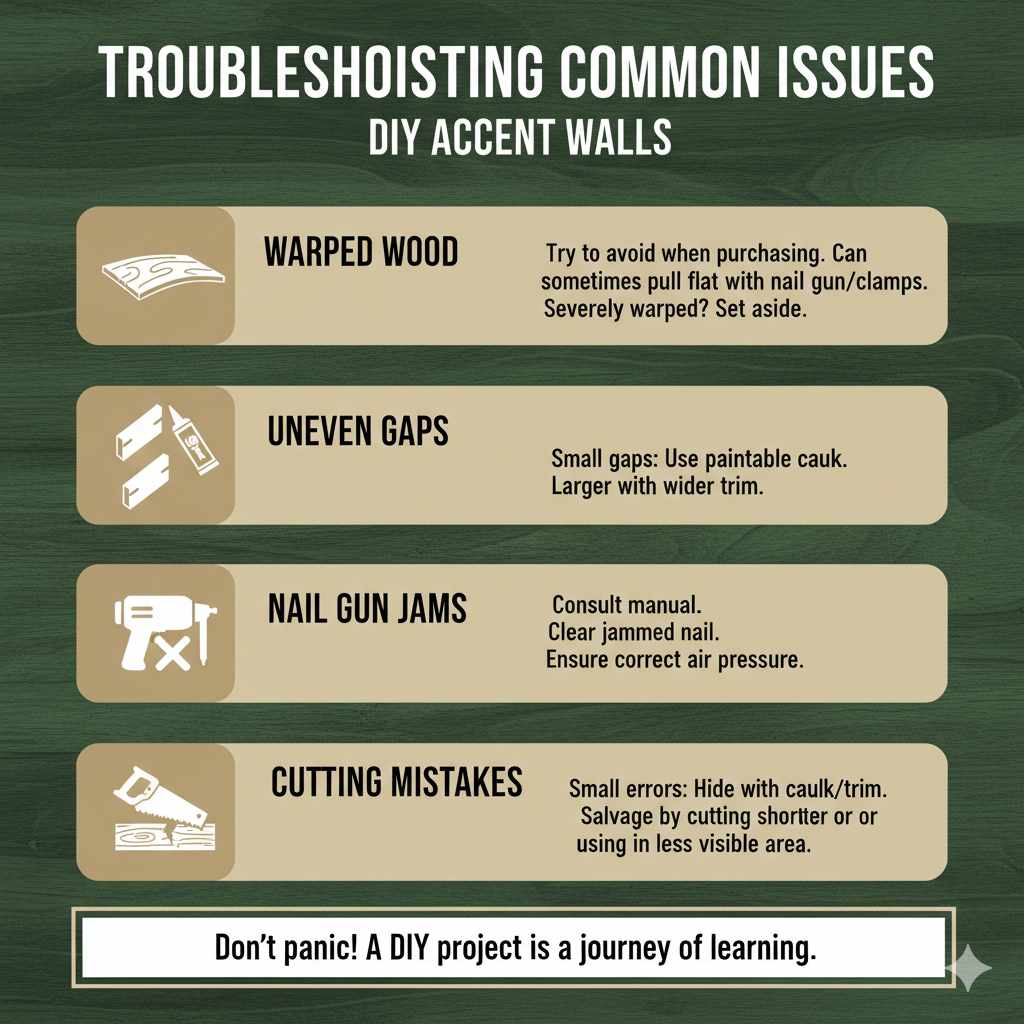
Troubleshooting Common Issues
Even with careful planning, you might run into a few snags. Here’s how to handle them:
- Warped Wood: Try to avoid warped boards when purchasing. If you notice a slight warp during installation, you can sometimes pull it flat with your nail gun or clamp it while it dries. If it’s severely warped, it’s best to set it aside and use a straighter piece.
- Uneven Gaps: If you have small, uneven gaps, a good bead of paintable caulk can work wonders. For larger gaps, you might need to use a wider piece of trim to cover them.
- Nail Gun Jams: Consult your nail gun’s manual for troubleshooting. Often, clearing the jammed nail and ensuring the air pressure is correct will solve the issue.
- Cutting Mistakes: Don’t panic! Small errors can often be hidden with caulk or trim. If it’s a significant mistake, try to salvage the piece by cutting it shorter or using it in a less visible area.
Remember, a DIY project is about learning and making it your own. Minor imperfections can add to the charm and character of a handmade wall!
FAQ: Your Wood Accent Wall Questions Answered
Q1: How much wood do I really need for my accent wall?
A1: Measure your wall’s square footage (width x height). Then, add 10-15% more material to account for cuts, waste, and any mistakes. It’s always better to have a little extra than to run short midway through your project.
Q2: Can I install a wood accent wall directly over drywall?
A2: Yes, for most standard drywall installations in good condition, you can attach wood planks directly. The key is to ensure you are driving your fasteners into the wall studs for a secure hold. Heavy materials might benefit from construction adhesive as well.
Q3: Do I need a special tool to cut wood planks?
A3: A miter saw or circular saw is highly recommended for clean, accurate cuts. While other saws might “cut” the wood, these types provide the best finish for this type of project. For very simple projects, a handsaw is possible but much more labor-intensive and less precise.
Q4: What is the best way to secure the wood planks to the wall?
A4: The most common and efficient method is using a brad nailer or finish nailer to attach planks to wall studs.