How To Remove Buried Nails From Wood: Your Step-by-Step Guide
To remove buried nails from wood, first clear any debris. Select the appropriate tool, such as a nail puller or end nippers, depending on how much of the nail is exposed. Use gentle leverage and a fulcrum to extract the nail slowly, minimizing wood damage. Always prioritize safety with eye protection and gloves, then repair the wood for a smooth finish.
Ever found yourself working on a beautiful piece of wood, only to discover a hidden nail lurking just beneath the surface? It’s a common, often frustrating moment for many DIY enthusiasts and homeowners. Buried nails can cause serious damage to your tools, ruin your project, and even pose a safety risk. But don’t worry, you’re not alone, and it’s a problem with clear solutions!
I’m Apollo Radar, and I’m here to guide you through this challenge. Knowing how to remove buried nails from wood safely and effectively is a valuable skill that will save your projects and your sanity. In this guide, we’ll walk through simple, step-by-step methods, the right tools to use, and crucial tips to ensure a clean, successful removal every time. Let’s get those stubborn nails out!
Removing a buried nail might seem daunting, especially if it’s flush with the surface or deeply embedded. But with the right approach and a bit of patience, you can tackle this task like a pro. Here’s how to remove buried nails from wood without causing unnecessary damage to your cherished material.
Step-by-Step: Extracting Buried Nails from Wood Safely
1. Assess the Situation and Prepare Your Workspace
Before you grab any tools, take a moment to understand what you’re up against. Is the nail head visible? Is it rusty? How deep is it buried? This initial assessment will help you choose the best method and tools.
- Clear the Area: Remove any sawdust, dirt, or loose wood splinters around the nail. A wire brush or an air compressor can be helpful here. This gives you a clear view and prevents debris from getting in the way.
- Safety First: Always put on your safety glasses and work gloves. Nails can snap, tools can slip, and wood splinters are no fun. Protecting your eyes and hands is non-negotiable.
2. Choose the Right Tool for the Job
The type of nail and its depth will dictate your tool choice. Having a few options on hand is always a good idea.
- For Slightly Exposed Heads: A good old claw hammer or a pry bar is often sufficient if you can get a grip on the nail head.
- For Flush or Slightly Recessed Nails: This is where specialized tools shine. A cat’s paw nail puller or a pair of end nippers (also known as carpenter’s pincers) are excellent choices.
- For Deeply Buried or Broken Nails: Sometimes, you might need to use a drill to create a small pilot hole around the nail to expose it, or even locking pliers for a firm grip.
3. Expose and Grip the Nail Head
If the nail is truly buried, your first task is to expose enough of it to get a solid grip.
- Using a Chisel or Utility Knife: Carefully chip away a small amount of wood around the nail head. Be gentle! You only want to expose the head, not create a huge crater. Work slowly, angling the chisel away from the nail to avoid hitting it directly.
- Using a Cat’s Paw Nail Puller: If the nail is flush or slightly recessed, position the “paw” of the tool directly over the nail head. Gently tap the back of the cat’s paw with a hammer until its teeth bite into the nail head.
- Using End Nippers: For nails that are flush or have a very small portion exposed, end nippers can be surprisingly effective. Grip the nail head as close to the wood surface as possible.
4. Leverage and Extract with Care
This is the critical step where patience truly pays off. Rushing can cause significant damage to your wood.
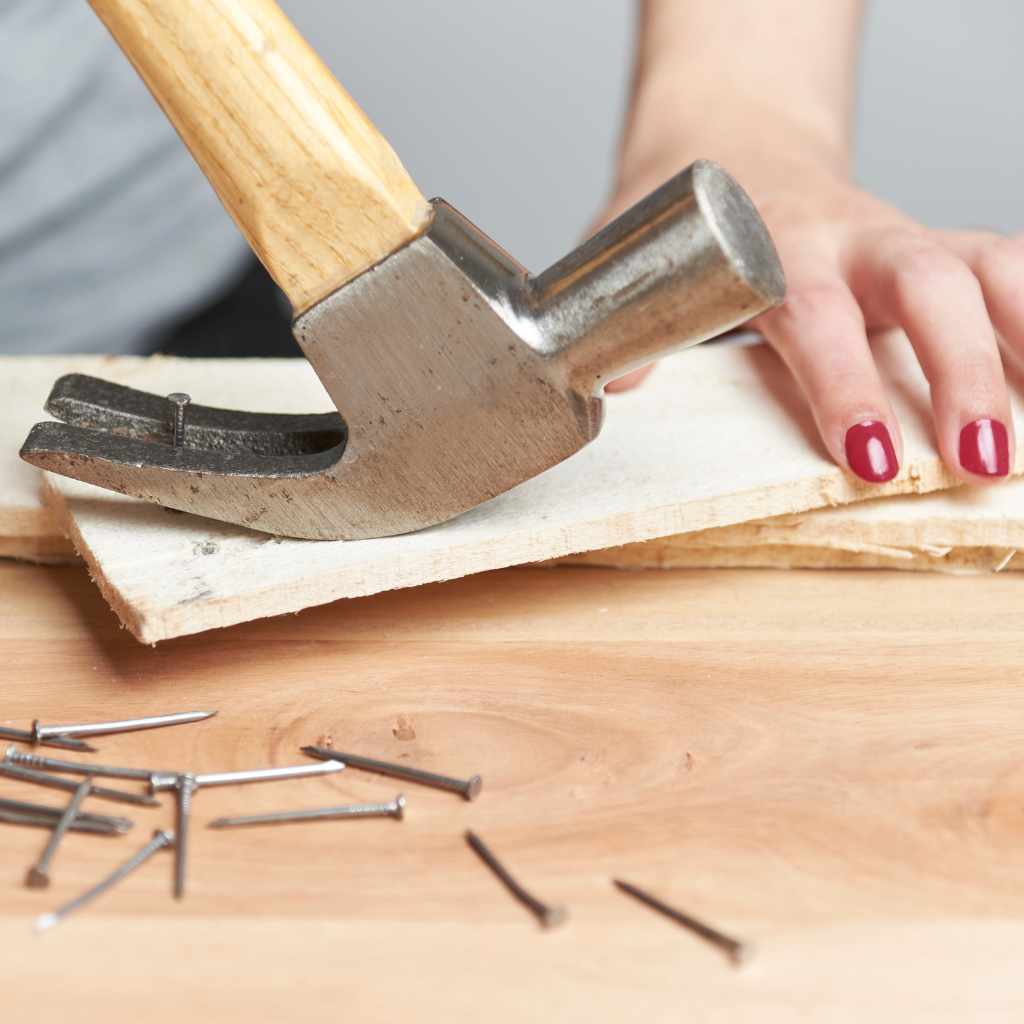
- Create a Fulcrum: Whether you’re using a hammer, pry bar, or cat’s paw, always place a scrap piece of wood (like a thin block or shingle) under the tool’s head. This protects your workpiece from dents and scratches and provides better leverage, making the removal easier and more controlled.
- Gentle, Steady Pressure: Apply slow, consistent pressure to the tool’s handle, levering the nail upward. Avoid sudden jerks or excessive force. If the nail feels stuck, try wiggling it slightly from side to side before continuing to pull.
- Reposition if Needed: As the nail starts to come out, you might need to adjust your fulcrum or grip to maintain leverage. For longer nails, you might pull it out a bit, then reposition your grip closer to the wood to finish the extraction.
- For End Nippers: Once you have a firm grip, you can roll the nippers sideways, using the curved head as a fulcrum against the wood. This technique provides excellent leverage for lifting the nail straight up.
5. Repair the Wood Surface
After successfully removing the nail, you’ll likely have a small hole or indentation. Repairing this ensures a smooth, finished look for your project.
- Clean the Hole: Remove any remaining splinters or dust from the nail hole.
- Fill the Hole: Use wood filler that matches your wood’s color, or a contrasting color if that’s your aesthetic. For small holes, wood glue mixed with fine sawdust can also work well. Apply the filler with a putty knife, slightly overfilling the hole.
- Sand Smooth: Once the filler is completely dry (check product instructions for drying times), sand the area flush with the surrounding wood using fine-grit sandpaper (e.g., 180-220 grit).

Essential Tools and Materials for Removing Buried Nails
Having the right tools makes all the difference when you need to remove buried nails from wood. Here’s a breakdown of what you might need, along with some specialized options.
Basic Tools You’ll Likely Need:
- Safety Glasses: Absolutely essential to protect your eyes from flying debris or snapping nails.
- Work Gloves: Protects your hands from splinters, rust, and tool slips.
- Claw Hammer: Great for nails with exposed heads. The claw can also be used to gently pry.
- Pry Bar (Wonder Bar/Flat Bar): Offers excellent leverage for larger nails or when you need to lift boards.
- Scrap Wood (Fulcrum): Crucial for protecting your workpiece and increasing leverage.
Specialized Nail Removal Tools:
- Cat’s Paw Nail Puller: This tool is specifically designed to bite into the head of a flush or slightly recessed nail. Its curved end provides superb leverage. There are various sizes, so choose one appropriate for the nail size you expect to encounter.
- End Nippers (Carpenter’s Pincers): These look like heavy-duty pliers with a rounded, curved head. They excel at gripping nail heads flush with the surface and rolling them out using the curved head as a fulcrum. They offer precise control.
- Locking Pliers (Vise-Grips): If a nail head is exposed but bent or broken, locking pliers can provide an unyielding grip, allowing you to twist and pull the nail out.
- Drill with Small Bit: For extremely stubborn or broken nails, a small drill bit (slightly smaller than the nail shank) can be used to carefully drill around the nail to loosen the wood fibers or expose more of the nail. This should be a last resort to minimize wood damage.
Repair Materials:
- Wood Filler: To patch holes after nail removal. Choose a color that blends with your wood.
- Putty Knife: For applying wood filler smoothly.
- Sandpaper (various grits): For smoothing repaired areas.
Tool Comparison: Choosing the Best Nail Puller
Let’s look at some common tools and when to use them for removing buried nails from wood.
| Tool | Best For | Pros | Cons |
|---|---|---|---|
| Claw Hammer | Nails with exposed heads; light prying | Commonly available, versatile | Limited leverage for buried nails, can dent wood easily |
| Pry Bar (Flat Bar) | Larger nails, lifting boards, demolition | Excellent leverage, durable | Can cause significant wood damage if not careful, less precise |
| Cat’s Paw Nail Puller | Flush or slightly recessed nail heads | Designed for nail heads, good leverage, minimizes wood damage | Requires tapping to engage, not ideal for deeply buried nails |
| End Nippers | Flush or slightly exposed small nail heads | Very precise, excellent for gripping flush nails, good leverage by rolling | Can be difficult for very large nails, specialized use |
| Locking Pliers | Bent, broken, or headless nails with some exposure | Extremely strong grip, can twist and pull | Can mar the nail shaft, less leverage than pry tools |
Tips for Better Results When You Remove Buried Nails From Wood
Achieving a clean, damage-free removal of buried nails takes a little finesse. Here are some practical, experience-based tips to help you get the best results every time.
Work Slowly and Deliberately
Rushing is the number one cause of accidents and wood damage. Take your time with each step. A slow, steady pull is far more effective and safer than a sudden, forceful yank.
Always Use a Fulcrum
This cannot be stressed enough. Placing a small piece of scrap wood (plywood, shingle, or even a thick cloth) under your hammer claw, pry bar, or cat’s paw significantly increases leverage and protects the surface of your workpiece from dents and scratches. It’s a simple trick that makes a huge difference.
Protect the Surrounding Wood
Beyond the fulcrum, consider taping off the area around the nail with painter’s tape if the wood is particularly soft or finished. This adds an extra layer of protection against accidental slips or marring.
For Rusted or Stubborn Nails, Lubricate
If a nail is old, rusty, or simply refusing to budge, a drop of penetrating oil (like WD-40) can work wonders. Apply it around the nail head and let it sit for 15-30 minutes. The oil helps to loosen the rust and reduce friction, making extraction much easier. Always clean up any excess oil thoroughly afterward.
Wiggle, Don’t Yank
If the nail is very tight, try gently wiggling it from side to side with your tool before attempting a full pull. This can help break the bond between the nail and the wood fibers, making the extraction smoother.
Consider a Drill for Extremely Stubborn Nails (Last Resort)
For nails that are completely flush, headless, or badly bent, a small drill bit (slightly smaller than the nail’s diameter) can be used to drill a shallow pilot hole directly alongside the nail. This can help expose the nail or loosen the wood around it enough to get a grip with nippers or locking pliers. Be extremely careful not to hit the nail itself with the drill bit, as this can dull the bit and create more problems. This method is best reserved for situations where other techniques have failed and you are prepared to do more extensive wood repair.
For more detailed information on safe drilling practices, you can consult resources like OSHA’s Hand and Power Tools publication (PDF).
Repair Immediately
Once the nail is out, clean and fill the hole promptly. This prevents further splintering or damage and ensures your repair blends seamlessly with the surrounding wood.
Common Mistakes to Avoid When Removing Buried Nails
Even experienced woodworkers can make mistakes, but as a beginner, being aware of these common pitfalls will save you a lot of headaches and potential damage to your projects.
1. Rushing the Process
This is probably the most common mistake. Trying to quickly yank out a stubborn nail often results in:
- Damaged Wood: Large gouges, splinters, or crushed wood fibers around the nail hole.
- Bent or Broken Nails: Making it even harder to remove the remaining piece.
- Tool Slips: Potentially causing injury to yourself or damage to the workpiece.
Prevention: Slow down. Plan each step. Use gentle, consistent pressure. Patience is your most valuable tool here.
2. Not Using a Fulcrum
Attempting to pry a nail directly against the wood surface without a protective block is a surefire way to leave unsightly dents and marks. The tool’s head will dig into the wood, especially softer species.
Prevention: Always place a scrap piece of wood under your hammer, pry bar, or cat’s paw. This distributes the pressure and protects the surface.
3. Using the Wrong Tool for the Job
Trying to extract a flush nail with a standard claw hammer is like trying to cut a board with a butter knife – it’s inefficient and can cause more harm than good.
- A claw hammer is great for exposed nail heads, but not for flush ones.
- A large pry bar might be overkill for a small finishing nail and could cause too much collateral damage.
Prevention: Assess the nail’s condition and depth, then choose the appropriate tool from your arsenal (cat’s paw, end nippers, etc.). Refer back to our tool comparison table.
4. Ignoring Safety Gear
Nails can snap, rust can fly, and tools can slip. A small splinter in the eye or a crushed finger can quickly turn a simple task into a painful ordeal.
Prevention: Always wear safety glasses and work gloves. Make it a habit for any woodworking task, no matter how small.
5. Leaving a Jagged Hole or Splinters
After the nail is out, sometimes the wood around the hole can be splintered or rough. Neglecting to clean and repair this can compromise the integrity and appearance of your project.
Prevention: Carefully remove any loose splinters with a utility knife or chisel. Clean the hole thoroughly before applying wood filler. Sand the repaired area smoothly for a professional finish.
6. Applying Too Much Force
Sometimes, a nail just won’t budge. Applying excessive force can bend the nail, break the tool, or damage the surrounding wood more severely than the original nail. It can also lead to loss of balance and injury.
Prevention: If a nail is truly stuck, try lubricating it, wiggling it, or considering a more aggressive but controlled method like drilling around it (as a last resort). Never force it beyond what feels safe and controlled.
Frequently Asked Questions About Removing Buried Nails From Wood
Q1: What if the nail is completely flush with the wood and I can’t get a grip?
A1: For completely flush nails, your best bet is a cat’s paw nail puller. Position the paw directly over the nail head and tap it with a hammer until its teeth bite into the nail. Alternatively, end nippers can often grip even a tiny sliver of the nail head. If neither works, carefully use a small chisel to expose a tiny bit of the nail head, then try the specialized tools again.
Q2: Can I remove a rusted nail the same way as a new one?
A2: Rusted nails can be more challenging. Rust creates a stronger bond with the wood and makes the nail more brittle, increasing the risk of it breaking. Apply a penetrating oil to the nail head and let it soak for 15-30 minutes before attempting removal. This helps loosen the rust and reduces friction, making extraction easier.
Q3: How do I avoid damaging the wood surface during nail removal?
A3: The most important tip is to always use a scrap piece of wood as a fulcrum under your prying tool. This distributes the pressure and prevents dents. Work slowly and gently, applying steady, consistent pressure rather than sudden jerks. You can also tape off the area with painter’s tape for extra protection on delicate finishes.
Q4: What’s the best tool for removing a bent or broken nail?
A4: For bent or broken nails where some part is still exposed, locking pliers (like Vise-Grips) are excellent. They provide an incredibly strong, non-slip grip, allowing you to twist and pull the nail out. If the nail is broken below the surface, you might need to carefully expose it with a chisel or use a drill to loosen the wood around it before using locking pliers or end nippers.
Q5: Is it always worth the effort to remove buried nails, or should I just cut around them?
A5: It depends on your project. If you’re repurposing wood, especially for a finished piece, removing nails is crucial to prevent damage to saw blades, planer blades, and sanding equipment. It also ensures a clean, smooth surface. For rough construction or if the wood is being discarded, cutting around them might be acceptable. However, for craftsmanship and safety, removal is generally preferred.
Q6: What safety gear is absolutely essential for this task?
A6: At a minimum, always wear safety glasses to protect your eyes from flying splinters or snapping nails. Work gloves are also highly recommended to protect your hands from sharp edges, rust, and tool slips. Good lighting in your workspace is also key to clearly seeing what you’re doing.
Conclusion: Master the Art of Nail Removal for Flawless Woodworking
There you have it! Removing buried nails from wood doesn’t have to be a frustrating or damaging experience. By following these clear, step-by-step instructions, choosing the right tools, and approaching the task with patience and care, you can tackle this common woodworking challenge with confidence.
Remember, the key takeaways are always to prioritize safety, use a fulcrum to protect your wood, and work slowly. With a little practice, you’ll be able to extract even the most stubborn nails, leaving your wood ready for its next purpose. Don’t let a hidden fastener derail your project; embrace these techniques and continue crafting beautiful, functional pieces with the assurance of a true woodworking mentor. Happy woodworking!