How Long Does Wet Wood Take to Dry: Essential Guide
Wet wood drying times can range from a few weeks to over a year, depending heavily on wood type, thickness, storage conditions, and ambient humidity. Proper drying is crucial for successful woodworking, structural integrity, and preventing issues like warping and rot. This guide will break down the factors influencing drying time and how you can achieve optimal results for your projects.
Welcome to the workshop! If you’ve ever picked up a piece of wood that feels heavy and cool to the touch, you’ve likely encountered wet wood. It’s a common situation for beginners, and it can be a bit frustrating because wet wood just won’t behave like its dry counterpart. It warps, it’s heavy, and you certainly can’t glue or finish it properly. But don’t worry! Understanding how long it takes for wood to dry and how to help it along is a fundamental skill that opens up a world of possibilities for your DIY projects. We’ll walk through everything you need to know, step-by-step, so you can confidently prepare your wood for whatever you want to build.
Understanding Wood Moisture Content
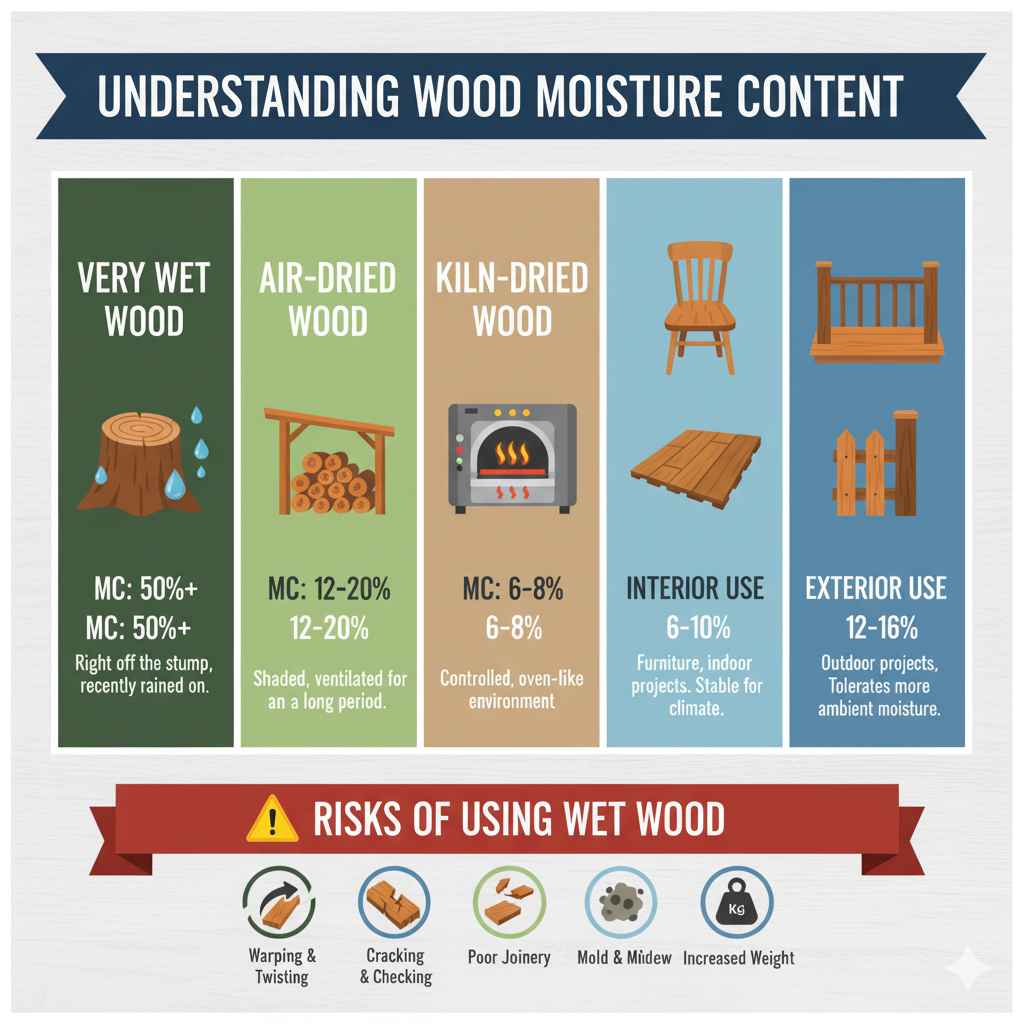
Before we dive into drying times, let’s quickly talk about what “wet” and “dry” mean for wood. Wood is a natural material that absorbs and releases moisture. Its moisture content (MC) is measured as a percentage of the wood’s oven-dry weight. Simply put, the more water in the wood, the higher its MC.
- Very Wet Wood: Can have an MC of 50% or higher. This is wood right off the stump or recently rained on.
- Air-Dried Wood: Typically ranges from 12-20% MC. This is wood that has been left to dry in a shaded, ventilated area for an extended period.
- Kiln-Dried Wood: Usually has an MC of 6-8%. This is wood that has been dried in a controlled oven-like environment, which speeds up the process significantly.
- Interior Use Dry Wood: For furniture and most indoor projects, wood should ideally be around 6-10% MC. Colder climates might need slightly lower MC, while humid climates might tolerate slightly higher MC.
- Exterior Use Dry Wood: For outdoor projects, the MC can be higher, often around 12-16%, as it will be exposed to more ambient moisture fluctuations.
The goal of drying wood is to bring its MC down to a stable level suitable for its intended use. Using wood that is too wet can lead to significant problems down the line, such as:
- Warping and Twisting: As wood dries, it shrinks. If drying is uneven, the wood will distort.
- Cracking and Checking: Rapid or uneven drying can cause the wood fibers to split.
- Poor Joinery: Glue doesn’t adhere well to wet wood, and fasteners can loosen as the wood shrinks around them.
- Mold and Mildew: High moisture creates a perfect environment for fungal growth.
- Increased Weight: Wet wood is substantially heavier, making it harder to handle and transport.
How Long Does Wet Wood Take to Dry? The Big Picture
So, you’ve got wet wood. How long until it’s ready? The honest answer is: it depends. There’s no single magic number. However, we can give you a good framework. Drying wood is a slow process of evaporation. Think of it like a sponge – the bigger and wetter the sponge, the longer it takes to dry out.
For most common hardwoods and softwoods, you’re looking at a range that can span from a few weeks to over a year for air-drying. Kiln-drying can drastically reduce this, often bringing lumber down to usable moisture levels in a matter of days or weeks, but this requires specialized equipment.
Here’s a general idea for air-drying common lumber (assuming it’s stacked properly in good conditions):
| Type of Wood | Average Thickness (1x lumber) | Estimated Air-Drying Time |
|---|---|---|
| Softwoods (Pine, Fir, Spruce) | 1 inch | 4 weeks – 6 months |
| Softwoods (Pine, Fir, Spruce) | 2 inches | 6 months – 1.5 years |
| Hardwoods (Oak, Maple, Cherry) | 1 inch | 6 months – 2 years |
| Hardwoods (Oak, Maple, Cherry) | 2 inches | 1 year – 3 years (or more) |
Remember, these are rough estimates for air-drying. Kiln-dried lumber you buy from a lumberyard has already gone through this intensive process. If you’re salvaging wood or cutting your own, you’ll likely be air-drying.
Key Factors Influencing Drying Time
Let’s break down what makes a piece of wood dry faster or slower:
1. Wood Species
Some woods are naturally more porous and open-grained, allowing moisture to escape more readily. Others have tighter grain structures, which slows down the drying process.
- Faster Drying Woods (often softer, more porous): Pine, Poplar, Aspen, Willow.
- Slower Drying Woods (often harder, denser, tighter grain): Oak, Maple, Hickory, Walnut, Teak.
2. Thickness of the Wood
This is a huge factor. Thicker pieces of wood have more water to lose and a longer path for that water to travel to the surface. A one-inch board will dry much faster than a four-inch thick slab of the same species.
As a very rough rule of thumb, you can often estimate that a piece of lumber will take about one year to air dry per inch of thickness to reach a stable 12-15% moisture content. This is heavily influenced by other factors, but it’s a good starting point.
3. Wood’s Initial Moisture Content
Wood straight off the stump, especially when it’s been exposed to rain, will naturally take longer than wood that has only been slightly damp. The higher the starting MC, the longer the journey to dryness.
4. Environmental Conditions
Where you store and dry your wood makes a massive difference. Think about what helps things dry in everyday life – a warm, dry, breezy day is perfect for laundry!
- Temperature: Warmer temperatures increase the rate of evaporation.
- Humidity: Lower humidity (drier air) allows the wood to release moisture more easily. Very high humidity can stall the drying process significantly.
- Airflow: Good circulation is crucial. It carries away the moist air that evaporates from the wood’s surface, allowing more moisture to escape. Stagnant, enclosed spaces trap humidity and slow drying.
- Sunlight: Direct sunlight can heat the wood unevenly, leading to faster surface drying and potential cracking while the core remains wet. While it can speed up drying, it often sacrifices wood quality.
5. Stacking Methods and Spacing
How you stack your lumber is critical for even drying and preventing warping. This is where proper “stickering” comes into play.
- Stickering: This involves placing thin strips of wood (stickers) between layers of lumber. These stickers create air gaps, allowing air to circulate freely on all sides of each board.
- Alignment: Stickers should be aligned vertically, one above the other, to provide consistent support and air channels.
- Spacing: Stickers are typically placed every 16-24 inches along the length of the board.
- Weight: You may need to place weight on top of the stack to keep the boards flat as they dry and shrink.
You can learn more about standard lumber stacking practices from resources like the Forest Products Laboratory (FPL), a leading research institution for wood science.
6. End Sealing
The ends of boards lose moisture much faster than the sides because their grain is exposed. This rapid end-grain drying can cause significant checking (cracks). Applying a sealant like wax, a latex paint, or a specialized end-grain sealer to the ends of freshly cut lumber can slow down this process, promoting more even drying throughout the entire piece.
How to Properly Air-Dry Wood
Air-drying is the most accessible method for DIYers and homeowners. It requires patience but yields beautifully stable wood.
Step-by-Step Guide to Air-Drying Wood:
- Prepare Your Wood: If you’ve just cut logs, you’ll need to saw them into lumber. Fresher cuts are better for starting the drying process.
- Choose a Drying Location: Select a site that offers good air circulation, is protected from direct sun and rain, and has relatively low humidity. A shaded spot next to your workshop or a covered outdoor area works well. Avoid basements or garages that tend to be humid.
- Create a Base: Build a level platform or use stringers (solid blocks) to elevate the wood stack off the ground. This prevents ground moisture from wicking into the lumber and promotes airflow underneath. Ensure the base is sturdy enough to support the weight of a lot of wood.
- Stack Your Lumber: Lay down your first layer of lumber. Place stickers (1/2 to 1 inch thick, about 1-2 inches wide) on top of this layer, ensuring they are perfectly aligned. Space stickers about 16-24 inches apart.
- Add More Layers: Lay the next layer of lumber perpendicular to the first, or parallel if you’re stacking standard boards. Place stickers on top of this layer, aligning with the stickers below, creating vertical air channels. Repeat until your stack is the desired height.
- Consider Weight: For wider boards or denser hardwoods, you might need to place weight on top of the stack, especially the upper layers, to help keep them flat. Old concrete blocks or heavy stones can work.
- Seal the Ends (Optional but Recommended): For thicker lumber or prized species, liberally apply a sealer to the end grain of each board.
- Be Patient: Now, the waiting game begins. Check on your wood periodically. You can use a moisture meter to test the MC.
The time it takes for wood to be considered “air-dry” enough for use can vary greatly. For many projects, wood in the 12-18% MC range might be acceptable, especially for outdoor use. For indoor furniture or fine woodworking, you’ll want it drier, ideally in the 6-10% range, which might take significantly longer.
Using a Moisture Meter: Your Best Friend
Eyeballing wood moisture is unreliable. A moisture meter is an inexpensive but invaluable tool for any woodworker, especially when you’re drying your own wood. There are two main types:
- Pin-Type Meters: These have two metal pins that you press into the wood. They measure the electrical resistance between the pins, which is related to the wood’s moisture content. They are quite accurate but leave small pinholes.
- Pinless (or Non-Invasive) Meters: These use electromagnetic waves to measure moisture content beneath the surface without damaging the wood. They are generally more expensive than pin-type meters but offer convenience and prevent surface damage.
To get an accurate reading:
- Ensure you’re testing a freshly cut surface if possible, or sand a small spot.
- Insert pins (for pin-type) or place the meter flat on the surface (for pinless).
- Test in multiple locations – near the ends, in the middle, and in thicker sections.
- For thicker lumber, you may need to take readings from both sides.
You can find detailed guides on using moisture meters and understanding their readings from many woodworking supply stores or educational sites like Wood Magazine.
When is Wood “Dry Enough”?
This is a crucial question for beginners. “Dry enough” depends on the intended use:
- For most indoor projects (furniture, cabinetry, trim): Aim for 6-10% MC. Wood will continue to lose moisture and shrink slightly once brought indoors, so starting a bit higher than the final target is often recommended.
- For outdoor projects (decking, fences, garden furniture): 12-18% MC is often acceptable. Wood intended for outdoor use will naturally fluctuate more with ambient humidity.
- For structural framing: While often sold as “construction grade” and may have higher MC, for DIY durability, aiming for 15-20% is a good goal.
It’s important to know your local climate’s typical humidity levels. In very humid regions, wood might struggle to get below 15% naturally. In very dry, arid regions, it might drop below 5% if not managed.
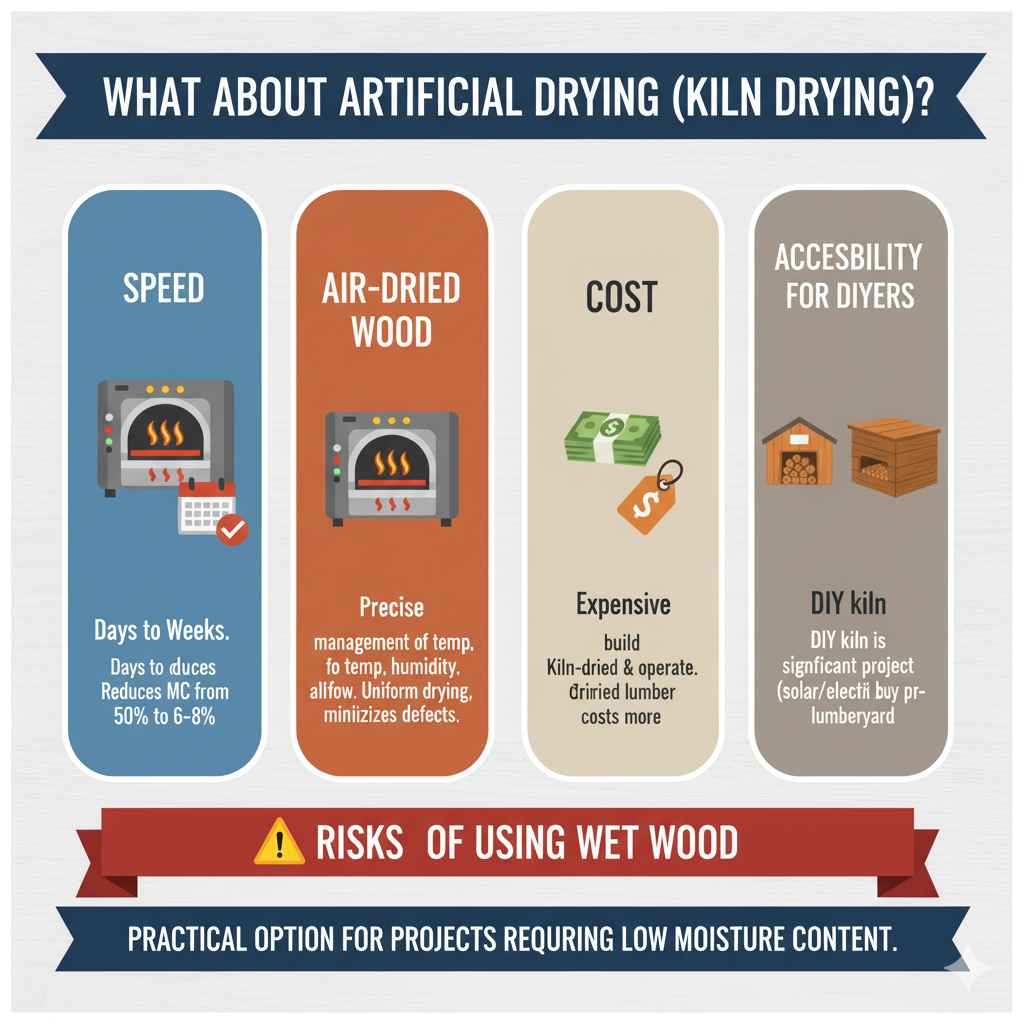
What About Artificial Drying (Kiln Drying)?
Kiln drying is the industrial process of drying wood in a controlled environment (a kiln). It’s fast and efficient for large volumes of lumber.
- Speed: Kiln drying can reduce a piece of lumber’s MC from 50%+ to 6-8% in a matter of days to weeks, depending on the wood and kiln schedule.
- Control: The temperature, humidity, and airflow are precisely managed to dry the wood uniformly and minimize defects like checking and warping.
- Cost: Kilns are expensive to build and operate, so kiln-dried lumber is generally more expensive than air-dried lumber.
- Accessibility for DIYers: Building a DIY kiln is a significant project, often beyond the scope of a beginner. However, some hobbyists do build small, solar-powered kilns or small electric kilns.
For most beginners, buying lumber that is already kiln-dried from a reputable lumberyard is the most practical option for projects requiring low moisture content.
Troubleshooting Common Drying Issues
Even with the best intentions, things can go wrong. Here’s how to handle common problems:
Problem: Wood is Drying Too Fast (Cracking/Checking)
Cause: High temperatures, low humidity, direct sun, poor end-sealing, inadequate airflow on surfaces.
Solution:
- Move the wood to a more shaded, humid location if possible.
- Increase the stack’s density slightly (don’t completely block airflow, but reduce extreme direct breezes).
- Ensure ends are well sealed.
- For slight surface checking, you can sometimes fill it with epoxy or wood filler. Major checks may render the board unusable for its original purpose.
Problem: Wood is Developing Mold or Mildew
Cause: Insufficient airflow, high humidity, wood stacked too tightly, dirt/debris in stack.
Solution:
- Ensure proper sticker spacing and vertical alignment for maximum airflow.
- Clean the drying area and the wood stack.
- If mold is superficial, you can often scrub it off with a stiff brush and a mild detergent or a bleach solution (wear protective gear!).
- If wood is significantly rotten or discolored, it may be unusable.
Problem: Wood is Warping or Twisting
Cause: Uneven drying, lack of support during drying, improper stacking.
Solution:
- Ensure stickers are perfectly aligned and the base is level.
- Add weight to the top of the stack.
- Thicker lumber is more prone to warping than thinner boards.
- Sometimes, planers and jointers can flatten slightly warped boards, but severe warping can be unrecoverable.
FAQ: Your Wood Drying Questions Answered
Q1: Can I dry wood in my garage?
A: A garage can be a good place to air-dry wood if it’s well-ventilated and has relatively low humidity. Many garages can become quite humid, especially if they are attached to a house without good airflow. Avoid storing wood directly on the floor, and keep stickers in place to allow air movement.
Q2: How long will it take to dry a log?
A: Drying a whole log is a very slow and often problematic process, leading to significant checking and cracking as the exterior dries much faster than the interior. Freshly cut and sawn lumber from the log will dry much more predictably and quickly.