How To Get White Heat Marks Off Wood Table: A Beginner’s Guide
Got a white heat mark on your wood table? Don’t fret! Gently apply mayonnaise, petroleum jelly, or non-gel toothpaste to the mark. Let it sit for several hours, then wipe clean and buff. For stubborn marks, a warm iron with a cloth can help draw out moisture. Always test any method in an inconspicuous area first for the best results.
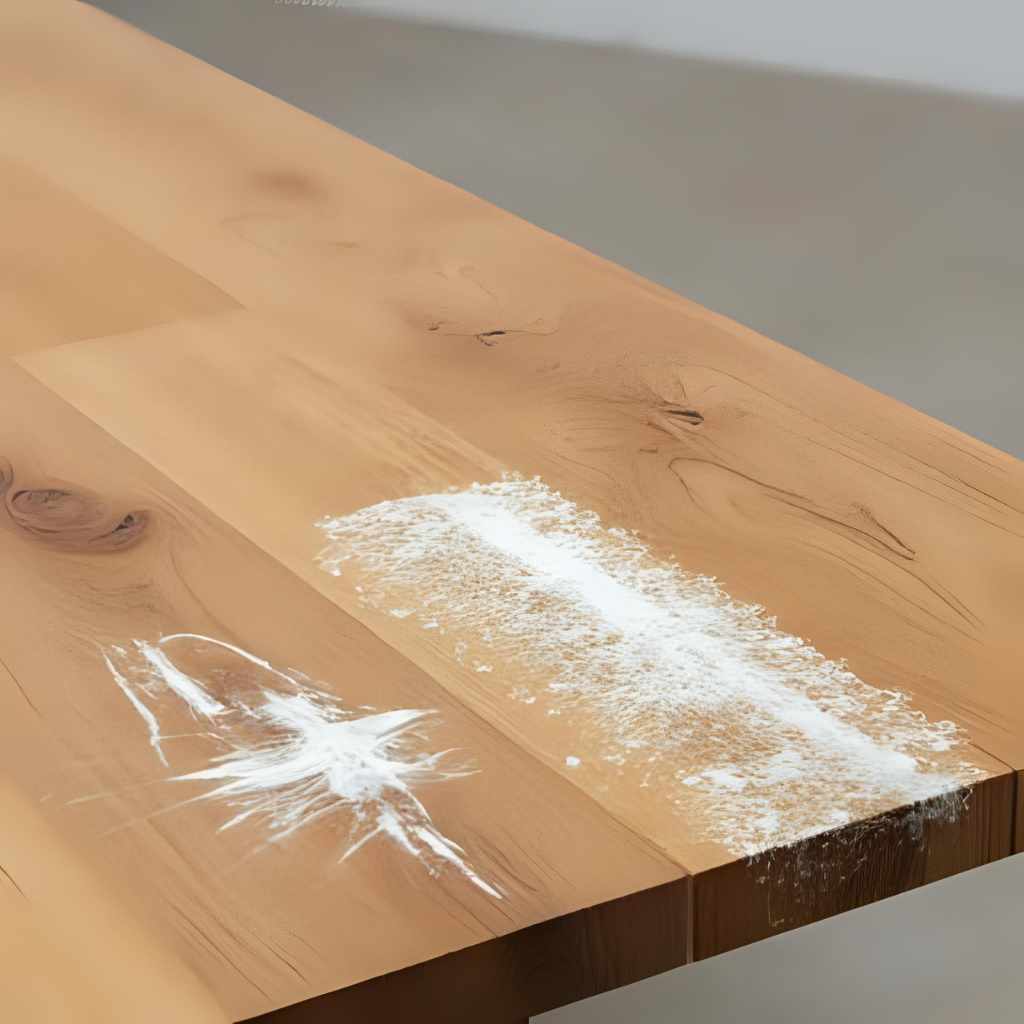
It happens to the best of us. One moment you’re enjoying a hot cup of coffee or a steamy dish, the next you notice that dreaded cloudy white ring or patch on your beautiful wood table. These “heat marks” are frustrating, making your cherished furniture look damaged. Many beginners feel lost, wondering if their table is ruined forever. But don’t worry! As your woodworking mentor, Apollo Radar, I’m here to show you exactly how to get white heat marks off wood table surfaces with simple, effective methods. You’ll learn easy, step-by-step solutions that will restore your table’s beauty and boost your confidence.
Seeing a white heat mark on your beloved wood table can feel like a punch to the gut. It’s a common issue, often caused by hot items placed directly on the surface, trapping moisture under the finish. This moisture creates that cloudy, opaque appearance. But here’s the good news: most white heat marks are superficial and can be removed with common household items and a little patience. You don’t need fancy tools or professional skills to restore your table.
Let’s dive into some trusted, beginner-friendly methods that will help you tackle those unsightly marks and bring your wood table back to its former glory. Remember, the key is to work gently and test each method in a hidden spot first.
Understanding White Heat Marks on Wood Tables
Before we start fixing, it’s helpful to understand what you’re dealing with. A white heat mark isn’t usually a burn on the wood itself. Instead, it’s moisture trapped *under* the finish of your wood table. The heat from a hot object causes the finish (like lacquer or varnish) to soften and expand, allowing moisture from the air or the hot item to get trapped within the finish layers. When it cools, the moisture is sealed in, creating that cloudy white appearance.
Dark heat marks, on the other hand, usually indicate that the heat has gone through the finish and scorched the wood itself. These are much harder to fix and might require refinishing. For this guide, we’re focusing specifically on those common, more easily reversible white marks.
Step-by-Step Guide: How To Get White Heat Marks Off Wood Table
Here are the most effective and beginner-friendly methods to remove those pesky white heat marks. Always start with the gentlest method first and work your way up if needed.
Method 1: The Mayonnaise or Petroleum Jelly Trick
This is often the first method I recommend because it’s so simple and uses items you likely already have. The oil in these products helps to displace the trapped moisture in the wood finish.
Materials You’ll Need:
- Mayonnaise (full-fat works best) OR Petroleum Jelly (Vaseline)
- Soft, clean cloth (microfiber is ideal)
- Clean, dry paper towels
- Wood polish or furniture wax (optional, for aftercare)
Steps:
- Clean the Area: Gently wipe the heat mark and surrounding area with a clean, dry cloth to remove any dust or debris.
- Apply the Product: Dab a generous amount of mayonnaise or petroleum jelly directly onto the white heat mark. Make sure the mark is completely covered.
- Let it Sit: This is where patience comes in! Leave the mayonnaise or petroleum jelly on the mark for several hours, or even overnight. For very stubborn marks, you might leave it for 12-24 hours.
- Wipe Away: After the waiting period, use a clean, dry cloth or paper towel to wipe away the mayonnaise or petroleum jelly.
- Buff and Inspect: Using a fresh, clean cloth, gently buff the area. The white mark should be gone or significantly faded. If a faint mark remains, you can repeat the process.
- Finish Up: Once the mark is gone, you can apply your usual wood polish or furniture wax to restore the shine and protect the surface.
Method 2: The Non-Gel Toothpaste Method
This method uses the mild abrasive properties of non-gel toothpaste to gently “scrub” away the trapped moisture.
Materials You’ll Need:
- White, non-gel toothpaste (not a gel formula)
- Soft, clean cloth (microfiber)
- Clean, damp cloth
- Wood polish or furniture wax (optional)
Steps:
- Clean the Area: As always, start by wiping the mark with a clean, dry cloth.
- Apply Toothpaste: Squeeze a small amount of non-gel toothpaste onto a soft, clean cloth.
- Gently Rub: Lightly rub the toothpaste onto the white heat mark in the direction of the wood grain. Use very gentle pressure. You’re not trying to sand the finish off, just gently abrade it. Rub for about 30-60 seconds.
- Wipe Clean: Use a clean, damp cloth to wipe away the toothpaste.
- Inspect: Check the mark. If it’s still there, you can repeat the process once or twice, but be very careful not to over-rub, which could damage the finish.
- Finish Up: Once the mark is gone, apply wood polish or furniture wax.
For more insights on general wood care and finishes, you might find resources from woodworking associations helpful, such as the Woodworking Network.
Method 3: The Iron and Cloth Method
This method uses gentle heat to re-open the finish and allow the trapped moisture to evaporate. It requires a bit more care but can be very effective for stubborn marks.
Materials You’ll Need:
- Clothes iron (empty of water, set to low or medium heat, no steam)
- Clean, dry cotton cloth (an old t-shirt or dish towel works well)
- Soft, clean cloth for buffing
- Wood polish or furniture wax (optional)
Steps:
- Prepare the Iron: Make sure your iron is completely empty of water. Set it to a low or medium heat setting (no steam!).
- Place the Cloth: Lay the clean, dry cotton cloth over the white heat mark. The cloth acts as a barrier to protect the wood finish from direct heat.
- Apply Gentle Heat: Lightly press the warm iron onto the cloth directly over the heat mark for just a few seconds (5-10 seconds maximum). Do not let the iron sit in one spot for too long.
- Lift and Check: Immediately lift the iron and cloth. Check the mark. You should see the white mark starting to disappear as the moisture evaporates.
- Repeat if Necessary: If the mark is still there, let the area cool completely. Then, repeat steps 3 and 4, moving the iron slightly and using short bursts of heat. Continue this process until the mark is gone.
- Buff and Finish: Once the mark is gone and the area has cooled, buff the table with a clean cloth and apply wood polish or furniture wax.
Safety Tip: Be extremely cautious with the iron method. Too much heat or leaving the iron on for too long can burn the finish or the wood, causing irreversible damage. Always use a cloth barrier and work in short bursts.
Method 4: Hair Dryer Method
Similar to the iron method, a hair dryer can apply controlled heat to evaporate trapped moisture.
Materials You’ll Need:
- Hair dryer
- Soft, clean cloth for buffing
- Wood polish or furniture wax (optional)
Steps:
- Set Hair Dryer: Set your hair dryer to a medium heat setting.
- Apply Heat: Hold the hair dryer about 6-8 inches above the white heat mark. Move it constantly in a circular motion over the mark.
- Observe: Watch the mark closely. As the moisture evaporates, the white mark should begin to disappear. This might take a few minutes.
- Cool Down: Once the mark is gone, switch the hair dryer to a cool setting and continue to blow over the area for a minute or two to help the finish re-set.
- Buff and Finish: Buff the area with a clean cloth and apply wood polish or furniture wax.
Safety Tip: Do not hold the hair dryer too close or focus the heat on one spot for too long, as this can also damage the finish.
Choosing the Right Method for Your White Heat Marks
Not all heat marks are created equal, and some methods might work better than others depending on the finish and severity. Here’s a quick comparison to help you decide where to start:
| Method | Effectiveness for White Heat Marks | Difficulty Level | Risk of Damage | Common Household Items? |
|---|---|---|---|---|
| Mayonnaise / Petroleum Jelly | Good for fresh, light marks | Very Easy | Very Low | Yes |
| Non-Gel Toothpaste | Good for light to medium marks | Easy | Low (if gentle) | Yes |
| Iron and Cloth | Excellent for stubborn, deeper white marks | Medium | Medium (if not careful) | Yes |
| Hair Dryer | Good for light to medium marks | Easy | Low (if not too close) | Yes |
As your mentor, I always suggest starting with the least invasive method (mayonnaise or petroleum jelly) and only moving to the iron or hair dryer if the others don’t yield results. Always remember to test!
Tips for Better Results When You Get White Heat Marks Off Wood Table
Achieving a flawless finish requires a bit of finesse. Here are some extra tips from my workshop to yours:
- Test First: This cannot be stressed enough! Always test your chosen method on an inconspicuous area of the table (like the underside or a hidden corner) before tackling the main mark. This ensures the method won’t damage your specific finish.
- Work in the Direction of the Grain: When rubbing or buffing, always follow the natural grain of the wood. This helps to blend the repair and prevent visible scratches or swirl marks.
- Be Patient: Some marks, especially older or deeper ones, might require multiple applications or longer waiting times. Don’t rush the process.
- Clean the Surface Thoroughly: Any dust or grit can scratch your finish during the repair process. A clean surface is a happy surface.
- Finish with Care: After successfully removing the mark, always reapply a good quality furniture polish or wax. This not only restores the shine but also adds a layer of protection to your wood table.
- Consider the Finish Type: These methods are generally safe for most common wood finishes like lacquer, varnish, and polyurethane. If your table has an oil finish or is an antique with a delicate shellac, proceed with extra caution and research specific care for that finish type.
Common Mistakes to Avoid When Removing White Heat Marks
Even with the best intentions, beginners can sometimes make mistakes that worsen the problem. Let’s make sure you avoid these pitfalls:
- Rubbing Too Hard: Whether using toothpaste or an abrasive cleaner, excessive pressure can strip away the finish, creating a dull spot or even exposing the raw wood. Gentle is key.
- Using Abrasive Cleaners: Harsh household cleaners or scouring pads are a big no-no. They will scratch and damage your wood table’s finish, making the problem much worse than a simple white mark.
- Ignoring the “Test First” Rule: Skipping the test spot is a gamble. Different wood finishes react differently. What works perfectly on one table might harm another.
- Applying Too Much Heat with an Iron: Overheating is the fastest way to burn the finish, turning a reversible white mark into an irreversible dark burn. Always use a cloth barrier, low heat, and short, quick applications.
- Not Cleaning Properly Beforehand: Dust and grime can turn into abrasives when you start rubbing. A quick wipe-down prevents accidental scratches.
- Giving Up Too Soon: Sometimes, a mark needs a second or third application, or a longer waiting period. Don’t assume failure after one attempt.
By being mindful of these common mistakes, you’ll greatly increase your chances of a successful repair and keep your wood table looking its best.
Preventing Future White Heat Marks on Your Wood Table
Of course, the best way to deal with white heat marks is to prevent them in the first place! As a woodworking mentor, I always emphasize proactive care.
- Use Coasters and Trivets: This is the golden rule! Always place hot mugs, dishes, and pots on coasters or trivets. These create a barrier that prevents heat and moisture from reaching your table’s finish.
- Tablecloths and Placemats: For meals, consider using tablecloths or placemats. They offer a larger protective surface, especially for serving dishes.
- Wipe Spills Immediately: While not directly related to heat, moisture from spills can also penetrate the finish and cause damage over time. Quick cleanup is always best.
- Maintain Your Finish: Regularly clean and polish your wood table according to the manufacturer’s recommendations or with a good quality furniture polish. A well-maintained finish is more resilient to minor mishaps.
- Educate Family and Guests: Gently remind everyone about using protective barriers. A polite “Would you mind using a coaster for that?” goes a long way.
For more detailed information on general furniture care and maintenance, authoritative sources like university extension programs often provide excellent, research-backed advice. For example, the Penn State Extension offers valuable tips on caring for furniture.

FAQ: Your Questions About White Heat Marks Answered
Let’s address some common questions beginners have when dealing with white heat marks on their wood tables.
Q1: Are white heat marks permanent?
No, most white heat marks are not permanent. They are usually superficial moisture trapped in the finish, which can be removed with the methods discussed in this guide. Darker marks, however, might indicate actual scorching of the wood and are more challenging to fix.
Q2: Can I use these methods on any type of wood table?
These methods are generally safe for tables with common clear finishes like lacquer, varnish, or polyurethane. However, always test in an inconspicuous area first, especially for antique furniture or tables with delicate finishes like shellac or oil finishes. If unsure, consult a professional furniture restorer.
Q3: What if the mark doesn’t completely disappear after trying these methods?
If a faint mark remains, you can try repeating the process, or move to a slightly more aggressive method (e.g., from mayonnaise to the iron method). Sometimes, very stubborn marks may require a light sanding and spot refinishing, which is a more advanced technique. Don’t hesitate to seek advice from a local furniture repair expert if you’re not comfortable proceeding.
Q4: How long does it typically take to remove a white heat mark?
The time varies greatly. Simple marks might disappear within minutes with the iron or hair dryer method. For methods like mayonnaise or petroleum jelly, it can take several hours, or even overnight, for the product to work its magic. Patience is key!
Q5: Is it safe to use an iron on my wood table?
Yes, but with extreme caution. The iron method relies on gentle, indirect heat through a cloth. Never place a hot iron directly on the wood, and never leave it in one spot for more long than 5-10 seconds. Too much heat will burn the finish. If you’re nervous, try the other methods first.
Q6: Will these methods damage the finish of my table?
When performed correctly and gently, these methods are designed to be safe for most wood finishes. The biggest risks come from rubbing too hard, using too much heat with an iron, or skipping the crucial “test first” step. Always proceed with care.
Q7: What’s the best way to prevent future heat marks?
Prevention is always better than cure! Always use coasters for drinks and trivets for hot dishes. Consider tablecloths or placemats for extra protection during meals. Regularly maintaining your table’s finish also helps create a more resilient surface.
Conclusion: Restore Your Table with Confidence!
There you have it, fellow DIY enthusiasts! You now have a comprehensive guide on how to get white heat marks off wood table surfaces, armed with practical, beginner-friendly methods. You’ve learned that those cloudy blemishes are usually just trapped moisture, not permanent damage, and can often be fixed with items already in your home.
Remember, the key to success is patience, gentleness, and always testing your chosen method in an inconspicuous area first. With these simple steps, you can confidently tackle those heat marks, restore the beauty of your wood furniture, and feel a real sense of accomplishment. Keep practicing, keep learning, and keep building that confidence in your woodworking journey. You’ve got this!