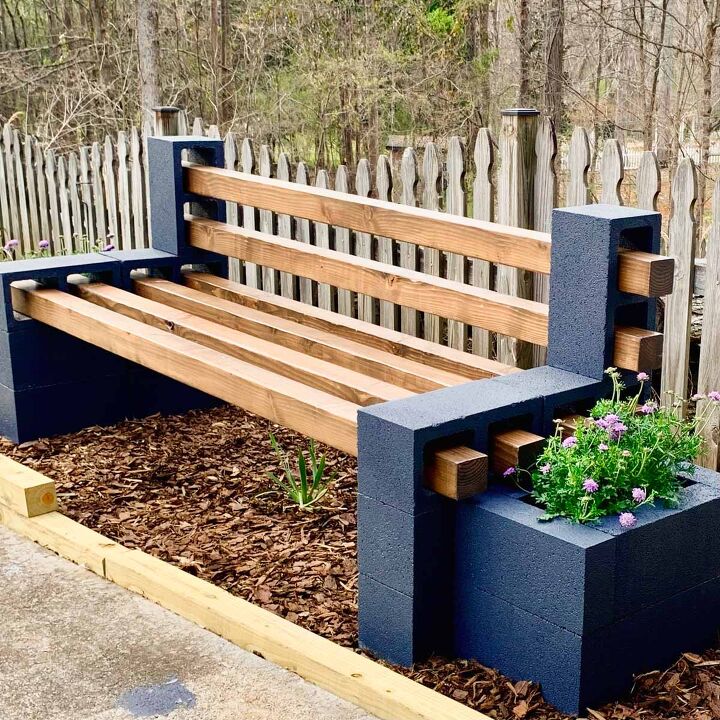
DIY Garden Bench: Easy Steps to Build Your Perfect Outdoor Seat
Imagine having a cozy spot in your garden where you can relax, read a book, or enjoy a cup of coffee. What if you could create that perfect bench yourself, tailored exactly to your style and space?
Building your own garden bench is easier than you think, and it adds a personal touch that store-bought furniture just can’t match. In this guide, you’ll discover simple steps and tips to craft a beautiful, sturdy bench that transforms your outdoor space.
Ready to bring your garden to life with your own hands? Let’s get started!
Choosing The Right Materials
Choosing the right materials is key to building a strong garden bench. The materials affect how long your bench lasts and how it looks outside. Picking durable wood and good finishes helps your bench resist weather damage. Also, having the right tools makes the building process easier and safer.
Wood Types For Durability
Choose wood that stands up to sun, rain, and bugs. Cedar and redwood resist rot and insects naturally. Pressure-treated pine is affordable and lasts long after treatment. Teak offers excellent durability but costs more. Avoid soft woods like pine without treatment; they wear out fast.
Selecting Weather-resistant Finishes
Finishes protect wood from moisture and sun damage. Use outdoor paint, stain, or sealant made for gardens. Oil-based finishes soak into wood and protect deeply. Water-based finishes dry fast and clean up easily. Reapply finishes every year to keep the bench strong.
Essential Tools And Supplies
Gather basic tools for smooth building. A saw cuts wood to size. Drill and screws join pieces tightly. Sandpaper smooths rough edges. A paintbrush or sprayer applies finish evenly. Safety gear like gloves and goggles protects you during work.

Planning Your Bench Design
Planning your garden bench design is the first step to a successful DIY project. It helps you create a bench that fits your space and style perfectly. Taking time to plan saves money and effort later. A well-thought-out plan means a bench that is both comfortable and beautiful.
Measuring For Comfort
Comfort is key in any bench design. Start by measuring the area where the bench will sit. Allow enough space for people to sit and move freely. Standard seat height is about 18 inches from the ground. Seat depth should be around 15 to 18 inches. These sizes suit most adults. Adjust measurements if children or taller people will use it.
Simple Vs. Decorative Styles
Decide on the bench style before building. Simple designs use straight lines and basic shapes. They are easy to build and fit many gardens. Decorative styles add curves, patterns, or carved details. These benches look elegant but take more time and skill. Choose a style that matches your garden and your skill level.
Drawing Your Blueprint
Create a clear blueprint before cutting any wood. Draw the bench from different angles. Mark all measurements on your drawing. Include seat height, width, and leg placement. A good blueprint guides you through each step. It reduces mistakes and helps you finish faster.
Cutting And Preparing Wood
Cutting and preparing wood is a key step in building your DIY garden bench. Precise cuts make the bench strong and look great. Proper preparation helps the wood last longer outdoors. Taking time here saves effort later.
Safe Cutting Techniques
Always wear safety goggles and gloves before cutting wood. Use a sharp saw to make clean cuts without splinters. Secure the wood firmly with clamps or a workbench. Cut slowly and steadily to keep control. Follow the marked lines carefully for accuracy. Keep fingers away from the blade at all times.
Sanding For Smoothness
Sand all wood pieces to remove rough edges and splinters. Start with medium-grit sandpaper to smooth large surfaces. Finish with fine-grit sandpaper for a soft touch. Sand along the wood grain for best results. Proper sanding helps paint or stain stick better. It also makes the bench safer to touch.
Pre-assembly Checks
Check all cut pieces for correct size and shape. Match each part to your bench plan before assembling. Look for cracks, knots, or defects that could weaken the wood. Ensure all pieces fit well together without gaps. Fix any issues by trimming or sanding again. Double-check measurements for a perfect build.

Assembling The Bench Frame
Building the frame is the key step in making your garden bench strong and steady. This part holds everything together. Focus on careful assembly for a durable bench. Follow simple steps to join parts tightly and neatly.
Joining Legs And Supports
Start by attaching the legs to the side supports. Use screws that fit the wood thickness. Check each leg for even height. Tighten screws firmly to avoid wobbling. A square frame means a stable bench.
Securing Seat Slats
Lay the seat slats evenly across the frame. Space them slightly for water drainage. Screw each slat into the supports below. Use a drill for straight, clean holes. Make sure slats sit flat and steady.
Adding Backrest Components
Fix the backrest supports to the rear legs. Align the backrest slats vertically or slightly angled. Secure each slat with screws at top and bottom. Check the backrest for comfort and strength. Adjust tightness if needed before finishing.
Finishing Touches
Finishing touches make your DIY garden bench look complete and last longer. They protect the wood and add style. Taking time here helps your bench stay beautiful through all seasons.
Applying Paint Or Stain
Choose paint or stain that suits your garden style. Paint offers bright colors and full coverage. Stain shows the wood grain and looks natural. Use a brush or roller for even coating. Apply two coats for best results. Let each coat dry fully before the next.
Protecting Against Elements
Seal your bench with a clear outdoor sealer. It guards against rain, sun, and bugs. Reapply sealer every year or after heavy weather. Cover the bench or move it under shelter in winter. These steps keep the wood strong and fresh.
Decorative Enhancements
Add cushions or pillows for comfort and color. Use weather-resistant fabric to avoid damage. Attach metal or wooden accents for a personal touch. Plant flowers nearby to create a cozy space. Small decorations make your bench inviting and unique.
Maintenance Tips For Longevity
Keeping your DIY garden bench in great shape takes some care. Simple maintenance helps the bench last longer and stay beautiful. Follow these easy tips to protect your bench from damage and wear. A little effort can save money and time over the years.
Regular Cleaning
Clean your bench often to stop dirt buildup. Use a soft brush or cloth to remove dust and debris. Mild soap and water work well for most materials. Avoid harsh chemicals that can damage the finish. Dry the bench completely to prevent moisture problems.
Seasonal Care Routines
Change your care routine with the seasons. In spring, check for any winter damage and fix it fast. Apply a fresh coat of paint or sealant for protection. During summer, keep the bench shaded to avoid sun damage. In fall, clear leaves and dirt to prevent mold. Winter needs extra protection from snow and ice.
Repairing Wear And Tear
Watch for cracks, loose screws, or splinters. Fix small problems early to stop bigger damage. Tighten screws and replace broken parts quickly. Sand rough spots to keep the surface smooth. Use wood filler or epoxy for cracks in wooden benches.
Frequently Asked Questions
What Materials Are Best For A Diy Garden Bench?
Wood like cedar, teak, or redwood is ideal. These woods resist decay and weather well outdoors. Avoid softwoods unless treated. Metal and recycled materials are alternatives but may require more maintenance.
How Long Does It Take To Build A Garden Bench?
Typically, a DIY garden bench takes 3 to 6 hours to build. This varies with design complexity and skill level. Proper planning and preparation can speed up the process significantly.
What Tools Do I Need For A Garden Bench Project?
Basic tools include a saw, drill, screwdriver, measuring tape, and sandpaper. Clamps and a level help ensure accuracy. Power tools speed up work but aren’t mandatory for beginners.
How Do I Protect My Garden Bench From Weather?
Apply a weather-resistant sealant or outdoor paint. Reapply every year or as needed. Cover the bench during harsh weather or move it to a sheltered spot to extend its life.
Conclusion
Building your own garden bench brings joy and pride. It adds charm and comfort to your outdoor space. Simple tools and wood can create a strong, beautiful bench. Each step teaches patience and skill. Enjoy sitting on your handiwork with family and friends.
A DIY garden bench fits your style perfectly. Try it today and see the difference yourself. Small projects like this make your garden special. Keep crafting and making your outdoor area cozy. Your garden bench will last and bring smiles for years.