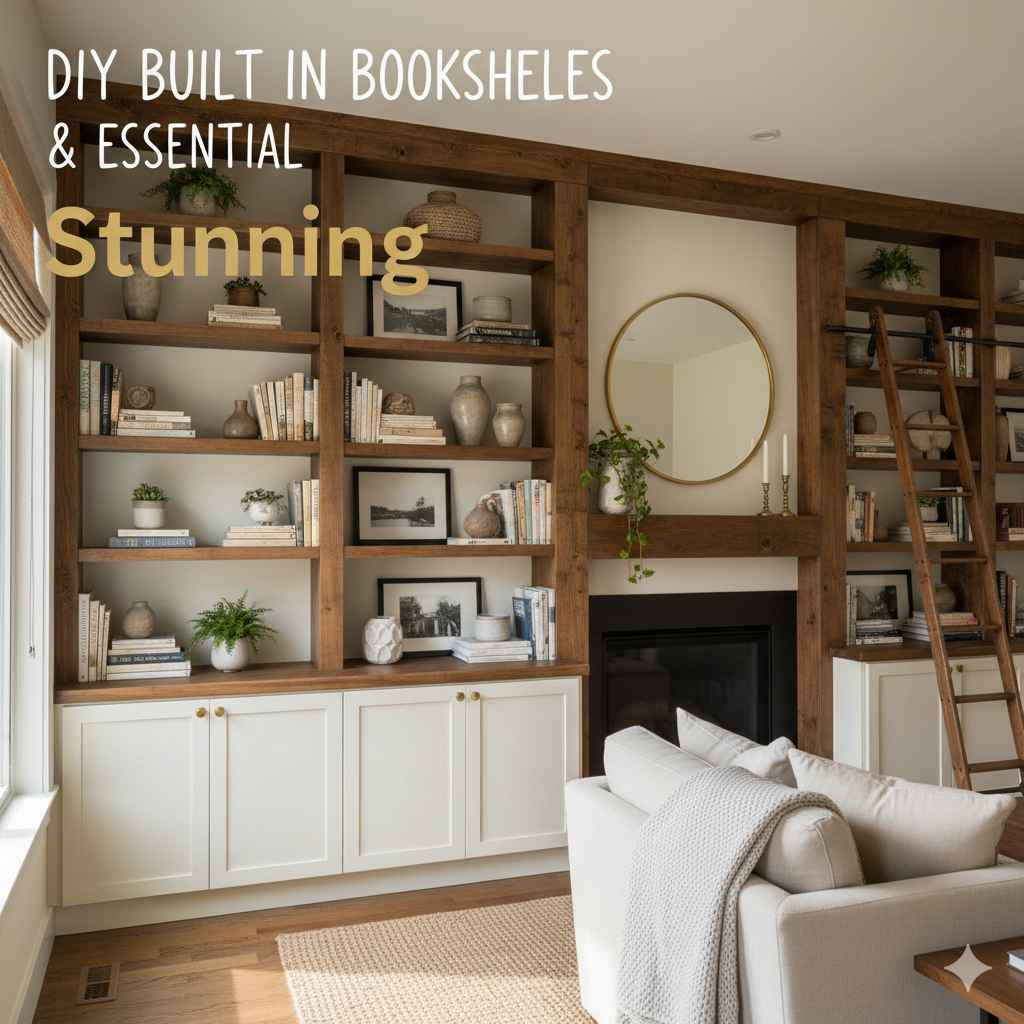
DIY Built In Bookshelves: Essential & Stunning
Transform any room with stunning DIY built-in bookshelves! This guide simplifies the process, offering clear, beginner-friendly steps to add essential storage and timeless style to your home, proving you don’t need to be a master carpenter to create beautiful, functional built-ins.
Is your living room looking a little… plain? Do you have walls that feel empty or a growing book collection with no home? You’re not alone! Many of us dream of those gorgeous, integrated bookshelves that make a room feel complete and cozy. But the thought of building them can seem pretty daunting, right? You might worry about complicated tools, tricky measurements, or ending up with something wobbly. Don’t fret! I’m here to show you that building your own beautiful, sturdy built-in bookshelves is absolutely achievable, even if you’re new to DIY. We’ll break down every step, from picking your design to the final coat of paint. Get ready to add essential storage and a touch of elegance to your home!
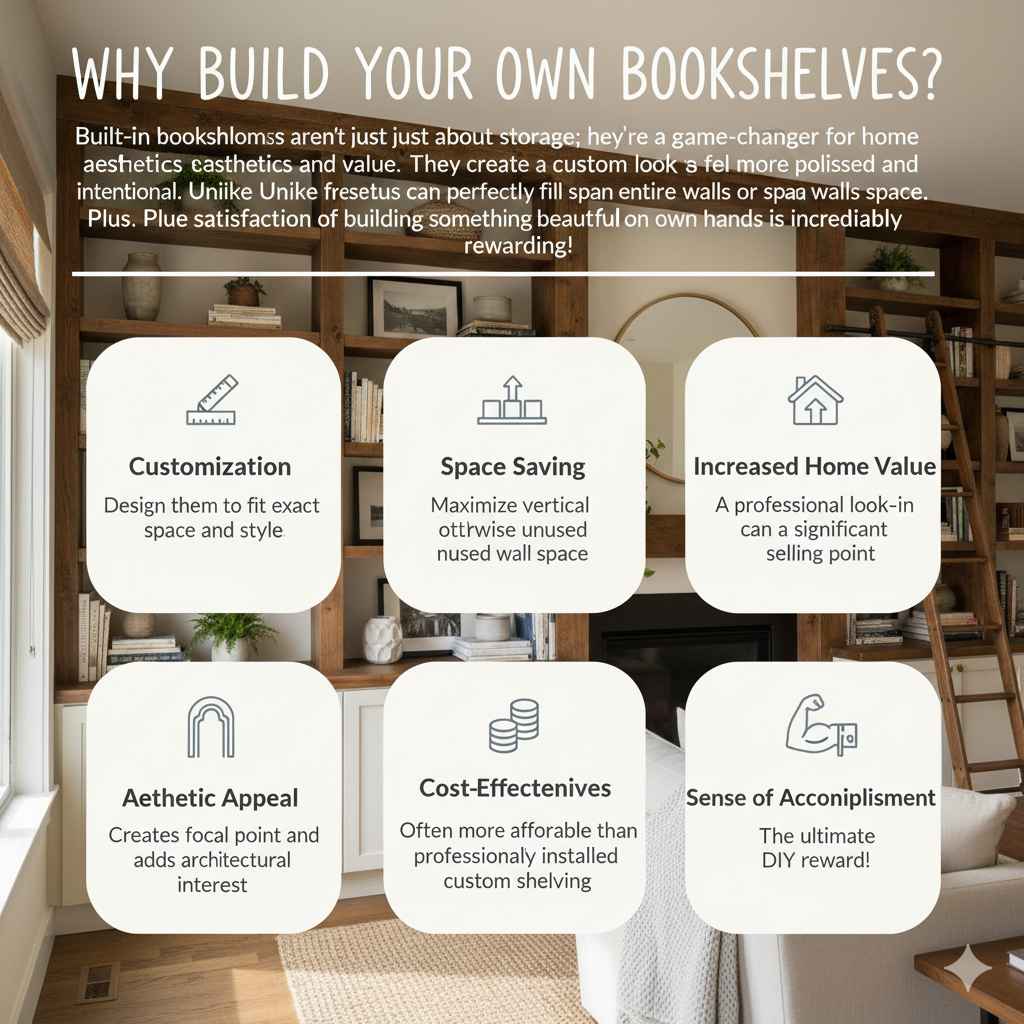
Why Build Your Own Bookshelves?
Built-in bookshelves aren’t just about storage; they’re a game-changer for home aesthetics and value. They create a custom look, making a space feel more polished and intentional. Unlike freestanding units, built-ins can perfectly fill awkward nooks or span entire walls, maximizing your available space. Plus, the satisfaction of building something beautiful with your own hands is incredibly rewarding!
The Benefits at a Glance:
- Customization: Design them to fit your exact space and style.
- Space Saving: Maximize vertical and otherwise unused wall space.
- Increased Home Value: A professional-looking built-in can be a significant selling point.
- Aesthetic Appeal: Creates a focal point and adds architectural interest.
- Cost-Effectiveness: Often more affordable than professionally installed custom shelving.
- Sense of Accomplishment: The ultimate DIY reward!
Planning Your DIY Built-In Bookshelves: The Blueprint for Success
Before we grab any tools, let’s get our thinking caps on! Good planning is the secret sauce to any successful DIY project, especially one like built-in bookshelves. It stops you from making costly mistakes and ensures your finished product looks and works just the way you imagined.
1. Visualize Your Dream Shelves
What’s the overall look you’re going for? Do you want a modern, minimalist design, or something more traditional with decorative molding? Consider:
- Style: Modern, farmhouse, classic, rustic?
- Size: How tall, wide, and deep do you need them to be?
- Shelf Spacing: Will you hold large art books, paperbacks, or display items? Variable spacing is often best.
- Features: Open shelves, or perhaps a cabinet base?
2. Measure Your Space Accurately
This is crucial! Measure the wall area where your shelves will go. Measure the height from the floor to the ceiling, the width of the space, and the depth if you’re building into alcoves. Don’t forget to account for baseboards or any existing trim you want to work around or incorporate. Measure multiple times to be absolutely sure!
3. Choose Your Materials Wisely
For beginners, plywood and MDF are great choices. They are stable, relatively inexpensive, and easy to work with. Hardwoods like pine or oak are also popular, offering more natural beauty but at a higher cost and with a bit more challenge in finishing.
- Plywood: Strong, comes in various grades (e.g., birch for a smoother finish), and is good for shelves and cabinet carcasses. Look for cabinet-grade plywood for the best appearance.
- MDF (Medium-Density Fiberboard): Very smooth, perfect for painting. It’s heavier and can sag over time on long spans if not supported.
- Solid Wood (Pine, Poplar, Oak): Beautiful grain, but can be more expensive and prone to warping if not properly acclimated and finished.
4. Sketch It Out
Grab a notepad and sketch your design. This doesn’t need to be professional art! A simple drawing helps you visualize proportions, decide on cabinet dimensions, and plan the internal shelf layout. You can even use graph paper to get a better sense of scale. This sketch will be your guide when cutting and assembling.
5. Consider Your Tools
You don’t need a professional workshop, but a few key tools will make the job much easier and safer. We’ll go over the essentials later, but think about what you currently have and what you might need to borrow or purchase.
Essential Tools for Your DIY Bookshelf Project
Having the right tools makes all the difference. For a beginner-friendly DIY built-in bookshelf project, here’s a list of what you’ll likely need. Don’t be intimidated; many can be rented or are relatively affordable!
Must-Have Tools:
- Measuring Tape: Accurate measurements are key.
- Pencil: For marking cuts and placement.
- Safety Glasses: Always protect your eyes! Essential for any woodworking.
- Hearing Protection: Especially when using power saws or routers.
- Circular Saw or Miter Saw: For making straight, accurate cuts. A circular saw with a guide can be very effective.
- Jigsaw: Useful for any curved cuts or cutouts, though often not needed for basic built-ins.
- Drill/Driver: For pre-drilling holes and driving screws.
- Level: To ensure your shelves are perfectly straight.
- Stud Finder: To locate wall studs for secure mounting.
- Clamps: For holding pieces together while gluing or screwing.
- Putty Knife: For applying wood filler.
- Sander (Orbital or a simple sanding block): To smooth edges and surfaces.
- Paintbrushes/Rollers: For applying primer and paint.
Helpful, But Not Essential:
- Table Saw: For more precise and repetitive cuts, especially if working with a lot of sheet goods.
- Router: To create decorative edges on shelves or dadoes for shelves to sit in.
- Nail Gun (Brad or Finish): For faster assembly and a cleaner look than screws alone, though screws offer more strength for shelves.
Safety First! Always read the manuals for your tools and follow all safety precautions. If you’re unsure about using a tool, find a tutorial or ask someone experienced. A good resource for tool safety is the U.S. Consumer Product Safety Commission’s guidance on tools.
Building Your Built-In Bookshelves: Step-by-Step
Okay, let’s get building! We’ll cover a common and beginner-friendly approach: building shelf boxes that attach to the wall. This method allows for a built-in look without needing to deconstruct your wall.
Step 1: Prepare Your Materials
Measure and cut all your pieces according to your design sketch. It’s often best to have your lumber or plywood cut at the hardware store if they offer this service, especially for large sheet goods. If you’re cutting yourself, measure twice, cut once!
- Cut the sides, top, and bottom for your shelf boxes.
- Cut the shelves.
- Cut the backing panels (optional, but adds stability and a finished look).
- Cut any face frame pieces if you’re adding them for a more finished edge.
Step 2: Assemble the Shelf Boxes
Work on a flat surface. For each shelf unit, attach the sides to the top and bottom pieces. Use wood glue for extra strength, then secure with screws. Pre-drilling pilot holes will prevent the wood from splitting, especially near edges. If you have a backing panel, attach it now. You can also add shelf supports (like dados or cleats) inside the boxes now if you’re not using adjustable shelving pins.
| Assembly Item | Method | Tip |
|---|---|---|
| Sides to Top/Bottom | Wood glue and screws | Pre-drill pilot holes to avoid splitting. Use clamps to hold pieces square. |
| Backing Panel | Wood glue and small nails or screws | Ensures the box is square and adds rigidity. |
| Shelves | Glue and screws into cleats, or resting on pins/supports. | Ensure shelves are level before securing. |
Step 3: Secure the Shelf Boxes to the Wall
This is where your stud finder is essential. Position the assembled shelf units against the wall. Use a level to make sure they are plumb (perfectly vertical). From the inside of the shelf boxes, drive long screws through the back panel (or the back edges of the sides/top/bottom) directly into the wall studs. Use at least two screws per stud for each shelf unit.
For optimal strength and to prevent sagging, it’s highly recommended to secure the units to studs. You can find resources on locating wall studs from places like This Old House.
Step 4: Add a Face Frame (Optional but Recommended)
To hide the raw edges of the plywood or MDF and give your shelves a more professional, furniture-like appearance, add a face frame. Cut thin strips of wood (e.g., 1x2s or 1x3s) to fit around the front edges of your shelf boxes. Attach them using wood glue and brad nails.
Step 5: Fill, Sand, and Prime
Now, it’s time to make those seams and screw holes disappear! Fill all screw holes and any gaps or imperfections with wood filler or a good quality spackle. Let it dry completely. Once dry, sand everything smooth. Start with a medium-grit sandpaper (like 120-grit) and finish with a finer grit (like 220-grit) for a silky-smooth surface. Wipe away all dust with a damp cloth. Apply a coat of primer. This is vital for ensuring your paint adheres well and achieves an even finish.
Step 6: Paint or Stain
Once the primer is dry, you can paint or stain your bookshelves. If painting, apply two to three thin, even coats, allowing each coat to dry thoroughly according to the paint manufacturer’s instructions. If staining, apply your chosen stain, wipe off the excess, and then seal with a clear coat (polyurethane or polycrylic) for protection.
Step 7: Add Shelves and Finishing Touches
If you used adjustable shelf pins, insert them at your desired heights and place your shelves. If your shelves were permanently fixed during assembly, you’re already done with the structure! Consider adding decorative molding around the top or bottom for extra flair. Secure it with glue and brad nails, then fill, sand, and touch up the paint.
Pros and Cons of DIY Built-In Bookshelves
Like any project, building your own bookshelves has its advantages and disadvantages to consider.
| Pros | Cons |
|---|---|
| Significant cost savings compared to professional installation. | Requires time, effort, and learning new skills. |
| Complete customization of size, style, and layout. | Potential for errors if measurements or construction aren’t precise. |
| Boosts home’s aesthetic appeal and potentially its value. | Requires purchasing or renting tools, which can add to the initial cost. |
| Deep satisfaction and pride in a DIY accomplishment. | Finishing (sanding, painting, staining) can be labor-intensive and require patience. |
| Perfect for utilizing awkward spaces or creating focal points. | The process may take longer than anticipated, especially for a first-timer. |
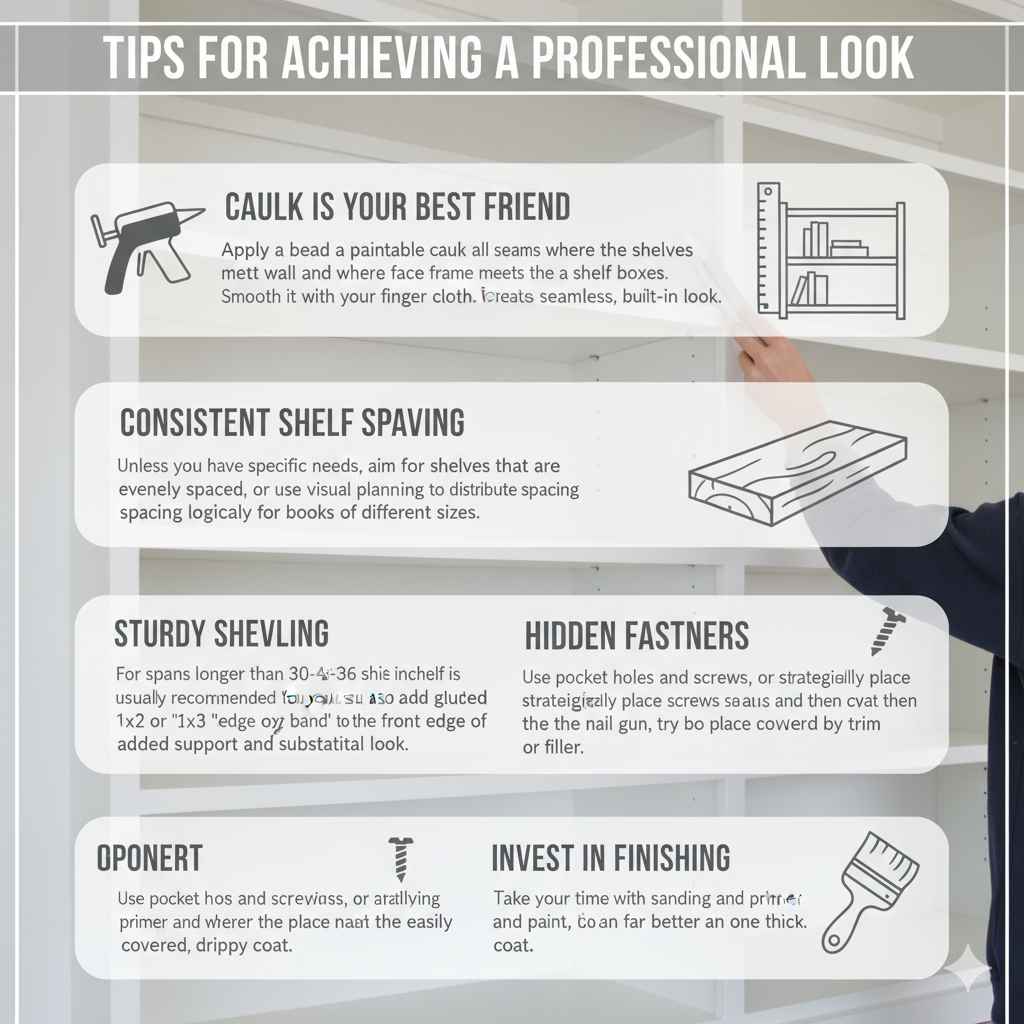
Tips for Achieving a Professional Look
Want your DIY built-ins to wow? Here are a few tricks:
- Caulk is Your Best Friend: Apply a bead of paintable caulk along all seams where the shelves meet the wall and where the face frame meets the shelf boxes. Smooth it with your finger or a damp cloth. Once painted, it creates a seamless, built-in look.
- Consistent Shelf Spacing: Unless you have specific needs, aim for shelves that are evenly spaced, or use visual planning to distribute spacing logically for books of different sizes.
- Sturdy Shelving: For spans longer than 30-36 inches, a 3/4-inch thick shelf is usually recommended to prevent sagging. You can also add a glued and screwed 1×2 or 1×3 “cleat” or “edge band” to the front edge of the shelf for added support and a thicker, more substantial look.
- Hidden Fasteners: Use pocket holes and screws for assembling boxes, or strategically place screws and then cover them with wood filler. If using a nail gun, try to place nails where they can be easily covered by trim or filler.
- Invest in Finishing: Take your time with sanding and applying primer and paint. Thin, even coats are far better than one thick, drippy coat.
Frequently Asked Questions (FAQ)
Q1: How thick should my DIY bookshelf shelves be?
For most standard bookshelves, 3/4-inch thick material (like plywood or MDF) is sufficient. For spans longer than about 30-36 inches, consider using thicker material or adding a front edge band (like a 1×2 piece of wood) to prevent sagging.
Q2: What’s the easiest way to attach built-in bookshelves to the wall?
The most secure method is to drive long screws (at least 2.5 inches) through the back of your shelf structure directly into the wall studs. Use a stud finder to locate them accurately and ensure you have at least two screws per stud for each unit.
Q3: Can I build DIY built-in bookshelves without a lot of power tools?
While power tools make the job faster and easier, you can certainly build them with care using a high-quality handsaw for cuts, a hand drill for holes, and a screwdriver. It will take more time and effort, but it’s achievable!