DIY Backdrop Stand Wood: Genius Essential Build
Absolutely! This DIY wood backdrop stand is a smart, budget-friendly build for photographers, event planners, or anyone needing a custom backdrop. It’s straightforward to make, incredibly sturdy, and costs far less than store-bought options.
Creating a stable and attractive backdrop is essential for so many projects, whether you’re capturing precious memories, setting up for a party, or filming a video. But, those store-bought stands can be pricey, and sometimes, they just aren’t quite right for what you need. If you’ve ever found yourself frustrated by wobbly frames or limited size options, you’re in the right place! Building your own wood backdrop stand is a fantastic solution. It’s more affordable, can be customized to your exact dimensions, and you’ll gain the satisfaction of crafting something truly useful with your own two hands. This guide will walk you through building a genius, essential wood backdrop stand, step by easy step. Get ready to create a durable, professional-looking backdrop that’s perfect for any occasion!
Why Build Your Own Wood Backdrop Stand?
When you’re hunting for the perfect backdrop for a special event, a photo shoot, or even just to add some flair to your home studio, the cost of pre-made stands can add up quickly. Not only that, but they often come with limitations. You might need a specific size, or perhaps a certain level of sturdiness to hold heavier fabrics or decorations. This is where the DIY approach shines!
Building your own provides unparalleled flexibility. You can tailor the dimensions precisely to your needs, ensuring it fits perfectly in your available space or accommodates your desired backdrop size. Furthermore, a well-built wooden stand is often far more robust and durable than its metal or plastic counterparts. Imagine having a reliable, custom-built stand that you made yourself for a fraction of the cost of buying one. It’s a rewarding project that equips you with a versatile tool for countless future uses.
Understanding the Design: Simple, Sturdy, and Smart
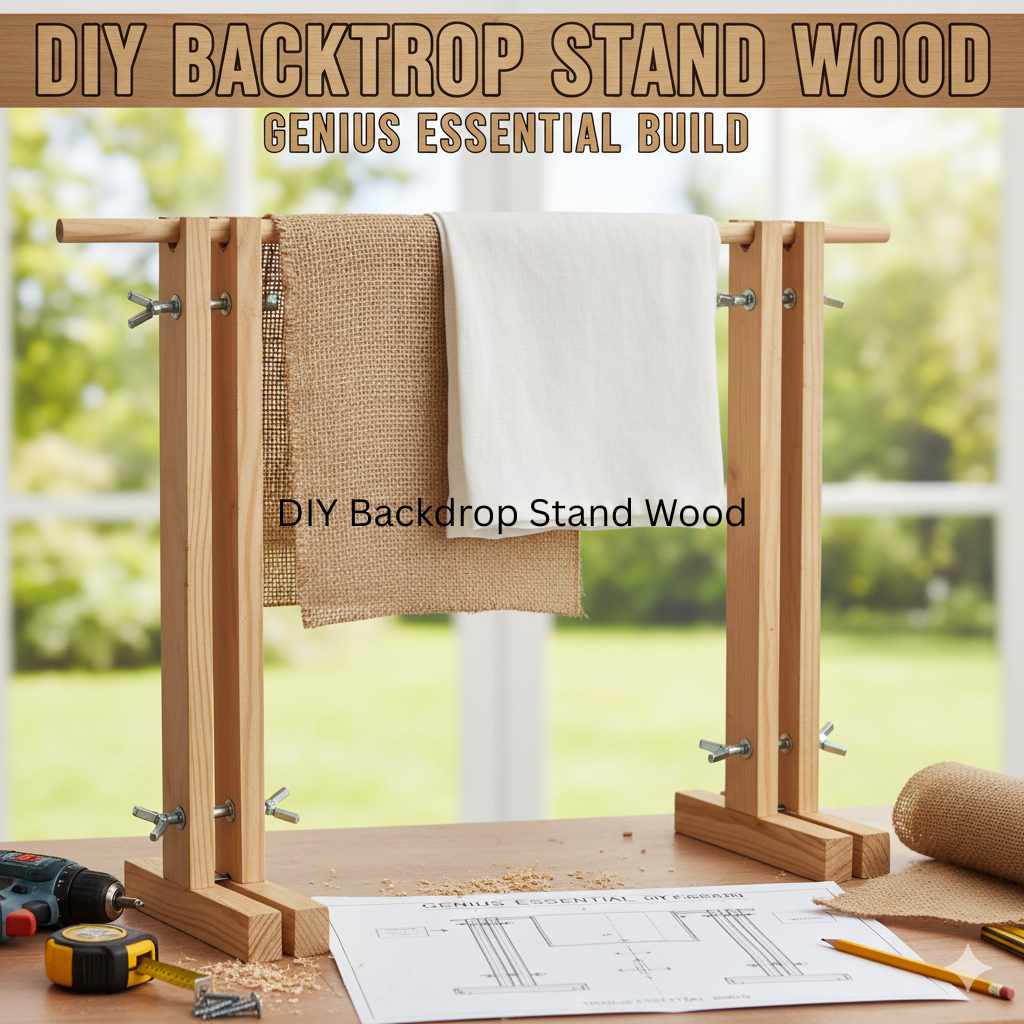
The beauty of this DIY backdrop stand lies in its simplicity. We’re aiming for a design that’s easy for beginners to assemble, incredibly stable, and requires only basic woodworking tools. The core idea is a frame with two sturdy vertical supports and a horizontal crossbar. To ensure stability, we’ll incorporate wide bases for each vertical support, creating an ‘H’ or ‘X’ shape when viewed from the top down. This wider footprint prevents tipping, which is crucial when you’re hanging anything from the crossbar.
We’ll use standard lumber sizes that are readily available at any home improvement store and are easy to cut and manage. The joints will be simple and strong, relying on screws for secure connections. This design isn’t just functional; it’s also aesthetically pleasing enough to be a permanent fixture in a studio space if needed. By the end of this guide, you’ll have a custom backdrop stand that rivals professional options in quality and stability, all thanks to a smart, beginner-friendly build.
Tools and Materials You’ll Need: Your Essential Toolkit
Don’t let a long list of tools intimidate you! For this project, we’re sticking to the essentials that most DIYers already have or can easily acquire. Safety is always the top priority, so make sure you have safety glasses and gloves before you start.
Essential Tools:
- Measuring Tape: For accurate measurements.
- Pencil: To mark your cutting lines.
- Saw: A handsaw is perfectly fine, but a circular saw or miter saw will make cutting faster and more precise. For beginners, a handsaw with a miter box can be a great, safe option.
- Drill/Driver: For pre-drilling holes and driving screws. Cordless drills are very handy.
- Drill Bits: A set including a bit slightly smaller than your screws for pilot holes.
- Screwdriver Bits: Matching the type of screws you use (usually Phillips head).
- Sandpaper: Medium-grit (e.g., 120) and fine-grit (e.g., 220) for smoothing edges. A sanding block or orbital sander makes this quicker.
- Clamps: A couple of C-clamps or bar clamps can be very helpful for holding pieces together while you assemble.
- Carpenter’s Square: To ensure your joints are at perfect 90-degree angles.
Materials List:
We’ll use common, sturdy lumber. Pine is a cost-effective and readily available choice for this project.
- 4×4 Lumber: Two pieces, each 6 feet long (for the vertical uprights).
- 2×4 Lumber:
- Two pieces, each 3 feet long (for the base stabilizers).
- Two pieces, each 4 feet long (for the base feet).
- Two pieces, each 4 feet long (for the horizontal crossbars – you can customize height here by adjusting your vertical supports).
- Wood Screws: Exterior-grade screws are best for durability.
- 2.5-inch screws (for joining 2×4 pieces to 4x4s and for base connections).
- 3-inch screws (optional, for extra-strong base connections).
- Wood Glue (Optional but Recommended): Adds extra strength to joints.
- Wood Finish (Optional): Paint, stain, or sealant to protect the wood and enhance its appearance.
Tip: When buying lumber, try to select pieces that are as straight as possible without large knots. This will make assembly easier and the final stand more stable. Many lumber yards will cut your wood to size for a small fee, which can be a great time-saver if you’re new to using saws.
Step-by-Step: Building Your DIY Wood Backdrop Stand
Let’s get building! This process is broken down into simple, manageable steps. Remember to measure twice and cut once!
Step 1: Cut Your Lumber
If you haven’t had your lumber cut already, this is where you’ll do it. Ensure all your cuts are as square as possible. You’ll need:
- 2 pieces of 4×4 lumber, 6 feet long (Vertical Uprights)
- 4 pieces of 2×4 lumber, 3 feet long (Base Stabilizers)
- 4 pieces of 2×4 lumber, 4 feet long (Base Feet)
- 2 pieces of 2×4 lumber, 4 feet long (Horizontal Crossbars)
Step 2: Assemble the Bases
Each of your 6-foot 4×4 uprights will attach to a stable base. We’re creating an ‘H’ shape with the 2x4s for a wide, sturdy foundation.
- Take two of the 3-foot 2×4 pieces (Base Stabilizers) and lay them parallel on your work surface, about 6 inches apart.
- Take two of the 4-foot 2×4 pieces (Base Feet) and place them on top of the stabilizers, perpendicular to them, so they form a cross shape. The two longer 4-foot pieces will extend past the ends of the 3-foot pieces, creating a wider footprint. Think of it like building a plus sign or an ‘H’ if you drew a line down the middle.
- Apply wood glue to the edges where the pieces meet, if using.
- Secure the pieces together by driving 2.5-inch or 3-inch screws through the 4-foot pieces and into the ends of the 3-foot pieces. Use at least two screws per joint.
- Repeat this process to build the second base.
Pro Tip: For extra stability, ensure the ends of the 4-foot 2x4s are perfectly flush with the ends of the 3-foot 2x4s where they meet.
Step 3: Attach the Vertical Uprights to the Bases
Now we’ll connect the tall 4×4 uprights to the bases you just made.
- Stand one of the 6-foot 4×4 pieces upright, centering it on top of one of your assembled bases. The 4×4 should stand vertically in the middle of the ‘H’ shape.
- Ensure the 4×4 is positioned so its two wider sides face the longer 4-foot ‘feet’ of the base. This will give you the best surface area for attaching screws.
- Apply wood glue to the bottom of the 4×4 where it meets the base, if using.
- From the underside of the base, drive two 3-inch screws up through the 4-foot base feet (one screw on each side) and into the bottom of the 4×4 upright. This is where clamps can be helpful to hold the 4×4 steady while you work.
- Pre-drilling pilot holes will prevent the wood from splitting and make driving screws easier.
- Repeat this entire process to attach the second 6-foot 4×4 upright to the other base.
You should now have two upright posts, each sitting on a wide, stable base.
Step 4: Install the Horizontal Crossbars
This is the part where your backdrop will actually hang. We’ll attach the two 4-foot 2×4 crossbars to the vertical uprights.
- Decide on the height for your crossbars. A common height is around 6 feet from the ground, but you can adjust this. Mark this height on both 4×4 uprights.
- Take one of the 4-foot 2×4 crossbars and position it horizontally at your marked height, flush against the front of one of the 4×4 uprights. Use your carpenter’s square to ensure it’s perfectly level (at a 90-degree angle to the upright).
- Apply wood glue to the end of the 2×4 where it meets the 4×4, if using.
- Pre-drill pilot holes through the 2×4 crossbar and into the 4×4 upright.
- Drive at least two 2.5-inch wood screws through the 2×4 and into the 4×4.
- Repeat steps 2-4 to attach the same crossbar to the other 4×4 upright. Again, use your square to ensure it’s level and at the same height on both posts.
- Now, take the second 4-foot 2×4 crossbar and attach it to the uprights at your chosen height, mirroring the first crossbar. This second crossbar will be placed behind the first one. This creates a stronger, more robust hanging surface and allows you to potentially attach multiple backdrops or clips between the two bars.
By placing two crossbars one behind the other, you significantly increase the stand’s rigidity and provide two points of contact for hanging your backdrops.
Step 5: Add Stability Braces (Optional but Recommended)
For maximum stability, especially if you plan to hang heavier items or use the stand in a windy outdoor setting, adding diagonal braces is a smart move. This is similar to how professional photographers’ light stands have bracing.
- Cut two pieces of 2×4 lumber at a 45-degree angle on each end. The length will depend on where you want to add them, but a piece around 18-24 inches long, with the long points of the 45 cuts, usually works well.
- Attach one end of these braces diagonally from the top of a 4×4 upright down to the base. The other end will attach to the horizontal crossbar.
- Use wood glue and 2.5-inch screws. Pre-drill pilot holes.
- Repeat for the other side. These braces add significant rigidity and prevent any wobble.
Step 6: Sand and Finish
This is where your project starts to look polished!
- Using medium-grit sandpaper, go over all the cut edges and surfaces to remove any splinters and rough spots.
- Follow up with fine-grit sandpaper for a smooth finish. Pay special attention to areas where fabric might snag.
- Wipe down the entire stand with a damp cloth to remove sawdust.
- If you wish, apply your chosen finish:
- Paint: For a clean, modern look, or to match a specific color scheme.
- Stain: To bring out the natural beauty of the wood grain.
- Sealant/Polyurethane: For protection against moisture and wear, especially if it will be used outdoors.
Allow the finish to dry completely according to the product’s instructions before use.
Customization and Enhancement Ideas
This basic design is incredibly adaptable. Here are a few ideas to make your DIY backdrop stand even better:
- Adjustable Height: Instead of fixed crossbars, consider using a PVC pipe or a thicker wooden dowel that slides into holes drilled in the 4×4 uprights. You can then use pins or clamps to set the height. This is a bit more advanced but offers great flexibility.
- Wheels for Mobility: Add heavy-duty castor wheels to the base. Make sure they are rated to support the weight of the stand and anything you’ll hang from it. This is a game-changer for studio use.
- Double Crossbar System: Mount the crossbars in a way that allows them to slide horizontally along the uprights to change the width of your backdrop area.
- Built-in Hooks or Eyelets: Screw in small hooks or eyelets along the top crossbars to easily attach fabric clips or bungee cords for hanging your backdrops. Organizations like NASA offer guidance on structural integrity for even simple builds.
- Reinforce the Base: For extremely heavy-duty use, you could use thicker lumber for the bases (e.g., 2x6s) or add an extra layer of plywood to the top of the base for even more support.
Comparing Your DIY Stand to Alternatives
Let’s look at how your new homemade stand stacks up:
| Feature | DIY Wood Stand | Store-Bought Metal Stand | Store-Bought Fabric Frame |
|---|---|---|---|
| Cost | Low ($50-$100 for materials) | Moderate to High ($100-$300+) | Moderate to High ($80-$250+) |
| Durability | High (can be made very robust) | Moderate (can bend/break under stress) | Moderate (fabric can tear, frame can bend) |
| Customization | Excellent (size, height, features) | Limited (fixed sizes, some adjustable height) | Limited (fixed sizes) |
| Assembly Complexity | Beginner friendly | Easy to Moderate (snap-together types are very easy) | Easy to Moderate (can be fiddly) |
| Portability | Moderate (can be heavy, but manageable) | High (often collapsible, lightweight) | High (collapsible, lightweight) |
| Weight Capacity | High (depending on construction) | Moderate (check product specs) | Low to Moderate (depends on frame strength) |
As you can see, the DIY wood stand offers a fantastic balance of cost-effectiveness, durability, and customization. While store-bought options offer portability, they often sacrifice sturdiness and affordability. For a permanent or semi-permanent setup, or for someone who values the ability to build exactly what they need, the DIY route is a clear winner.
Frequently Asked Questions (FAQ)
Q1: How wide should my backdrop stand be?
For most common uses, a width of 6 to 8 feet is ideal. My design uses 4-foot crossbars, giving you an 8-foot span (or slightly less if you account for the width of the 4x4s). You can easily adjust the length of the 2×4 crossbars and base feet to change the width.
Q2: What kind of wood is best for this project?
Pine is an excellent choice because it’s affordable, widely available, and easy to work with. For extra durability, you could use a harder wood like oak or poplar, but it will be more expensive and heavier. Cedar is also a good, weather-resistant option if you plan to use it outdoors.


