Can You Cut Tile With A Skill Saw? Essential Guide
Yes, you can cut tile with a skill saw, but it requires the right blade and careful technique to avoid chipping and ensure safety. A diamond blade designed for tile is essential, and understanding the process will help you achieve clean cuts for your DIY projects.
Hello DIY enthusiasts! Md Meraj here. Ever looked at a beautiful tile project and wondered if your trusty skill saw could handle it? It’s a common thought, especially when you’re trying to make a straight cut on a tricky piece of tile for a backsplash or a floor. You might have a skill saw lying around and think, “Why buy a specialized tool if I can make do?” That’s a smart question! Today, we’re going to dive into exactly that: can you actually cut tile with a skill saw? The answer is a resounding yes, but with some important caveats. We’ll walk through everything you need to know, from the essential tools to the safest techniques. Get ready to feel confident in tackling those tile cuts yourself. Let’s get our hands a little dusty!
Cutting Tile with a Skill Saw: The Beginner’s Toolkit
Before we even think about making a cut, let’s make sure you have the right gear. Using a standard wood-cutting blade on tile is a recipe for disaster – for both your tile and your saw. That’s why the right blade is your most important friend here. Think of it as the key that unlocks your skill saw’s hidden talent for tile work.
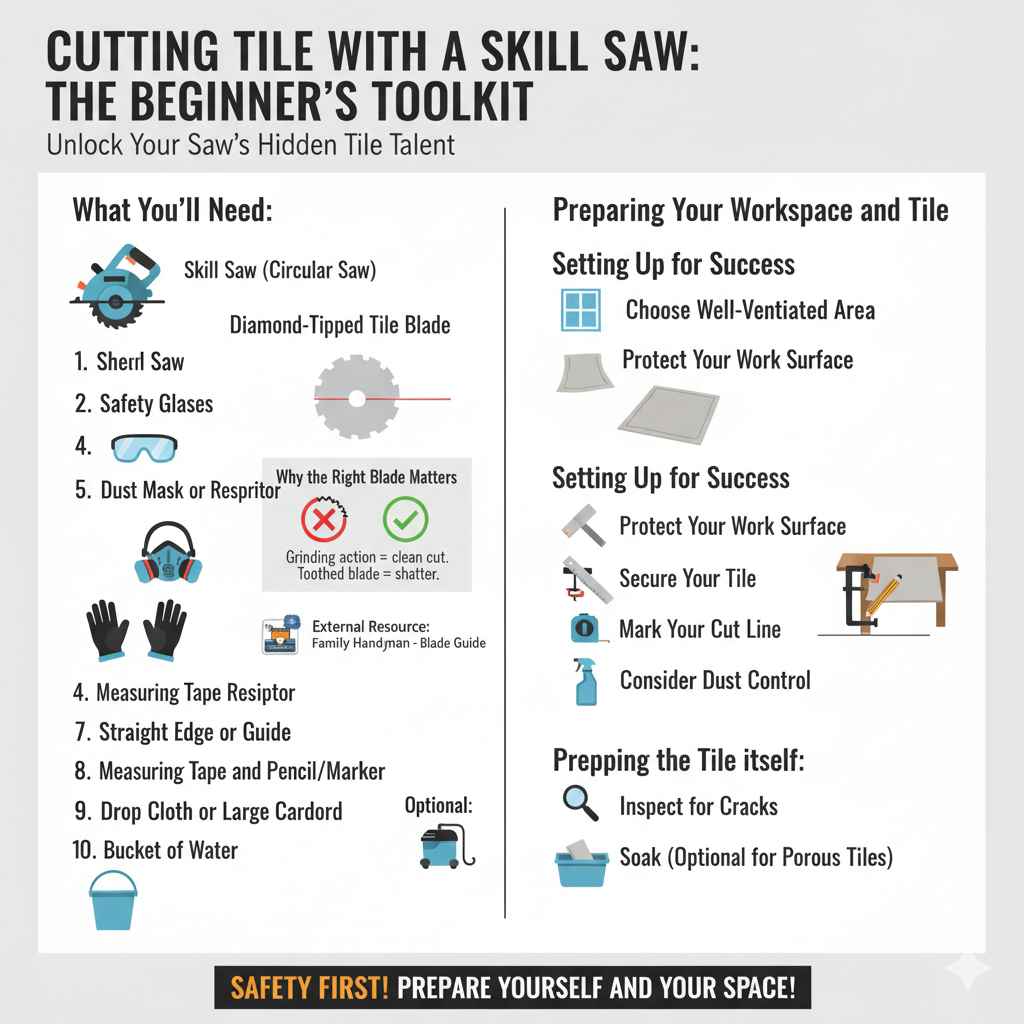
What You’ll Need:
- Skill Saw (Circular Saw): Any standard circular saw will do, but a smaller, lighter one might be easier to maneuver for delicate cuts.
- Diamond-Tipped Tile Blade: This is non-negotiable. These blades have diamond particles embedded in the cutting edge, specifically designed to grind through hard materials like ceramic and porcelain tile without shattering them. Look for a blade with a continuous rim or a segmented rim – continuous rims are generally better for smoother cuts, while segmented rims can help keep the blade cooler. For a comprehensive guide on different blade types, check out this resource from Family Handyman.
- Safety Glasses: Always. Tile dust and debris are no joke for your eyes.
- Dust Mask or Respirator: Cutting tile creates very fine dust. Protect your lungs! The Occupational Safety and Health Administration (OSHA) has guidelines on permissible exposure limits to silica dust, which is present in tile and grout.
- Work Gloves: For better grip and protection from sharp edges.
- Hearing Protection: Skill saws can be loud with any material.
- Measuring Tape and Pencil/Marker: For accurate layout.
- Straight Edge or Guide: Clamped to your tile for a perfectly straight cut. A speed square or a metal ruler works well.
- Drop Cloth or Large Cardboard: To catch dust and debris.
- Bucket of Water: To cool the blade and keep dust down.
- Optional: Wet/Dry Vacuum: To help manage dust at the source.
Why the Right Blade Matters
A standard skill saw blade has teeth designed to cut wood by chipping away material. Tile, on the other hand, is brittle. Trying to chip away at it with a toothed blade will cause it to crack and shatter. A diamond blade works differently; it grinds away the material. This grinding action is gentler and more controlled, allowing for a much cleaner cut. Think of it like using sandpaper versus a chisel on delicate material.
Preparing Your Workspace and Tile
Safety first, always! Before you even plug in your skill saw, setting up your workspace correctly is crucial. A little preparation goes a long way in making the job smoother and, most importantly, safer.
Setting Up for Success:
- Choose a Well-Ventilated Area: Ideally, work outdoors or in a garage with the door open. The dust from cutting tile can be a significant health hazard, and good ventilation helps disperse it.
- Protect Your Work Surface: Lay down a drop cloth, heavy cardboard, or plywood to protect your floor or workbench from scratches and dust.
- Secure Your Tile: This is critical for accuracy and safety. You don’t want the tile shifting while you’re cutting. Place the tile on a stable, flat surface. Use clamps to secure the tile to your workbench or sawhorses. Ensure the cut line is accessible and doesn’t overhang support.
- Mark Your Cut Line: Use a measuring tape and a sharp pencil or marker to carefully mark the exact line you need to cut. Double-check your measurements! For more complex shapes or curves, you might use specialized tile scribes.
- Consider Dust Control: Wetting the tile slightly along the cut line can help reduce dust. Some people have success attaching a vacuum hose near the blade’s dust port, but be aware that this may not be fully effective and the dust can still be substantial.
Prepping the Tile Itself:
- Inspect for Cracks: Before cutting, always check your tiles for any existing chips or cracks. A tile that’s already compromised is more likely to break during the cutting process.
- Soak (Optional, but Recommended for Some Tiles): For very porous tiles or if you have significant dust concerns, a brief soak in water can help. However, for most ceramic and porcelain tiles, and especially the type of cuts you’ll be making with a skill saw, this isn’t strictly necessary and can make the tile heavier and slipperier to handle.
The Step-by-Step Process: Cutting Tile with a Skill Saw
Now for the main event! With your setup complete and your diamond blade attached, it’s time to make that cut. Take your time, and remember that precision and safety are key. We’re aiming for clean lines, not speed records.
Making the Cut:
- Install the Diamond Blade: Ensure the blade is installed correctly and securely on your skill saw, following your saw manufacturer’s instructions. Make sure it’s oriented for correct rotation.
- Position Your Guide: If you’re making a straight cut, clamp your metal ruler or straight edge firmly to the tile, ensuring it lines up perfectly with your cut line. This guide will help you keep the saw steady.
- Set the Blade Depth: Adjust your skill saw so the diamond blade extends just slightly below the surface of the tile – about 1/8 to 1/4 inch. Too deep, and you’ll be cutting through your work surface; too shallow, and you won’t make a clean cut.
- Start the Saw: With the saw unplugged or the battery removed, place the blade just ahead of your cut line. Ensure the saw’s base plate (or shoe) is flat on the tile. Now, plug it in or insert the battery.
- Begin the Cut: Give the saw a moment to reach full speed. Then, begin to slowly and steadily guide the saw along your marked line, keeping it firmly against your straight edge if you’re using one. Let the blade do the work; don’t force the saw.
- Cooling the Blade: Periodically (every few minutes or so), lift the saw away from the tile and dip the blade into your bucket of lightly damp sand or water (or just spray it with water). This cools the blade and helps wash away some of the dust. A dry, hot blade can chip the tile and wear out faster.
- Completing the Cut: Continue guiding the saw until you’ve completed the cut. Allow the blade to stop spinning entirely before lifting the saw from the tile.
- Clean Up: Once the cut is made, turn off the saw and unplug it or remove the battery. Carefully remove the cut tile. Clean up any dust and debris.
Tips for Cleaner Cuts:
- Score First (Optional for some tiles): Some DIYers like to lightly score the tile surface along the cut line with a utility knife or a specialized scoring tool before making the saw cut. This can help create a guide for the blade and reduce chipping.
- Use a Denser Tile: Denser, harder tiles like porcelain are generally easier to cut with a skill saw than softer, more porous ceramic tiles, as they tend to chip less.
- Go Slow and Steady: Rushing the cut is the surest way to cause chipping and break the tile. A slow, consistent speed is best.
- Back Cut (for Finished Edges): If the cut edge will be visible, you might want to make a second, shallow pass with the blade along the cut line after the main cut is complete. This “back cut” can help remove any remaining jagged edges.
Table: Skill Saw vs. Tile Saw vs. Wet Saw
While we’re focusing on using a skill saw, it’s helpful to understand how it compares to other tile-cutting tools. Each has its pros and cons, and the best tool often depends on the type of tile, the complexity of the cut, and your budget.
| Tool | Best For | Pros | Cons | Skill Level |
|---|---|---|---|---|
| Skill Saw with Diamond Blade | Straight cuts, quick corrections, on-the-fly cuts. | Versatile (tool has other uses), can be affordable if you already own a skill saw, good for thicker tiles. | Can create a lot of dust (if not wet), prone to chipping if not careful, requires a steady hand and a guide for straight cuts. | Beginner to Intermediate |
| Wet Saw | Precise cuts, intricate patterns (like curves), high volume of cuts, minimal dust. | Very clean cuts, virtually dust-free (uses water), excellent for intricate designs, consistent results. | More expensive, requires water and cleanup, can be heavy, limited portability for some models. | Beginner to Advanced |
| Tile Saw (Dry Cut) | Straight cuts, faster than manual methods, less dust than a skill saw. | Relatively portable, can be quieter than a skill saw, good for straight cuts. | Can still generate dust, not ideal for intricate cuts, may chip tiles more than a wet saw. | Beginner to Intermediate |
When to Consider Alternatives
While using a skill saw for tile is definitely possible and often practical, there are times when a different tool might be a better choice. Understanding these situations can save you frustration and ensure the best outcome for your project.
When a Skill Saw Might Not Be Ideal:
- For Very Delicate or Expensive Tiles: If you’re working with intricate mosaic tiles, glass tiles, or very expensive natural stone, the risk of chipping or breakage with a skill saw might be too high. These materials often benefit from the precision of a wet saw.
- For Curved Cuts or Intricate Shapes: A skill saw is designed for straight lines. While you can make rough approximations of curves, achieving a clean, smooth curve is extremely difficult and often impossible. For these, a wet saw with a specialized blade or even a tile nipper for small adjustments is a better option.
- When Dust is a Major Concern: If you’re working in a small, enclosed space with no ventilation, or if you have respiratory issues, the dust generated by a dry skill saw can be a significant problem. A wet saw is far superior for dust control.
- For High-Volume Projects: If you have hundreds of tiles to cut, especially for a large floor, the time and effort it takes to meticulously cut each one with a skill saw can become overwhelming. A dedicated tile saw, particularly a wet saw, will be much more efficient.
- For Perfectly Finished Edges: While you can get decent straight cuts with a skill saw, achieving the ultra-smooth, factory-like edge that some projects require might be better accomplished with a wet saw.
Exploring Other Options:
- Wet Saw (Tile Saw): These are the gold standard for clean, precise tile cuts, especially for intricate designs and materials like porcelain or stone. They use water to lubricate the blade and keep dust down. You can rent them if you only need one for a specific project. Companies like DeWalt and other manufacturers offer various models.
- Manual Tile Cutter: For straight cuts on ceramic tiles, a manual cutter is a simple, affordable option. You score the tile and then snap it. It’s dust-free but limited to straight lines and certain types of tile.
- Angle Grinder with Diamond Blade: Similar to a skill saw, an angle grinder can cut tile, but it’s more difficult to control for straight lines. It’s often used for making small adjustments or rough cuts.
Safety First: A Deeper Dive
I cannot stress this enough: safety is paramount when working with power tools, especially when cutting materials they weren’t primarily designed for. Those safety glasses aren’t optional, and neither is a dust mask. Let’s reinforce the key safety measures.
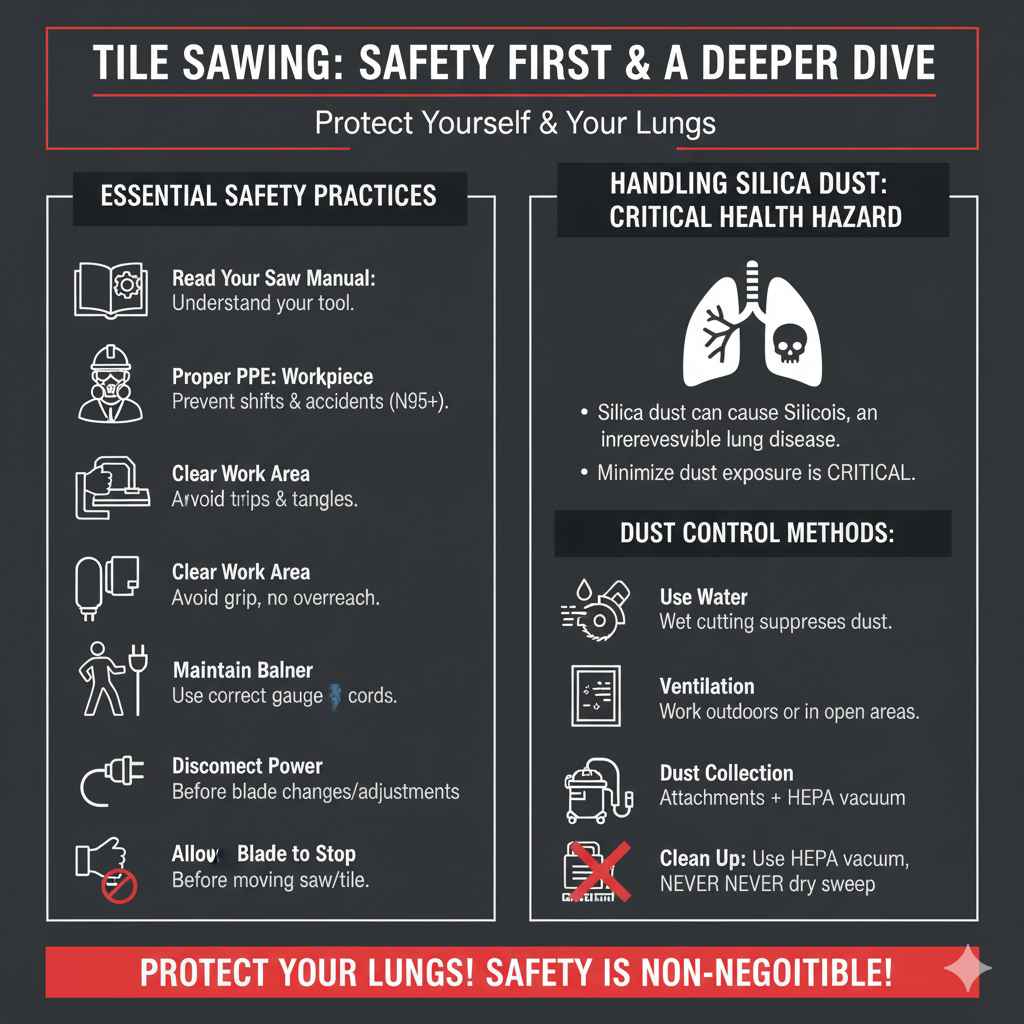
Essential Safety Practices:
- Read Your Skill Saw Manual: Familiarize yourself with your specific tool’s features, safety warnings, and maintenance.
- Proper Personal Protective Equipment (PPE):
- Eye Protection: Always wear safety glasses that meet ANSI Z87.1 standards. A full face shield over your safety glasses offers even better protection from flying debris.
- Hearing Protection: Use earplugs or earmuffs to protect your hearing from the noise generated by the saw.
- Respiratory Protection: A dust mask (N95 or higher) or a respirator is crucial to avoid inhaling fine tile dust, which can cause serious lung issues over time.
- Gloves: Work gloves provide a better grip on the tool and protect your hands from sharp tile edges.
- Secure Your Workpiece: Ensure the tile is firmly clamped. A loose tile can shift during the cut, leading to a bad cut, a broken tile, or worse, an accident.
- Keep the Work Area Clear: Remove any clutter, tools, or materials that could impede your movement or get tangled in the saw.
- Use a Grounded Power Source: Ensure your skill saw is properly grounded. If using an extension cord, make sure it’s the correct gauge for the saw’s power needs and in good condition.
- Maintain Good Balance: Stand in a stable position. Don’t overreach. Keep your hands away from the blade path.
- Disconnect Power When Changing Blades or Adjusting: Always unplug your skill saw or remove the battery before changing the blade or making any adjustments to the saw’s depth or guards.
- Allow Blades to Stop: Never try to move the saw or the tile until the blade has come to a complete stop.
- Be Aware of Kickback: While less common with tile than with wood, kickback can still occur. Maintain a firm grip and keep the saw’s safety features engaged.
Handling Tile Dust
Silica dust generated from cutting tile is a serious health concern. According to the National Institute for Occupational Safety and Health (NIOSH), excessive exposure to silica dust can lead to silicosis, a serious and irreversible lung disease. Minimizing dust is critical:
- Use Water: Wetting the tile and the blade intermittently during the cut is the most effective way to suppress dust.
- Ventilation: Work in an open, well-ventilated area.
- Dust Collection Attachments: Some skill saws can be fitted with dust shrouds that connect to a shop vacuum.
- Clean Up Promptly: Use a HEPA-filtered vacuum for cleanup and avoid dry sweeping, which can stir up settled dust.
FAQ: Your Skill Saw & Tile Cutting Questions Answered
It’s natural to have questions when trying a new technique. Here are some common ones beginner DIYers ask about cutting tile with a skill saw.
Q1: Can I use my skill saw for ceramic tile, porcelain tile, and natural stone?
A: Yes, a skill saw with a diamond blade can cut ceramic and porcelain tiles. For natural stone, it’s more challenging and depends on the density of the stone. Always use a diamond blade specifically rated for the material you are cutting.
Q2: How do I avoid chipping the tile when using a skill saw?
A: To minimize chipping, use a diamond blade with a continuous rim for a smoother cut, go slowly, let the blade do the work without forcing it, keep the blade slightly wet, and try to make your cut on the underside of the tile if it won’t be visible.