Can You Cut Pavers With a Tile Saw? Essential Guide
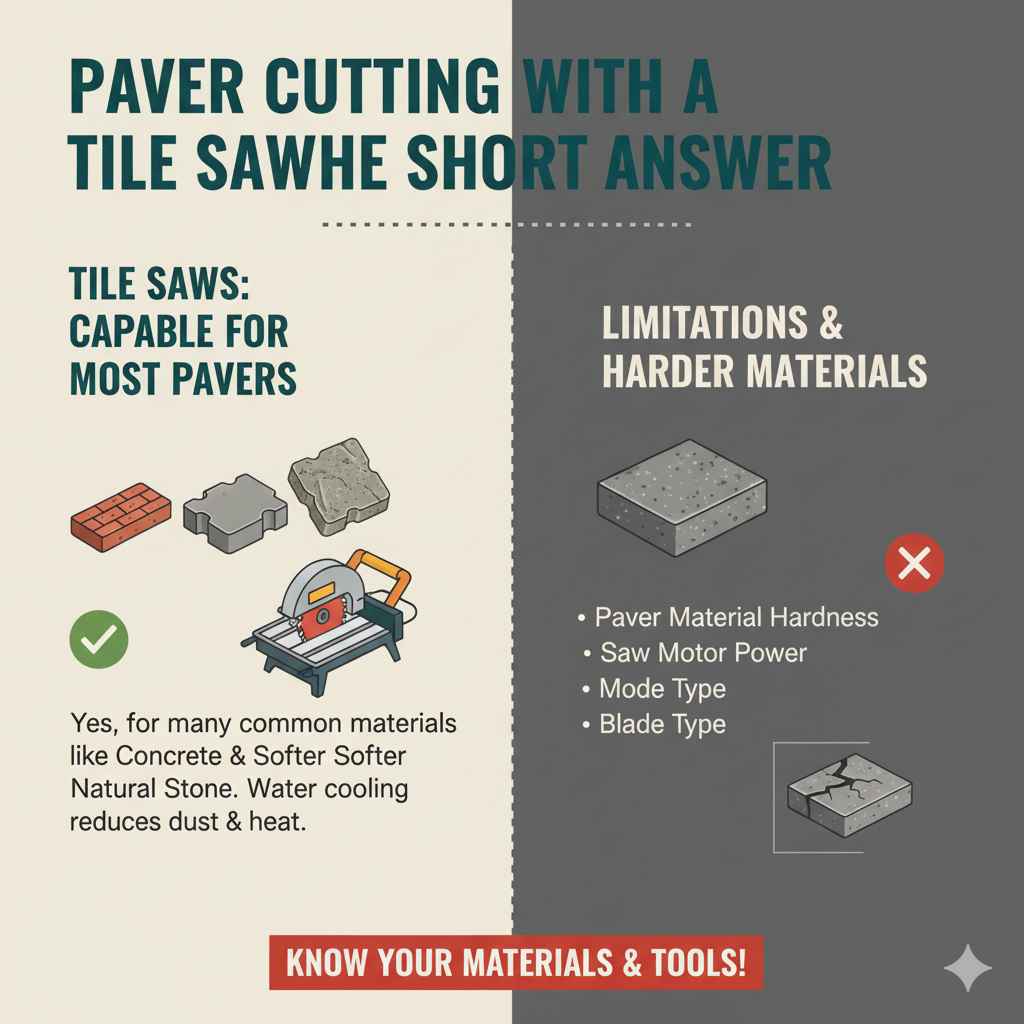
Yes, you can absolutely cut pavers with a tile saw, but with important considerations! A standard wet tile saw can cut many types of pavers, especially softer ones like concrete or some natural stones. However, for harder pavers or very precise cuts, you might need specific blades or a more powerful saw. This guide will show you how to do it safely and effectively.
Hey there, DIYers and aspiring home renovators! Md Meraj here, your go-to guy for making DIY projects feel less like a chore and more like a triumph. Ever found yourself staring at a beautiful patio project, only to realize your pavers don’t quite fit those awkward corners or straight lines? It’s a common puzzle, and often, the first tool that comes to mind for cutting tough stuff like stone or brick is a big, bulky saw. But what if you already have a wet tile saw for those smaller tiling jobs? The big question on your mind might be: can you cut pavers with a tile saw?
The answer is a resounding “it depends!” Many times, the answer is yes, you can. But there are crucial details to understand to avoid frustration and ensure safety. We’ll walk through exactly what you need to know, from choosing the right blade to making those perfect cuts. Get ready to tackle your paver projects with confidence!
Can You Cut Pavers With a Tile Saw? The Short Answer
For many common paver materials, like concrete pavers or softer natural stones, a standard wet tile saw is indeed capable of making cuts. The water reservoir and blade cooling system are essential for preventing overheating and dust. However, the success and ease of cutting depend heavily on the type of paver material, the power of your saw, and the type of blade you use. Harder materials or intricate cuts might push the limits of a typical tile saw.
Understanding Paver Types and Saw Compatibility
Not all pavers are created equal, and this is the first thing to understand when considering a tile saw. The material dictates how easily it will be cut and what tools will work best. Think of it like trying to cut wood: soft pine is easy, while hardwoods require more power and a sharper blade.
Common Paver Materials:
- Concrete Pavers: These are the most common type, manufactured from a mix of cement, aggregates, and pigments. They vary in hardness based on their density and mix. Most standard concrete pavers can be cut with a wet tile saw.
- Natural Stone Pavers: This category includes materials like flagstone, slate, granite, travertine, and bluestone. Their hardness varies significantly. Softer stones like travertine and some slates are generally cuttable with a tile saw, while harder stones like granite might be very challenging.
- Brick Pavers: Traditional brick pavers are fired clay and can be quite dense. While some softer bricks might be manageable, harder, denser bricks can be tough on a tile saw.
- Porcelain Pavers: These are incredibly dense and hard, designed for durability. While porcelain tiles can be cut with a tile saw, cutting large format porcelain pavers can be demanding and may require a more robust saw and a specialized blade.
What Makes a Tile Saw Suitable (or Not) for Pavers?
A wet tile saw uses a spinning diamond blade that’s continuously lubricated and cooled by water. This is fantastic for reducing dust and prolonging the life of the blade. However, the power of the motor and the size of the blade are limiting factors.
- Motor Power: Cutting denser or thicker pavers puts a strain on the motor. A less powerful saw might bog down, overheat, or struggle to make consistent cuts.
- Blade Size and Depth of Cut: Standard tile saws often have blades that are 7 to 10 inches. This determines the maximum depth you can cut. Many pavers are thicker than standard tiles, so you need to ensure your saw can handle the thickness.
- Blade Type: This is perhaps the most critical factor. A standard tile saw blade might be designed for ceramic and porcelain tile. Cutting stone and concrete requires a blade designed for harder materials.
Choosing the Right Blade: Your Secret Weapon
If you’re going to cut pavers with a tile saw, the blade you use is everything. Think of it as the difference between using a butter knife and a chef’s knife to cut vegetables – the right tool makes all the difference!
Essential Blade Characteristics for Pavers:
- Diamond Grit Designation: Look for blades specifically rated for cutting stone, concrete, brick, or pavers. These blades have a coarser diamond grit embedded in the metal rim.
- Continuous Rim vs. Segmented Rim:
- Continuous Rim: These blades have a smooth, unbroken rim. They produce cleaner, smoother cuts and are generally preferred for harder, denser materials like porcelain and some harder stones where a chip-free finish is desired.
- Segmented Rim: These blades have notches or segments along the rim. They are better for faster cutting and can handle softer materials like concrete or brick more efficiently. The gaps help with water flow and chip removal. For cutting pavers, a segmented or a specially designed “paver” blade is often a good choice.
- Blade Thickness: Thicker blades are generally more durable but can result in a wider kerf (the width of the cut), meaning you lose more material. For precise work, a thinner blade is often better if it can hold up to the material.
- Arbor Size: Ensure the blade’s arbor size (the hole in the center) matches the arbor on your tile saw. This is usually 5/8” or 7/8”.
Recommended Blades for Paver Cutting:
- Look for blades labeled “Diamond Blade for Masonry,” “Concrete Cutting Blade,” or “Paver Blade.”
- Brands like Diablo, MK Diamond, and Rubi often offer high-quality blades suitable for various masonry materials. Check the product specifications to ensure it’s compatible with your saw’s size and material type.
A good rule of thumb is to invest in a quality blade. It will not only make the cutting process easier but also safer and yield much better results. For detailed information on diamond blades and their applications, resources like the Mason Contractors Association of America offer excellent insights into choosing the right blade for masonry work.
Essential Tools and Safety Gear
Before you even think about plugging in that saw, let’s gather everything you’ll need. Preparing properly is key to a smooth and safe experience. Don’t skip any of these!
Tools Needed:
- Wet Tile Saw: Preferably one with a sturdy base and a powerful enough motor for your paver material.
- Appropriate Diamond Blade: As discussed above, choose one designed for masonry or pavers.
- Measuring Tape: For accurate measurements of your pavers.
- Pencil or Marker: A grease pencil or masonry marker works best for marking pavers.
- Straight Edge or Ruler: To guide your marking and cutting.
- Water Source: To refill your saw’s water reservoir.
- Bucket: For collecting water spills or debris.
- Shop Vacuum (Optional but Recommended): For cleaning up dust and slurry after cutting.
- Wheeled Cart or Dolly (For Heavy Pavers): To safely move pavers to and from your cutting area.
Safety Gear – Non-Negotiable!
Working with power tools and stone can be hazardous. Always prioritize your safety. Think of this gear as your DIY superhero costume!
- Safety Glasses or Goggles: Protect your eyes from flying debris and water spray. Essential!
- Hearing Protection: Earplugs or earmuffs are crucial, as saws can be very loud.
- Work Gloves: Protect your hands from rough paver edges and potential cuts.
- Dust Mask or Respirator: Even with a wet saw, some dust can be generated, especially if the water system isn’t perfect. A respirator offers the best protection for your lungs.
- Sturdy, Closed-Toe Shoes: Protect your feet from dropped materials or tools.
- Long Pants and Long-Sleeved Shirt: To protect your skin from abrasions and debris.
Step-by-Step Guide: Cutting Pavers With a Tile Saw
Alright, you’ve got your tools, your safety gear, and your pavers are ready. Let’s get to cutting! Remember to take your time. Rushing is the quickest way to make a mistake or have an accident.
Step 1: Prepare Your Workspace and Saw
Set up your tile saw on a stable, level surface, preferably outdoors or in a well-ventilated area where water runoff won’t be an issue. Ensure it’s easily accessible for adding water and safe from tripping hazards. Fill the water reservoir to the recommended level. Make sure the water pump is working correctly. Check that the blade is securely fastened and aligned.
Step 2: Measure and Mark Your Pavers
Determine the exact size and shape you need to cut for your project. Use a measuring tape and a pencil or masonry marker to clearly mark the cut line on the paver. For straight cuts, use a straight edge or ruler to ensure accuracy. If you’re making intricate shapes, mark them carefully.
Step 3: Secure Your Paver
This is very important for safety and precision. Many tile saws have a table or sled to guide the material. For larger or irregularly shaped pavers, you might need to manually guide them, but always ensure they are stable and won’t shift during cutting. If your saw has a miter gauge or fence, use it. If not, be prepared to guide the paver steadily and slowly.
Table: Paver Cutting Techniques & Considerations
| Cut Type | Technique | Considerations |
|---|---|---|
| Straight Cut | Slide the paver steadily through the blade, following your marked line. Use a fence or guide if available. | Ensure the paver is held firmly. Don’t force the cut. |
| Angle/Bevel Cut | Adjust the saw’s table or support to the desired angle. Ensure the paver is secured at that angle. | Requires a saw with an adjustable table. Very tricky, practice first! |
| Curved Cut (Limited) | Not recommended for most tile saws due to blade limitations and safety risks. | For curved cuts, a circular saw with a masonry blade or an angle grinder is usually a better, safer option. |
| Small Cuts / Notches | Carefully feed the paver to make partial cuts or notches. May involve stopping the blade and repositioning. | Requires extreme care to avoid blade binding or paver breakage. |
Step 4: Make the Cut
Turn on the saw and let the blade reach full speed. Slowly and steadily feed the paver into the blade. Don’t push too hard; let the blade do the work. Keep the water flowing and ensure the blade is cutting through the marked line. If you’re cutting a very thick paver, you might need to make the cut in two passes, lowering the blade slightly for a second pass once the first pass is a few millimeters deep.
Step 5: Finish the Cut and Clean Up
Once the cut is complete, slowly withdraw the paver from the blade and turn off the saw. Allow the blade to stop completely before removing any cut pieces. Carefully remove the cut paver. The water system will have created a slurry of water and stone dust. Clean up your workspace thoroughly. Dispose of the slurry responsibly; check local regulations for hazardous waste disposal. A guide from the EPA on concrete reuse may offer some disposal ideas, though check local hazardous waste protocols for slurry.
Tips for Success and Avoiding Common Pitfalls
Even with the best preparation, things can go wrong. Here are some pro tips to help you achieve the best results and steer clear of common headaches.
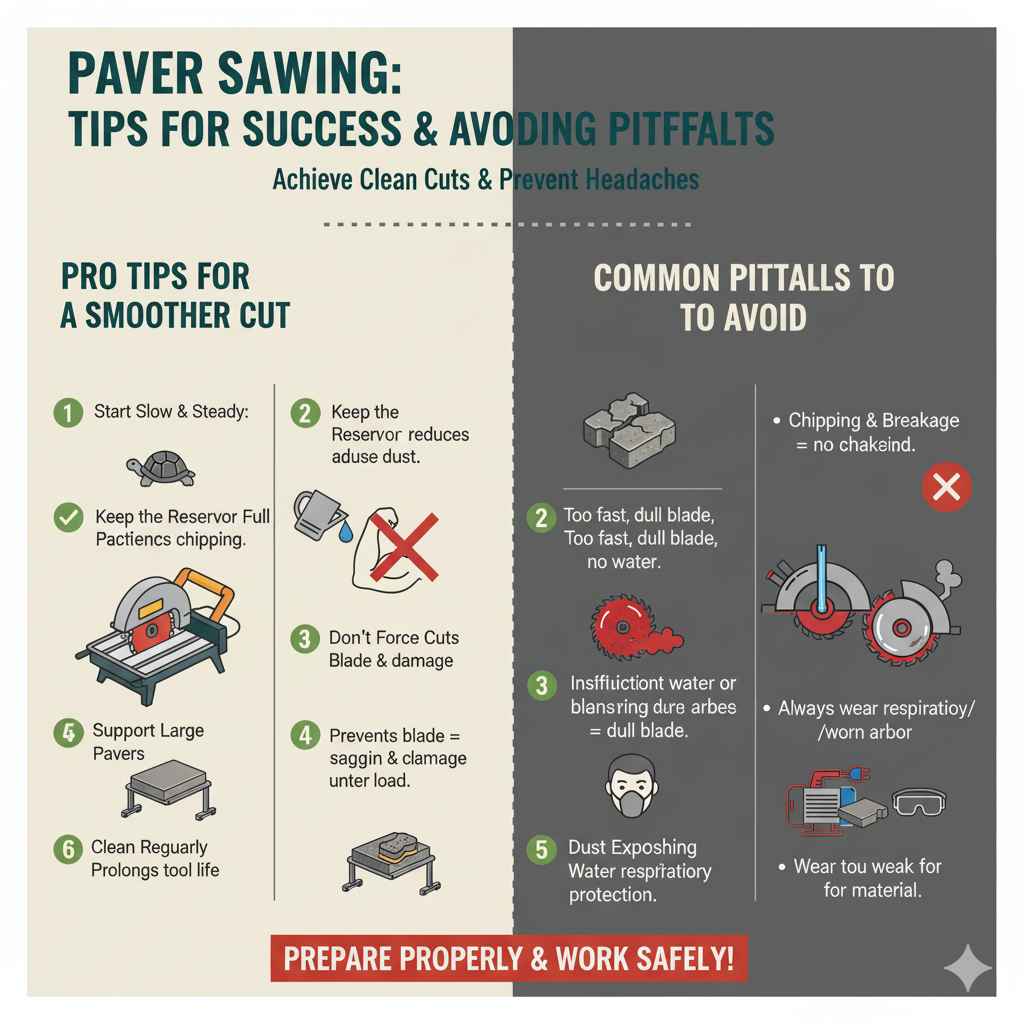
Tips for a Smoother Cut:
- Start Slow and Steady: Patience is key. Forcing the paver will lead to chipping, blade binding, or even breaking the paver.
- Keep the Reservoir Full: Adequate water is crucial for cooling the blade and reducing dust. Check it frequently.
- Don’t Force the Blade: If the saw bogs down, you’re pushing too hard or the blade is dull.
- Make Practice Cuts: If you have scrap pavers, practice on them first to get a feel for how the material cuts and how your saw performs.
- Cutting Large Pavers: For large, heavy pavers, consider using roller stands or a helper to support the paver as it feeds through the saw. This prevents sagging and potential breakage.
- Clean the Blade and Reservoir Regularly: Slurry can clog the blade and pump. Cleaning it after each major cutting session will prolong the life of your saw and blade.
Common Pitfalls to Avoid:
- Chipping and Breakage: Often caused by pushing too fast, a dull blade, or insufficient water.
- Blade Wobble: Can happen if the blade isn’t mounted correctly, is damaged, or if the arbor on the saw is worn.
- Overheating: Insufficient water or a dull blade will cause the blade to overheat, leading to premature wear or damage.
- Dust Exposure: Even wet saws can create airborne dust. Always wear respiratory protection.
- Water Splashing: Be mindful of where the water is spraying. Wear appropriate clothing and safety glasses.
- Power Limitations: Realizing your saw isn’t powerful enough for the material halfway through a cut. It’s better to assess this beforehand.
When a Tile Saw Might Not Be Enough
While a tile saw is versatile, there are times when it’s simply not the right tool for the job. Recognizing these limitations will save you time, effort, and potential frustration.
Scenarios Where a Tile Saw Might Struggle:
- Extremely Hard Materials: Cutting very dense granite, quartz-based stones, or certain high-fired porcelain pavers might be too much for a standard tile saw, even with the right blade.
- Very Thick Pavers: If your pavers are thicker than the maximum depth of cut of your saw, you’ll need a different tool.
- Intricate or Curved Cuts: Tile saws are primarily designed for straight cuts. Trying to make significant curves or complex shapes is dangerous and often impossible.
- Extended Cutting Tasks: For very large projects involving hundreds of cuts, a more powerful masonry saw designed for continuous heavy-duty use might be more efficient and less prone to overheating.
Alternative Tools for Paver Cutting:
- Angle Grinder with Diamond Blade: Excellent for smaller cuts, irregular shapes, and working in tight spaces. Requires very careful handling and excellent safety practices.
- Circular Saw with Diamond Blade (Wet or Dry): Can handle straight cuts and some depth. Often used with a water feed attachment for dust control.
- Specialized Masonry Saw: These are larger, more powerful saws designed specifically for cutting stone, concrete, and brick. They offer greater depth of cut and power for demanding jobs. You can often rent these for big projects. For information on these, it’s worth checking resources from manufacturers like DeWalt’s range of masonry saws.
Frequently Asked Questions (FAQ)
Can any tile saw cut pavers?
Not all tile saws are equally capable. While many can cut softer pavers like concrete, less powerful saws or those with smaller blades may struggle with thicker or harder materials. Always check your saw’s specifications and use an appropriate blade.
How thick of a paver can a standard tile saw cut?
This varies by saw. A 7-inch tile saw might cut about 2-3 inches deep, while a 10-inch saw can handle 3-4 inches. Always check your saw’s maximum depth of cut specification. Some pavers can be cut in two passes if they exceed the depth of cut.