Alexa Reclaimed Wood Bed: Smart & Stunning Design
Build a stunning Alexa reclaimed wood bed with smart, beginner-friendly steps! This guide breaks down creating a beautiful, rustic centerpiece for your bedroom, focusing on safety, affordability, and achieving a professional look with simple tools.
Dreaming of a beautiful, rustic bed frame that adds character and warmth to your bedroom? You’ve likely seen stunning reclaimed wood beds, but perhaps felt they were out of reach for your DIY skills. Many people worry that working with salvaged wood is too complicated or requires expensive tools. But what if I told you that building a gorgeous “Alexa” style reclaimed wood bed is totally achievable, even for beginners? We’ll walk through each step, making it simple, safe, and rewarding. Get ready to create a unique piece of furniture you’ll be proud of!
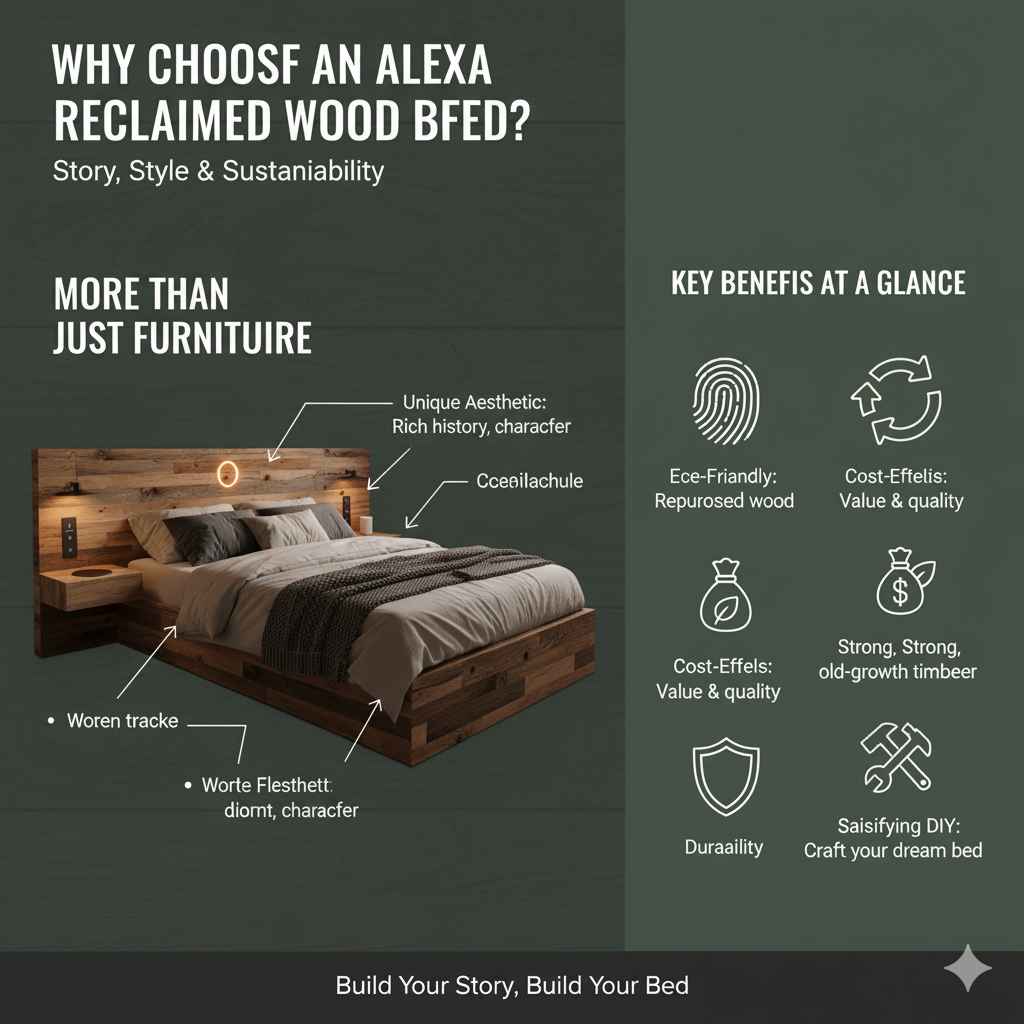
Why Choose an Alexa Reclaimed Wood Bed?
Reclaimed wood brings a sense of history and unique beauty to any piece of furniture. When combined in a design like the “Alexa,” it creates a bed that’s both stylish and incredibly sturdy. This design often features strong lines and a solid presence, making it a true centerpiece. Plus, using reclaimed wood is a fantastic way to be more sustainable and often more budget-friendly than buying new lumber. Imagine the satisfaction of sleeping in a bed you built yourself, knowing its story and craftsmanship.
Understanding Reclaimed Wood
Working with reclaimed wood is different from using new lumber. It has a past! This means you might find nail holes, saw marks, or variations in color and texture. These aren’t flaws; they are character! However, it’s important to prepare it correctly to ensure it’s safe and ready for your project.
Sources for Reclaimed Wood
- Salvage Yards & Architectural Salvage Stores: These places specialize in old building materials. You can often find beautiful old barn wood, flooring, or beams.
- Demolition Sites (with Permission!): If you know of a building being torn down, ask the owners or contractors if you can salvage wood. Always get explicit permission! Safety first is key here.
- Online Marketplaces: Websites like Craigslist, Facebook Marketplace, or even Etsy sometimes have individuals selling reclaimed lumber.
- Local Sawmills: Some sawmills process reclaimed lumber or can point you to sources.
Preparing Your Reclaimed Wood
Before you start cutting and assembling, your reclaimed wood needs some attention. This ensures a smooth building process and a safe, beautiful final product.
- Cleaning: Brush off loose dirt, cobwebs, and debris with a stiff brush. For tougher grime, a damp cloth might be enough. Avoid soaking the wood.
- Nail Removal: This is crucial for safety. Use a claw hammer, pry bar, or pliers to carefully remove any old nails, screws, or staples. Wear safety glasses!
- Inspecting for Pests: Though uncommon, it’s good practice to inspect wood for any signs of wood-boring insects. If you find any, you might need to treat the wood (consult a professional or specialized product instructions).
- Milling (Optional but Recommended): If your wood is very rough or uneven, you might want to mill it. This involves using tools like a jointer and planer to create flat surfaces and consistent thickness. For beginners, you can often skip this or embrace the rustic, uneven look. If you do mill, start with the least damaged pieces.
- Sanding: Start with a coarser grit sandpaper (like 60-80 grit) to smooth out rough patches and remove old finishes if desired. Gradually move to finer grits (120, 220) for a smoother touch. Don’t over-sand if you want to keep the wood’s character!
Tools You’ll Need
For a beginner-friendly project, you don’t need a workshop full of professional tools. Here’s a good starter list for building your Alexa reclaimed wood bed:
Essential Tools
- Measuring Tape: For accurate cuts and assembly.
- Pencil: To mark your measurements.
- Safety Glasses: Non-negotiable! Protect your eyes from sawdust and debris.
- Hearing Protection: If using power tools.
- Dust Mask: For sanding and cutting.
- Circular Saw or Miter Saw: For making straight cuts. A miter saw is easier for repeatable angles and straight cuts.
- Drill/Driver: For pre-drilling holes and driving screws.
- Screwdriver Bits: To match your screws.
- Clamps: Various sizes to hold pieces together while you work.
- Orbital Sander: For sanding down the wood.
- Sandpaper: Various grits (60, 80, 120, 220).
- Wood Glue: For strong joints.
- Hammer & Pry Bar/Pliers: For removing old nails.
Optional (but Helpful) Tools
- Jigsaw: For cutting curves if your design requires it.
- Pocket Hole Jig: A fantastic tool for creating strong, hidden joints, making assembly much easier. For example, Kreg Jig systems are very popular among DIYers.
- Level: To ensure your frame is straight.
- Rubber Mallet: To gently tap pieces into place.
Designing Your Alexa Reclaimed Wood Bed
The “Alexa” style often means a substantial headboard and footboard, sometimes with planks arranged in a distinctive pattern. For a beginner, simplicity is key. We’ll aim for a design that highlights the wood’s natural beauty without overly complex joinery.
Key Design Elements
- Headboard: This is where you can really make a statement with reclaimed wood. Varying plank widths and lengths can add visual interest.
- Footboard: Typically simpler than the headboard, often matching its height or a bit shorter.
- Side Rails: These connect the headboard and footboard and support the mattress platform.
- Mattress Support: This can be slats or a plywood sheet. Slats are common and allow for mattress breathability.
Sizing Your Bed
Make sure to measure your mattress! Standard US sizes are:
| Mattress Size | Width (inches) | Length (inches) |
|---|---|---|
| Twin | 38 | 75 |
| Twin XL | 38 | 80 |
| Full (Double) | 54 | 75 |
| Queen | 60 | 80 |
| King | 76 | 80 |
| California King | 72 | 84 |
Your bed frame will need to be slightly larger than your mattress to accommodate it comfortably, plus any overhang for the frame’s design. For example, a Queen mattress is 60″x80″. Your frame might be designed to be 62″x82″ internally where the mattress sits.
Building the Bed: Step-by-Step Guide
Let’s get building! This guide focuses on a common Alexa-style design with planked headboard and footboard. We’ll assume you’re building a Queen size bed for illustration, but adjust measurements for your needs.
Step 1: Prepare Your Wood and Cut Pieces
Once your reclaimed wood is cleaned and de-nailed, it’s time to cut. You’ll want to cut pieces for the headboard, footboard, side rails, and bed supports.
Headboard & Footboard Framing
You’ll need sturdy vertical posts and horizontal supports for both the headboard and footboard. For a Queen bed, the posts might be around 60 inches tall, and the main horizontal supports could be about 70 inches wide (to accommodate the mattress width plus some overlap).
Plank Cutting
Cut your reclaimed wood planks to size for the front panels of the headboard and footboard. You can vary the lengths to create an interesting pattern. For a 70-inch wide headboard, you might cut planks ranging from 10 inches to 30 inches, arranging them creatively.
Side Rails & Mattress Supports
Cut two side rails to the length of your mattress (e.g., 80 inches for a Queen). Cut shorter pieces to connect the headboard and footboard at the bottom, which will also support the mattress. Also, cut slats to span the width of the bed frame, spaced about 2-3 inches apart.
Safety Tip: Always measure twice and cut once. Ensure your wood is securely clamped before cutting with power saws. Use your safety glasses and hearing protection!
Step 2: Assemble the Headboard and Footboard Frames
This is where you build the main structure of your headboard and footboard. You’ll need your vertical posts and horizontal supports.
- Mark Joinery: Decide how you’ll attach the horizontal pieces to the vertical posts. For beginners, using wood glue and screws is a great method. You can pre-drill pocket holes on the ends of your horizontal pieces using a pocket hole jig for incredibly strong, hidden connections. If you don’t have a jig, you can simply pre-drill and screw directly through the outside of the posts into the ends of the horizontal supports.
- Apply Glue & Fasten: Apply wood glue to the connection points and assemble the frames. Use clamps to hold everything tightly while you drive screws.
- Check for Squareness: Use a carpenter’s square or measure diagonally. The two diagonal measurements should be equal if the frame is perfectly square.
Step 3: Attach the Reclaimed Wood Planks
Now for the fun part – bringing the rustic look to life!
- Layout: Arrange your cut reclaimed wood planks on the front of the headboard and footboard frames. Play with different patterns, mixing widths and textures.
- Secure Planks: Apply a bit of wood glue to the back of each plank where it touches a frame member. Then, use screws to attach them firmly. Predrill pilot holes to prevent the wood from splitting, especially with older, drier reclaimed wood. You can use decorative screws for added visual appeal.
- Work from Top Down (or Bottom Up): Decide on your pattern and work your way across and down, ensuring planks are well-supported by the frame members.
Step 4: Assemble the Main Bed Frame
This involves connecting the headboard and footboard with the side rails.
- Attach Side Rails: Connect the side rails to the outside of the headboard and footboard posts. Again, pocket holes or pre-drilled through-bolts are excellent for strength. Ensure the top edge of the side rails is level with or slightly below where the mattress will sit.
- Add Bottom Supports: Attach the shorter cross pieces that connect the side rails at the foot of the bed. These also help to square up the frame and can support the mattress if you’re not using full-length slats.
- Reinforce Joints: Use strong wood glue and ample screws for all frame connections.
Step 5: Install Mattress Supports
This ensures your mattress is well supported and prevents sagging.
- Center Support (for Queen/King+): For larger beds, a center support beam running from the headboard to the footboard is recommended. This prevents the slats from bowing in the middle. Attach it to the headboard and footboard with screws.
- Attach Slats: Lay your cut slats across the side rails (and center support, if used). Space them evenly, about 2-3 inches apart. Secure each slat at both ends with screws into the side rails.
- Alternatively, use Plywood: You can also cut a piece of plywood to fit inside the frame. This provides a solid surface. If you go this route, ensure your frame is built to accommodate the plywood’s thickness, and consider drilling ventilation holes in the plywood.
Step 6: Finishing Touches
Your bed frame is assembled! Now it’s time for the finishing.
- Final Sanding: Lightly sand any rough edges or surfaces you want smoother. Be careful not to sand away all the character of the reclaimed wood.
- Apply Finish: You have many options:
- Clear Coat: Polyurethane or lacquer will protect the wood and highlight its natural colors and textures.
- Stain: If you want to deepen the color or give it a specific tone, apply a wood stain.
- Wax: A simple wax finish can give a soft sheen and enhance the wood’s feel.
- Paint: For a more modern look, you could paint it, but this often masks the reclaimed wood’s charm.
- Application: Follow the product instructions carefully. Apply finishes in a well-ventilated area.
Allow ample drying time for the finish to cure before placing your mattress on the frame. For detailed guidance on wood finishes, resources like WoodBin’s guide to common finishes can be very helpful.
Maintenance and Care
Reclaimed wood can be surprisingly durable. To keep your Alexa bed looking great:
- Wipe up spills immediately.
- Dust regularly with a soft cloth.
- For deeper cleaning, use a slightly damp cloth, and dry immediately. Avoid harsh chemicals. Reapply wax or a light protective coat annually if needed.
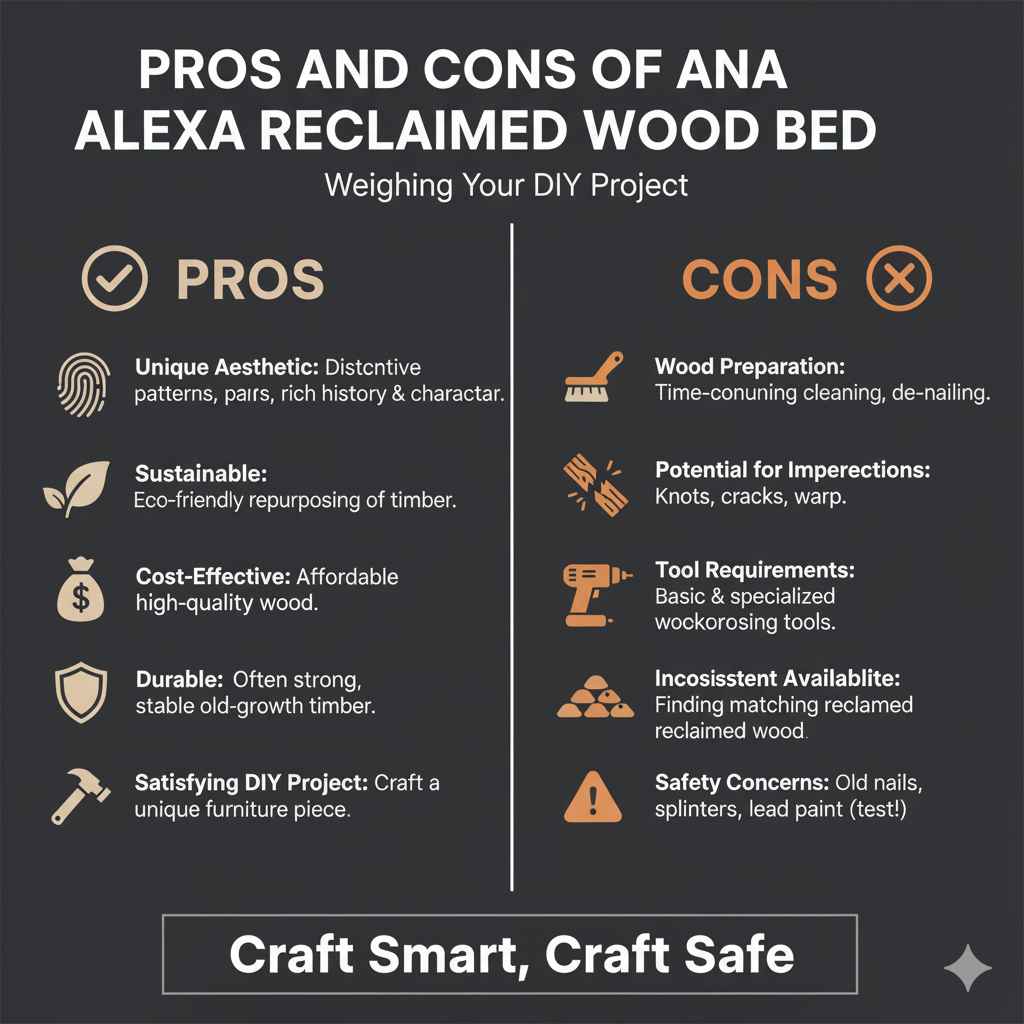
Pros and Cons of an Alexa Reclaimed Wood Bed
Like any project, there are advantages and disadvantages to consider.
| Pros | Cons |
|---|---|
| Unique Aesthetic: Each bed has a distinct look due to the reclaimed wood’s patterns and history. | Wood Preparation: Can be time-consuming to clean, de-nail, and prepare. |
| Sustainable: Repurposing wood is eco-friendly. | Potential for Imperfections: Unexpected knots, cracks, or warp can occur. |
| Cost-Effective: Often cheaper than buying new, high-quality hardwood. | Tool Requirements: Requires basic woodworking tools; some specialized tools can improve results. |
| Durable: Old-growth wood is often very strong and stable. | Inconsistent Availability: Finding enough matching or suitable reclaimed wood can sometimes be challenging. |
| Satisfying DIY Project: Creates a functional, beautiful piece of furniture you made yourself. | Safety Concerns: Need to be cautious about old nails, splinters, and potential lead paint on very old pieces. (Always test for lead if unsure). |
Frequently Asked Questions (FAQs)
Q1: Is reclaimed wood safe to use indoors?
Yes, reclaimed wood is generally safe for indoor use, provided it is properly cleaned and prepared. Always inspect for old finishes like lead paint, especially on very old wood, and test if you have concerns. If you find lead paint, specialized handling and removal are necessary, or you might choose to seal it completely with a primer and paint.
Q2: Do I need to treat reclaimed wood for pests?
While less common than with new wood, it’s wise to inspect reclaimed wood for any signs of wood-boring insects. If you suspect an infestation, you can often treat it with heat (kiln drying) or specialized pest control products. Many DIYers accept the risk with visually inspected wood.
Q3: How do I make sure my reclaimed wood bed is strong and won’t wobble?
Use sturdy joinery techniques like pocket holes or robust screw/bolt connections. Ensure all frame pieces are securely fastened and that the mattress supports (slats or plywood) are correctly installed and adequately spaced. A center support beam is highly recommended for Queen-sized beds and larger.
Q4: Can I achieve a smooth finish on rough reclaimed wood?
Yes, you can! Thorough sanding, starting with a coarse grit (like 60-80) and progressing to finer grits (up to 220), will smooth out much of the roughness. However, some texture and character will remain, which is often part of the appeal. You can also use wood filler to fill larger gaps if desired.