DIY Firewood Holder Outdoor: Genius Storage Solution
Build your own outdoor DIY firewood holder with these simple steps! Keep your wood dry, organized, and easily accessible, solving clutter issues and enhancing your outdoor space with this durable, cost-effective storage solution.
Are you tired of messy piles of firewood cluttering your yard? Keeping your firewood dry and organized outdoors can feel like a constant battle. Wet wood won’t burn well, and a disorganized pile is an eyesore. But what if you could build a smart, sturdy solution yourself? This guide will show you how to create a fantastic DIY outdoor firewood holder that keeps your wood neat, dry, and ready for those cozy fires. We’ll walk through every step, making it easy for anyone to build. Get ready to transform your firewood storage!
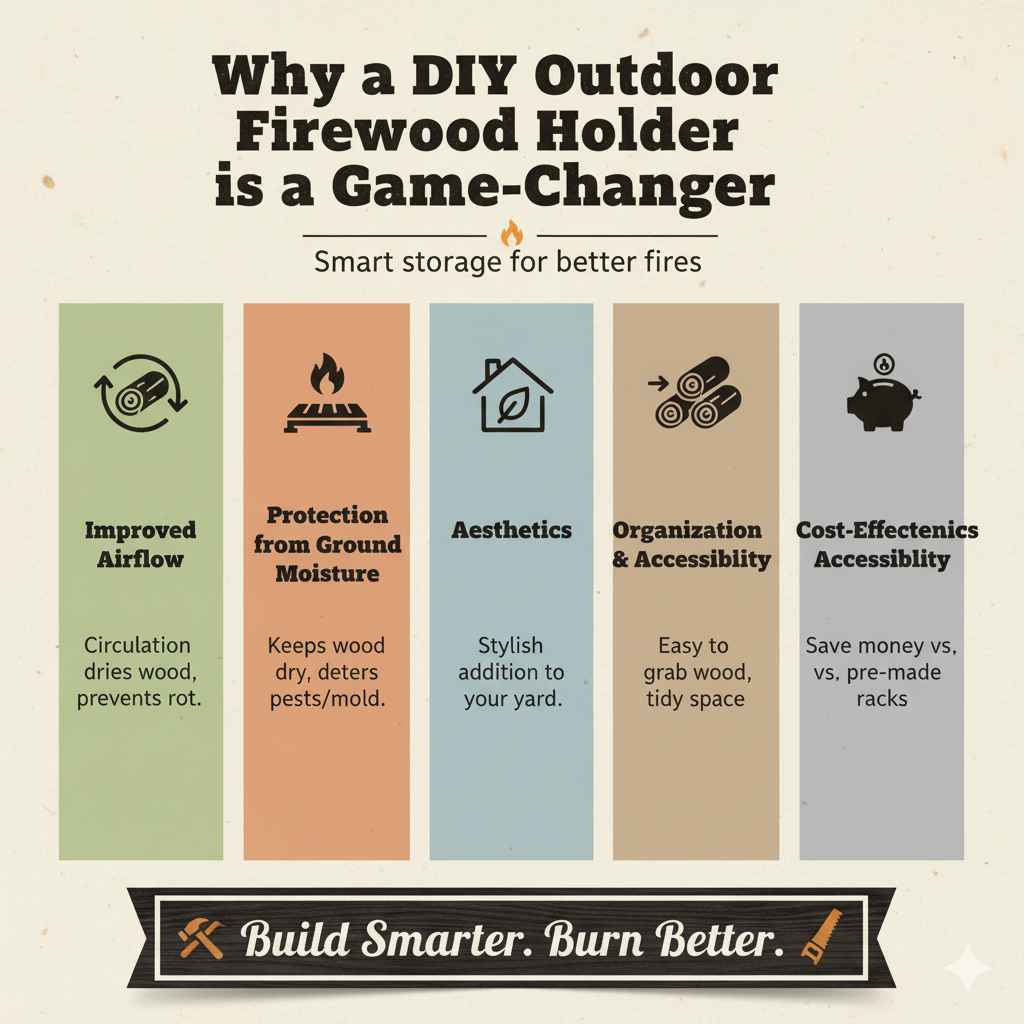
Why a DIY Outdoor Firewood Holder is a Game-Changer
An outdoor firewood holder isn’t just about tidiness; it’s a smart storage choice that benefits your home and your fire-starting experience. Unlike simply stacking wood against a wall, a dedicated holder offers several advantages:
Improved Airflow: Proper design allows air to circulate around the wood, helping it dry out faster and preventing rot. This is crucial for efficient burning.
Protection from Ground Moisture: Lifting the wood off the damp ground prevents it from absorbing moisture and reduces the risk of pests and mold.
Aesthetics: A well-built holder can be a stylish addition to your backyard, patio, or garden, turning a functional necessity into an attractive feature.
Organization and Accessibility: Everything stays in one place, making it easy to grab the wood you need without fumbling through a messy pile.
Cost-Effectiveness: Building your own often costs significantly less than buying a pre-made metal or plastic rack, especially for larger storage needs.
Choosing the Right Design for Your Needs
Before we grab our tools, let’s think about what kind of firewood holder will work best for you. Consider these factors:
Space: How much space do you have available? A larger yard might accommodate a bigger, more elaborate design, while a smaller patio might need something more compact.
Wood Quantity: How much firewood do you typically store? If you go through a lot, you’ll need a larger capacity holder.
Tools and Skills: Are you comfortable with basic cuts and assembly, or do you want the simplest possible design? We’ll focus on beginner-friendly options.
Budget: While DIY is generally affordable, material choices can affect the final cost. Keeping it simple with readily available lumber is usually the most budget-friendly route.
Here are a few popular design types to consider:
Simple Wall-Mounted Rack: Excellent for smaller spaces, this design attaches directly to an existing wall, saving ground space.
Freestanding A-Frame or Square Unit: These are versatile and can be placed anywhere. They often offer good capacity and stability.
Covered or Taller Units: For areas with heavy rain or snow, a holder with a roof or taller sides can offer extra protection.
For this guide, we’ll focus on building a sturdy, freestanding outdoor firewood holder using common lumber. It’s a fantastic project for beginners that yields excellent results.
Essential Tools and Materials
Gathering your supplies before you start is key to a smooth building process. Don’t worry if you don’t have everything; many of these tools are affordable or can be borrowed. Safety first is always my motto!
Tools You’ll Need:
Measuring Tape: For accurate measurements.
Pencil: For marking cuts.
Safety Glasses: Absolutely crucial for protecting your eyes!
Work Gloves: To protect your hands from splinters.
Saw: A handsaw, circular saw, or miter saw will work. A circular saw is often a good balance of power and ease of use for beginners.
Drill/Driver: Cordless is most convenient.
Drill Bits: For pilot holes and driving screws.
Clamps (optional but helpful): To hold pieces together while you work.
Level: To ensure your holder is straight.
Sandpaper or Sanding Block: For smoothing rough edges.
Materials You’ll Need (Example for a 4ft wide x 3ft tall holder):
This list is for a common, sturdy design. You can adjust dimensions based on your needs.
Lumber: Pressure-treated lumber is recommended for outdoor projects as it resists rot and insects. Pine or cedar are also good options but may require sealing.
4×4 Posts: (2) 8-foot lengths (will be cut to size for legs/verticals)
2×4 Lumber: (6) 8-foot lengths (will be cut to size for frame, braces, and shelves)
2×6 Lumber: (2) 8-foot lengths (optional, for a more robust shelf base)
Fasteners:
3-inch Exterior Wood Screws: For joining structural pieces.
2-inch Exterior Wood Screws: For attaching shelves and bracing.
Wood Sealant/Stain (optional but recommended): To further protect the wood and improve appearance.
Tip: Lumber yards often offer cutting services, which can be a huge help if you’re new to using saws.
Step-by-Step Guide to Building Your DIY Firewood Holder
Let’s get building! We’ll construct a simple, robust freestanding firewood holder. This design is about 4 feet wide and 3 feet tall, holding a good amount of firewood while being manageable for a beginner.
Step 1: Cut Your Lumber
Accuracy here makes assembly much easier. Measure twice, cut once! For our example 4ft wide x 3ft tall holder:
From 4×4 posts:
Cut (2) pieces 36 inches long (for the main uprights).
Cut (2) pieces approximately 9 inches long (for the front feet).
From 2×4 lumber:
Cut (2) pieces 48 inches long (for the top and bottom frame pieces).
Cut (2) pieces 30 inches long (for the side frame pieces).
Cut (2) pieces 45 inches long (for the front and back horizontal supports).
Cut (4) pieces approximately 9 inches long (for the lower shelf supports).
Cut (2) pieces 48 inches long (for the top horizontal supports).
Cut (2) pieces 30 inches long (for the back vertical braces).
From 2×6 lumber (if using):
Cut (4) pieces 45 inches long (for the main shelf supports).
Safety Note: Always wear safety glasses and gloves when cutting. If using power saws, read their manuals thoroughly and understand how to operate them safely. Refer to resources like OSHA’s guidelines on safe saw operation for best practices.
Step 2: Prepare the Base Frame
This creates the foundation of your firewood holder.
1. Lay out two 48-inch 2x4s parallel to each other.
2. Place the two 30-inch 2x4s between the ends of the 48-inch pieces to form a rectangle. The 30-inch pieces will fit inside the 48-inch pieces.
3. Measure to ensure the inside dimensions are correct. The total outside dimension will be 48 inches by 33 inches (48″ + 1.5″ + 1.5″ for the side pieces’ thickness).
4. Drill pilot holes through the ends of the 48-inch pieces into the ends of the 30-inch pieces.
5. Secure these corners with 3-inch exterior screws. You should now have a sturdy rectangular frame.
Step 3: Attach the Main Uprights and Front Feet
These are the vertical supports for your holder.
1. Take one of your 36-inch 4×4 posts. Position it vertically on the inside corner of one of the 30-inch sides of your base frame. The bottom of the post should be flush with the bottom of the frame.
2. Drill pilot holes through the base frame (from the bottom) upwards into the 4×4 post.
3. Secure the post with two or three 3-inch screws.
4. Repeat this process on the other 30-inch side of the base frame with the second 36-inch 4×4 post.
5. Now, attach the two 9-inch 4×4 pieces as front feet. These go on the front two corners of the base frame, extending forward. Position them so they are flush with the front edge of the frame and sit directly underneath the base frame.
6. Drill pilot holes down through the base frame into the top of these 4×4 feet. Secure with 3-inch screws. This elevates the front of your holder and adds stability.
You should now have an ‘H’ shape if viewed from the side, with the 4×4 posts standing tall.
Step 4: Install the Horizontal Supports
These provide structure and points for mounting the shelves.
1. Take the two 45-inch 2x4s. These will be the main horizontal supports for your shelves.
2. Place one 45-inch 2×4 horizontally between the two 4×4 uprights. Position it about 4-6 inches up from the bottom frame. This will be the lower shelf support.
3. Ensure it’s level and centered. Drill pilot holes through the 4×4 posts into the ends of the 45-inch 2×4.
4. Secure with 3-inch screws.
5. Repeat this process for the second 45-inch 2×4, placing it about 6 inches below the top of the 4×4 uprights. This will be your upper shelf support.
Step 5: Add Bracing for Stability
Braces prevent wobbling and make the whole structure much stronger.
1. Front Braces: Take the two 9-inch long 2×4 pieces (cut from Step 1). Position these diagonally or horizontally at the bottom front corners, connecting the front feet to the base frame and the uprights. A simple horizontal piece connecting the front foot to the upright, and another piece on the inside connecting the base frame to the upright, can work well. For simplicity, consider a single horizontal brace connecting the front 4×4 foot to the main frame.
Place one 9-inch 2×4 horizontally between the front 4×4 upright and the front 4×4 foot, flush with the top of the front foot.
Drill pilot holes and secure with 2-inch screws.
Repeat for the other side.
2. Back Braces: Take the two 30-inch 2×4 pieces. These will act as vertical braces at the back.
Position one 30-inch 2×4 vertically against the back of the frame, flush with the upright on one side.
Drill pilot holes through the 2×4 brace into the main frame and the upright.
Secure with 3-inch screws.
Repeat for the other side.
Step 6: Install the Shelves
This is where your firewood will rest.
Option 1 (using 2x4s):
1. Take your four 45-inch long 2×4 pieces. These will form your main shelf.
2. Lay them across the two horizontal 45-inch 2×4 supports you installed in Step 4. Space them evenly, leaving small gaps (about 1/2 inch) between them for airflow.
3. Drill pilot holes down through the shelf boards into the horizontal supports below.
4. Secure each shelf board with 2-inch screws.
Option 2 (using 2x6s for a sturdier shelf):
1. Take your four 45-inch long 2×6 pieces.
2. Lay them across the two horizontal 45-inch 2×4 supports. Space them evenly, leaving small gaps.
3. Drill pilot holes down through the shelf boards into the horizontal supports.
4. Secure each shelf board with 2-inch screws.
Step 7: Add Top Supports and Finishing Touches
These add to the structure and appearance.
1. Take the two 48-inch long 2×4 pieces.
2. Position one on top of the two 4×4 uprights on one side, flush with the top.
3. Drill pilot holes down through the top piece into the 4×4 uprights.
4. Secure with 3-inch screws.
5. Repeat for the other side.
6. Optional: Add the two 48-inch 2×4 pieces as a top cross piece for extra rigidity or to attach a cover later. Attach them to the top of the 4×4 posts.
Step 8: Sand and Seal
This protects your holder and makes it look great!
1. Use sandpaper or a sanding block to round any sharp edges and smooth rough surfaces. This is especially important on the shelf pieces where you’ll be handling the wood.
2. If you used pressure-treated lumber, you can skip sealing, but it’s still a good idea for extra protection and a nicer look. If you used untreated wood, sealing is highly recommended.
3. Apply an exterior-grade wood sealant, stain, or paint according to the product’s instructions. Allow it to dry completely before loading it with firewood.
Congratulations! Your DIY outdoor firewood holder is ready.
Tips for Keeping Your Firewood Dry and Ready
A good holder is the first step, but here are a few extra tips to ensure your firewood stays in prime condition:
Location, Location, Location: Place your new holder in a spot that gets good sunlight and air circulation. Avoid placing it directly against a building, as this can inhibit airflow and attract moisture.
Off the Ground: Ensure there’s a gap between the bottom of the holder and the ground to prevent moisture wicking and deter pests. Our design with the front feet helps with this.
“Seasoning” Your Wood: Firewood needs time to dry out (season) before it burns efficiently. Ideally, it should have a moisture content below 20%. Stacked wood in a well-ventilated holder will naturally season over time, typically 6-12 months. You can use a moisture meter for an accurate reading. For more on wood seasoning, check out resources from university extension offices like the Penn State Extension.
Stacking Smart: Arrange logs with some space between them to allow air to flow. Don’t cram them in too tightly.
Consider a Cover: If you live in a very wet climate, you might consider adding a simple tarp or a more permanent roof to your firewood holder for extra protection from rain and snow.
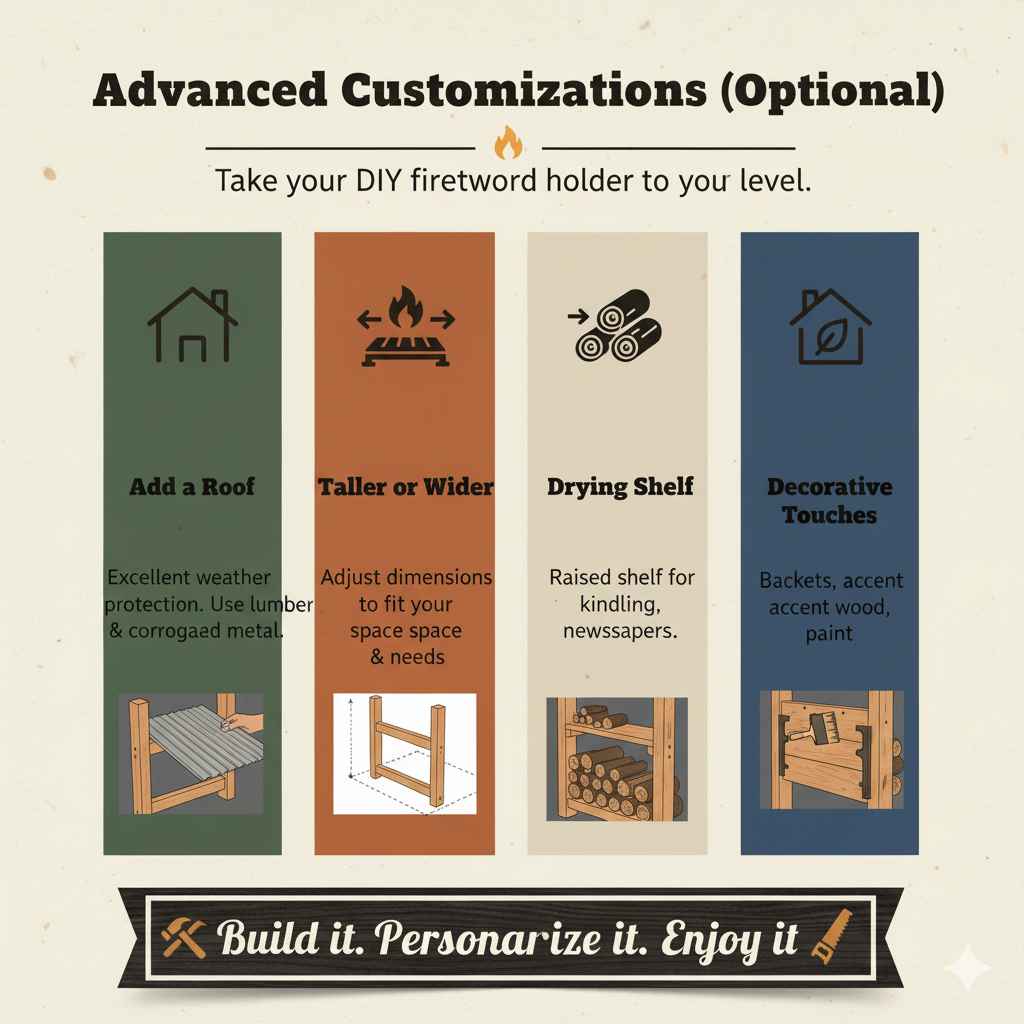
Advanced Customizations (Optional)
Once you’ve mastered the basic build, you might want to customize your firewood holder:
Add a Roof: Construct a simple pitched roof using more lumber and plywood or corrugated metal for excellent weather protection.
Build it Taller or Wider: Adjust the dimensions of the lumber cuts to create a holder that perfectly suits your space and needs.
Integrate a Small Drying Shelf: Add a smaller, raised shelf at the top for holding kindling or newspapers.
Decorative Touches: Add decorative brackets, use different types of wood for accents, or paint it to match your outdoor decor.
Frequently Asked Questions About DIY Firewood Holders
Here are some common questions beginners have:
Q1: What is the best type of wood for an outdoor firewood holder?
A1: Pressure-treated lumber is highly recommended because it’s resistant to rot and insects, making it ideal for outdoor use. Cedar and redwood are also good, naturally resistant options but can be more expensive. Standard pine can be used if thoroughly sealed with an exterior-grade sealant.
Q2: How much weight can a DIY firewood holder hold?
A2: The weight capacity depends on the size and construction of your holder. Our example, built with 2x4s and 4x4s and properly screwed, can safely hold several hundred pounds of firewood. For larger or heavier-duty needs, consider using thicker lumber like 2x6s for the shelves and increasing the number of vertical supports.
Q3: Do I need to seal or stain pressure-treated lumber?
A3: While pressure-treated lumber is engineered to withstand the elements, sealing or staining it will further extend its lifespan and improve its appearance. It also helps to prevent cracking and warping.
Q4: How far apart should the firewood logs be stacked?
A4: It’s best to stack logs with a small gap (about 1/2 inch to 1 inch) between them. This allows for adequate air circulation, which is crucial for seasoning the wood and preventing mold or rot.
Q5: Can I build a firewood holder without a level?
A5: It’s highly recommended to use a level. Building without one can result in a crooked, unstable, and less aesthetically pleasing structure. Even a small bubble level is inexpensive and makes a big difference in the quality of your build.