DIY Barrel Wood Stove: Proven Essential Guide
Learn how to build your own DIY barrel wood stove with this essential guide. We’ll cover everything from selecting materials to safe operation, making it an achievable project for beginners. Build a functional, affordable heating solution for your workshop or cabin.
Are you looking for a cozy way to heat your workshop, garage, or even a small cabin? A DIY barrel wood stove can be a fantastic, budget-friendly solution. Many people find building one a bit daunting, worrying about complex steps or safety. But with the right guidance, it’s a very achievable project! This guide breaks down everything you need, step-by-step, so you can build a reliable and efficient wood stove with confidence. Get ready to discover how simple and rewarding this project can be!
What is a DIY Barrel Wood Stove?
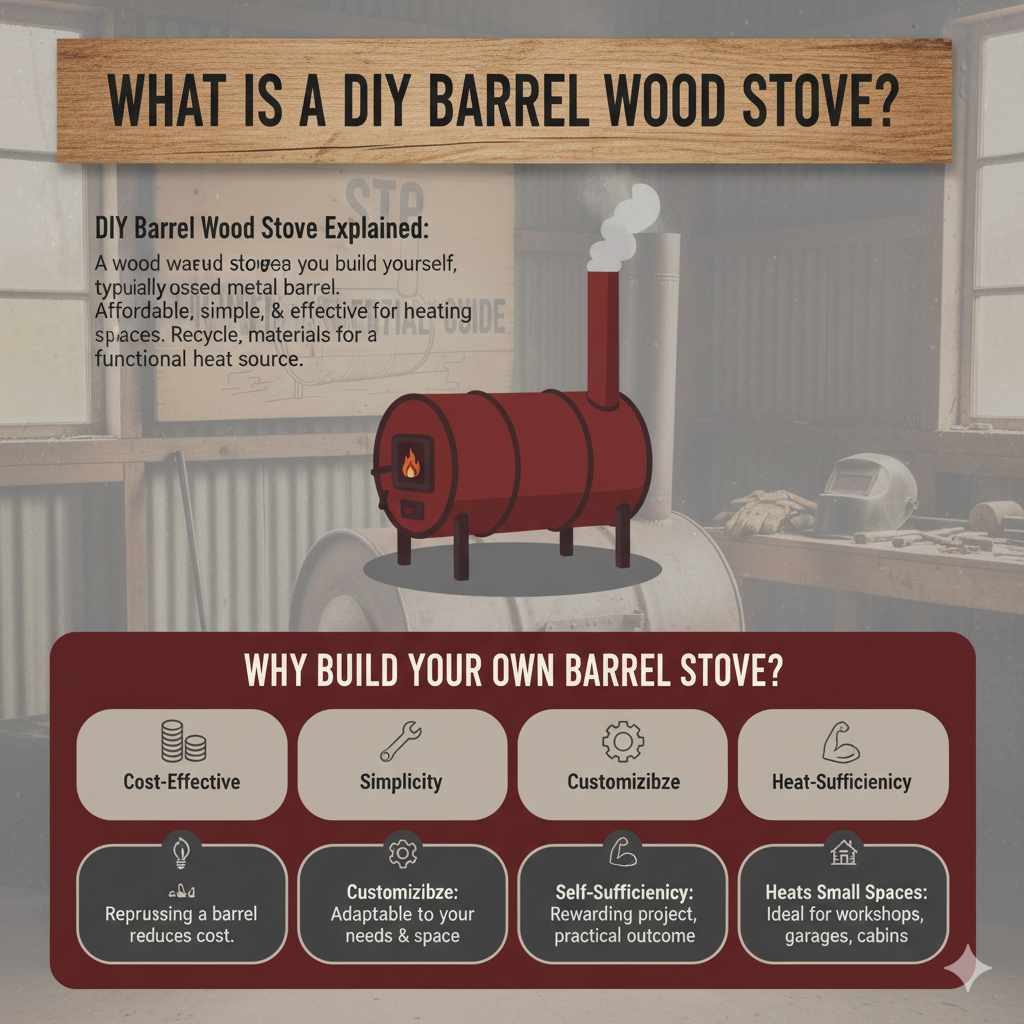
A DIY barrel wood stove is exactly what it sounds like: a wood-burning stove you build yourself, typically using a repurposed metal barrel. These stoves are popular for their affordability, simplicity, and effectiveness in providing heat in smaller spaces. They’re a great way to recycle materials and create a functional heating source without the high cost of a manufactured unit.
Why Build Your Own Barrel Stove?
Cost-Effective: Repurposing a barrel significantly reduces the cost compared to buying a new stove.
Simplicity: The basic design is relatively straightforward, making it accessible for beginners.
Customizable: You can adapt the design to fit your specific needs and space.
Self-Sufficiency: It’s a rewarding project that provides a valuable skill and a practical outcome.
Heats Small Spaces: Ideal for workshops, garages, sheds, campers, or off-grid cabins.
Essential Materials and Tools
Gathering the right materials and tools is the first crucial step. Don’t worry if some items seem unfamiliar; we’ll explain as we go. Safety first is always the motto in any DIY project!
Materials You’ll Need:
Metal Barrel: A 55-gallon steel drum is most common. Ensure it’s clean and has not stored flammable materials. A food-grade barrel is ideal. A quick search for “food grade 55 gallon barrel” online will give you an idea of where to find them.
Steel Plate: For the top, bottom, door, and flue collar. Thickness of around 1/8 inch (approximately 3mm) or thicker is recommended for durability.
Steel Pipe: For the stovepipe. Typically 4-6 inches in diameter. You’ll need enough length to vent outside safely.
Hinges and Latch: For the stove door. Heavy-duty ones are best.
Grill Grate (Optional): To elevate wood inside for better airflow.
Door Seal (Optional): High-temperature gasket material for a tighter seal.
High-Temperature Paint: To protect the exterior and make it look nice.
Fasteners: Bolts, nuts, and washers for attaching the door and any internal components.
Welding Rods/Flux (if welding): E6013 is a common choice for mild steel.
Grinding Discs: For cutting and shaping metal.
Cutting Discs: For your angle grinder.
Tools You’ll Need:
Angle Grinder: An absolute must-have for cutting metal.
Drill and Drill Bits: For making pilot holes and larger access holes.
Measuring Tape: For accurate measurements.
Marker or Soapstone: For marking cut lines on the metal.
Hammer and Pliers: For adjustments.
Safety Gear: Crucially important! This includes safety glasses or a face shield, heavy-duty work gloves, long sleeves, sturdy pants, and a welding helmet if welding.
Welder (Optional but recommended): A MIG or stick welder makes assembly much easier and more durable. If you don’t have one, you can often find local metal fabrication shops that can do the welding for you for a fee.
Clamps: To hold pieces in place while working.
Metal File: For smoothing sharp edges.
Step-by-Step Barrel Stove Construction
Let’s get building! Remember to wear your safety gear throughout this process. Take your time and double-check your measurements.
Step 1: Prepare the Barrel
1. Clean Thoroughly: If your barrel contained anything before, wash it out with soap and water. If it had oily or chemical residue, you might need to burn it out in a well-ventilated outdoor area (with fire safety precautions!), then clean again. Ensure it’s completely dry.
2. Decide Orientation: Most barrel stoves are built horizontally, meaning the barrel lies on its side. This is generally easier to load and can provide more even heating. Some designs use a vertical barrel, but we’ll focus on the horizontal orientation here.
Step 2: Mark and Cut the Door Opening
1. Positioning: On the side of the barrel that will be the top, measure and mark a rectangular opening for your door. Leave at least 2-3 inches of space from the ends and the top of the barrel for structural integrity.
2. Cutting: Using your angle grinder with a cutting disc, carefully cut along your marked lines. Go slowly and steadily for a clean cut.
3. Save the Cut-out: The piece you cut out will be used to make your door.
Step 3: Fabricate and Attach the Door
1. Prepare the Door Panel: Take the metal piece you just cut out. It might be slightly warped, so if needed, gently bend it back to shape.
2. Create a Frame (Optional but Recommended): For a stronger, more sealed door, you can weld or bolt a U-shaped frame around the inside edge of the barrel opening. This provides a lip for the door to close against.
3. Attach Hinges: Position your door panel over the opening. Mark where your hinges will attach to both the barrel opening and the door. Weld or bolt the hinges securely. Ensure the door opens smoothly.
4. Add Latch: Install a latch on the opposite side of the hinges to keep the door securely shut. A simple slide bolt or a spring-loaded latch works well.
5. Add Gasket (Optional): For better heat retention and less smoke leakage, attach a high-temperature gasket material around the inside edge of the door or the frame.
Step 4: Create the Flue (Exhaust) Opening
1. Positioning: The flue, or stovepipe, is where the smoke exits. This should be positioned on the top or the back of the barrel, away from the door. Placing it towards the back and slightly towards the top is common.
2. Marking: Mark a circular opening that matches the diameter of your steel pipe (e.g., 4 or 6 inches). You can trace a pipe end or use a compass.
3. Cutting: Use your angle grinder to cut out the circle. A hole saw attachment for your drill can also work for smaller diameters.
4. Fabricate Flue Collar: Cut a circular piece of steel plate about 1-2 inches larger in diameter than your flue opening. Cut a hole in the center of this plate that matches your flue pipe diameter. Weld this collar around the flue opening on the barrel. This provides a strong mounting point for your stovepipe.
5. Attach Pipe: Slide your stovepipe into the collar and secure it. Welding is the most robust method, but tight-fitting friction or small bolts can also work.
Step 5: Add Air Intake (Crucial for Combustion)
1. Location: You need a way for fresh air to enter the stove to feed the fire. This is often done with a small adjustable vent near the bottom of the firebox or sometimes through the door.
2. Simple Vent: Drill a few 1-inch holes near the lower part of the barrel. You can create a simple sliding damper plate to cover or uncover these holes to control airflow (and thus, the burn rate).
3. Door Venting: You can also drill holes directly into the door and create a smaller adjustable cover.
Step 6: Install Internal Supports and Grate (Optional)
1. Grate Support: If you want to use a grill grate inside to elevate the wood, you’ll need to create a way to support it. Weld small L-brackets or angle iron pieces on the inside walls of the barrel at the desired height.
2. Grate Placement: Place your grill grate on these supports. This allows air to circulate underneath the wood, leading to a more efficient burn.
Step 7: Secure the Top and Bottom (If Separated)
If your barrel has removable tops or bottoms, ensure they are sealed and secured properly. Welding or using high-temperature sealant is recommended for permanent fixtures. For a standard 55-gallon drum, the ends are usually already welded shut.
Step 8: Finishing Touches
1. Smooth Edges: Use a metal file to smooth down any sharp edges, especially around the door opening and flue.
2. Clean Again: Give the entire stove a good wipe-down to remove metal dust and debris.
3. High-Temperature Paint: Apply several light coats of high-temperature stove paint according to the manufacturer’s instructions. This protects the metal from rust and gives your stove a professional look. Allow it to cure fully before its first fire.
Stovepipe and Installation for Safety
This is arguably the most critical part of your DIY barrel stove project. Improper installation can lead to chimney fires or carbon monoxide poisoning. Always prioritize safety.
Stovepipe Setup:
1. Secure Connections: Ensure all sections of your stovepipe are securely connected. Use high-temperature sealant or self-tapping screws to join pipe sections.
2. Exit Point: The stovepipe must extend outdoors and above the roofline of the structure it’s heating to ensure proper draft and exhaust of smoke and gases. Building codes often have specific requirements for chimney height relative to the roof and nearby structures. Refer to local building codes or consult with a professional if unsure. The National Fire Protection Association (NFPA) offers valuable resources on safe stove installation.
3. Clearances: Maintain adequate clearance between the stovepipe and any combustible materials (wood, insulation, etc.). A minimum of 18 inches is often recommended, but this can be reduced with proper heat shielding. Check your local building codes and stove manufacturer guidelines (even for DIY ones, they provide good benchmarks). For example the International Code Council (ICC) provides building safety standards.
4. Roof Flashing and Cap: Use a proper roof flashing kit where the pipe penetrates the roof to prevent leaks. A spark arrestor cap on the end of the pipe can prevent embers from escaping and is often required by code.
Floor Protection:
Place your barrel stove on a non-combustible surface. This could be concrete, brick, or a thick layer of sand or gravel.
Maintain a safe distance between the stove and any combustible walls or furniture. A minimum of 36 inches is generally advised for the sides and back, and more for the front. Again, building codes are your best guide here.
Operating Your DIY Barrel Stove Safely and Efficiently
Now that your stove is built, let’s talk about using it.
First Firing:
When you first fire up your stove, do so cautiously and with minimal fuel. This helps to cure the high-temperature paint and allows the metal to expand slowly.
Ensure the area is well-ventilated. You might notice some odors or smoke as the paint cures; this is normal.
Burning Wood:
Fuel Type: Use dry, seasoned hardwood. Wet or unseasoned wood creates more smoke, creosote buildup (which can cause chimney fires), and less heat.
Loading: Don’t overload the stove. Leave space for air to circulate around the wood.
Airflow Control: Use the air intake vent to control the burn rate. Open it for a hotter, faster burn; close it partially or fully for a slower, longer burn. Never close the air intake completely when there is fire in the stove, as this can lead to incomplete combustion and the production of carbon monoxide.
Ash Management: Regularly clean out the ash. Too much ash buildup can restrict airflow to the burning wood. Dispose of ashes in a metal container away from any combustible materials.
Maintenance:
Regular Inspection: Periodically inspect your stove for cracks, rust, or loose parts.
Stovepipe Cleaning: Clean your stovepipe regularly (at least once a year, more often if you use the stove heavily) to remove creosote buildup. Scrape it with a chimney brush.
Door Seal: Check the door gasket annually and replace it if it’s worn or damaged.
Tips for Better Performance and Durability
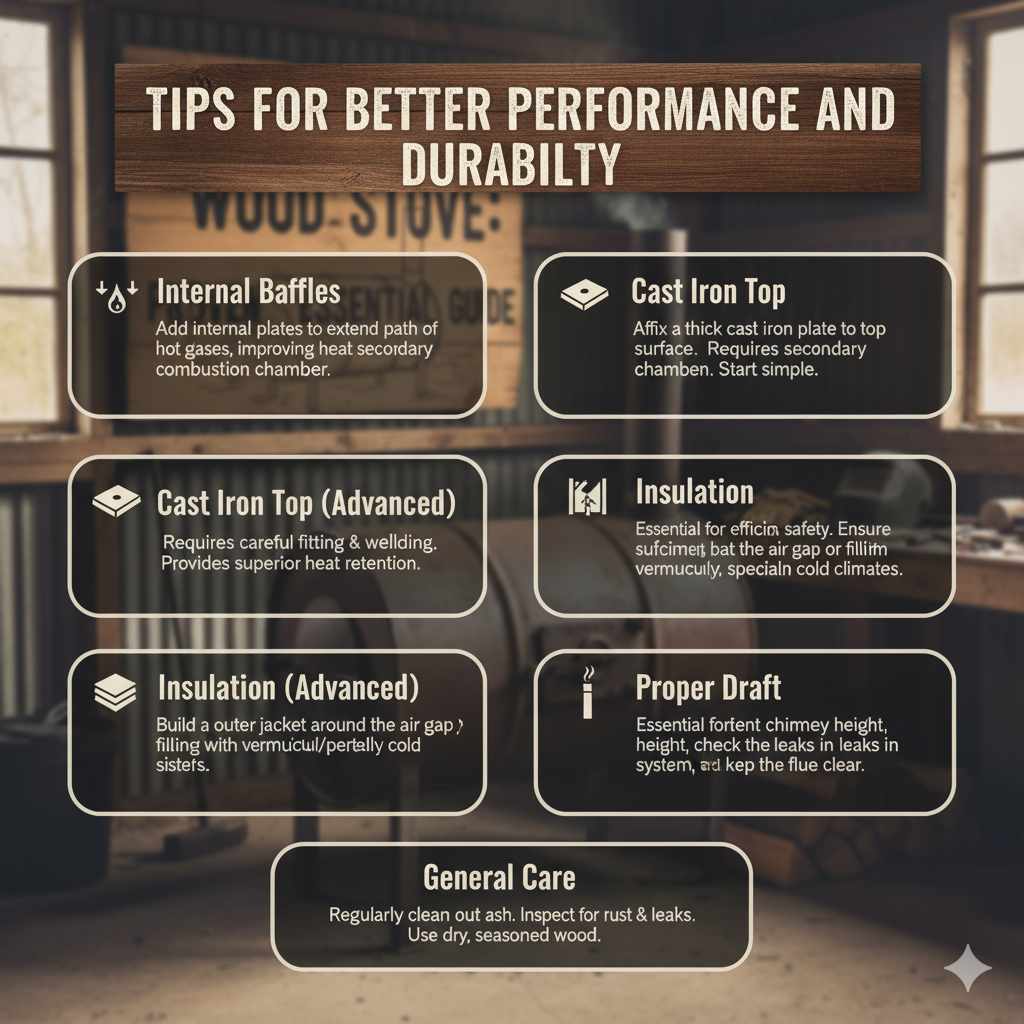
Internal Baffles: Consider adding internal baffles, or even a secondary combustion chamber, although this adds complexity. For a beginner, focus on a simple, well-built design first.
Cast Iron Top (Advanced): For a more robust and heat-retaining top, some advanced DIYers affix a cast iron plate to the barrel top. This requires careful fitting and welding.
Insulation: For increased efficiency, especially in colder climates, it’s possible to build an outer jacket around the barrel, creating an air gap for insulation, or even filling the gap with vermiculite or perlite. This is a more advanced project.
Proper Draft: A good draft is essential. If your stove doesn’t seem to draw well, it could be due to insufficient chimney height, leaks in the system, or a blocked flue.
Pros and Cons of a DIY Barrel Wood Stove
Like any project, there are advantages and disadvantages to consider.
Pros:
Affordability: Significantly cheaper than commercial stoves.
Customization: Can be tailored to specific needs.
Resourcefulness: Gives new life to discarded materials.
Simplicity: Basic design is manageable for DIYers.
Effective Heating: Can provide ample heat for smaller spaces.
Cons:
Safety Concerns: Requires careful attention to construction and installation to prevent fires and carbon monoxide leaks.
Durability: May not last as long as professionally manufactured stoves, depending on construction quality.
Efficiency: Can be less efficient than modern, EPA-certified stoves.
Aesthetics: Might not have the polished look of a store-bought unit.
Time Commitment: Building a quality stove takes time and effort.
Here’s a quick comparison table to help visualize:
| Feature | DIY Barrel Wood Stove | Manufactured Wood Stove |
|---|---|---|
| Cost | Low (primarily material and tool costs) | High (purchase price can be thousands) |
| Construction | Requires DIY skills, tools, and safety precautions | No construction needed, ready to install |
| Efficiency | Varies greatly, generally lower than modern units | Often high, EPA-certified models are very efficient |
| Durability | Varies by build quality, can be very durable | High, built to strict manufacturing standards |
| Safety | Entirely dependent on DIYer’s execution | Designed and tested to meet safety standards |
| Aesthetics | Rustic, utilitarian | Wide range of styles, often modern and sleek |
Frequently Asked Questions (FAQ)
Q1: Is it safe to use a DIY barrel stove?
A: Yes, it can be very safe if built and installed correctly. The most important aspects are ensuring a good seal for smoke containment, proper stovepipe installation with adequate clearances to combustibles, and always having a working carbon monoxide detector nearby. Always wear safety gear during construction.
Q2: What kind of barrel should I use?
A: A 55-gallon steel drum is ideal. It must be thoroughly cleaned and free from any flammable or toxic residues. Food-grade barrels are a good choice. Avoid barrels that held chemicals.
Q3: Do I need to weld to build a decent barrel stove?
A: Welding makes for a much stronger and more durable stove, especially for sealing joints and attaching the flue collar. However, if welding isn’t an option, you can use high-temperature sealant and fasteners, but this may compromise longevity and airtightness. You might also find a local welder to help with specific tasks.
Q4: How do I ensure a good draft?
A: A good draft is achieved by having a properly sized flue pipe, sufficient chimney height (generally extending at least 3 feet above the highest point of the roof it passes through, and at least 2 feet higher than anything within 10 feet), and an airtight system. Leaks in the barrel or pipe will reduce draft.
Q5: Can a barrel stove heat a whole house?
A: Generally, no. DIY barrel stoves are best suited for heating smaller, enclosed spaces like workshops, garages, sheds, or single rooms. They are not typically designed or certified for whole-house heating.
Q6: How often should I clean a DIY barrel stove and its chimney?
A: The stove itself should be de-ashed regularly. The chimney (stovepipe) should be inspected and cleaned for creosote buildup at least annually, and more frequently if you notice reduced draft or deposits. This is crucial for preventing chimney fires.
Q7: Where can I find specific DIY barrel stove plans?
A: While this guide provides general steps, many online resources, forums, and woodworking communities offer detailed plans, diagrams, and variations of the DIY barrel stove. Searching for “DIY barrel stove plans” will yield many results.