DIY Driveway Gates Wooden: Stunning Essential Guide
Build stunning DIY wooden driveway gates with this essential guide! Learn simple steps, necessary tools, and expert tips for a beautiful, secure, and affordable entrance to your home. Perfect for beginners!
Are you looking to add a touch of elegance and security to your property? Wooden driveway gates can do just that, but the thought of building them might seem a bit daunting. Many homeowners feel stuck, wondering if they have the skills or the right information to tackle such a project. Will it be too complicated? Too expensive? Will it even look good? You’re not alone! This guide is designed specifically for you, the DIY enthusiast and homeowner, to show you that building beautiful, sturdy wooden driveway gates is absolutely achievable. We’ll break down everything step-by-step, making this exciting project straightforward and rewarding. Get ready to transform your entryway!
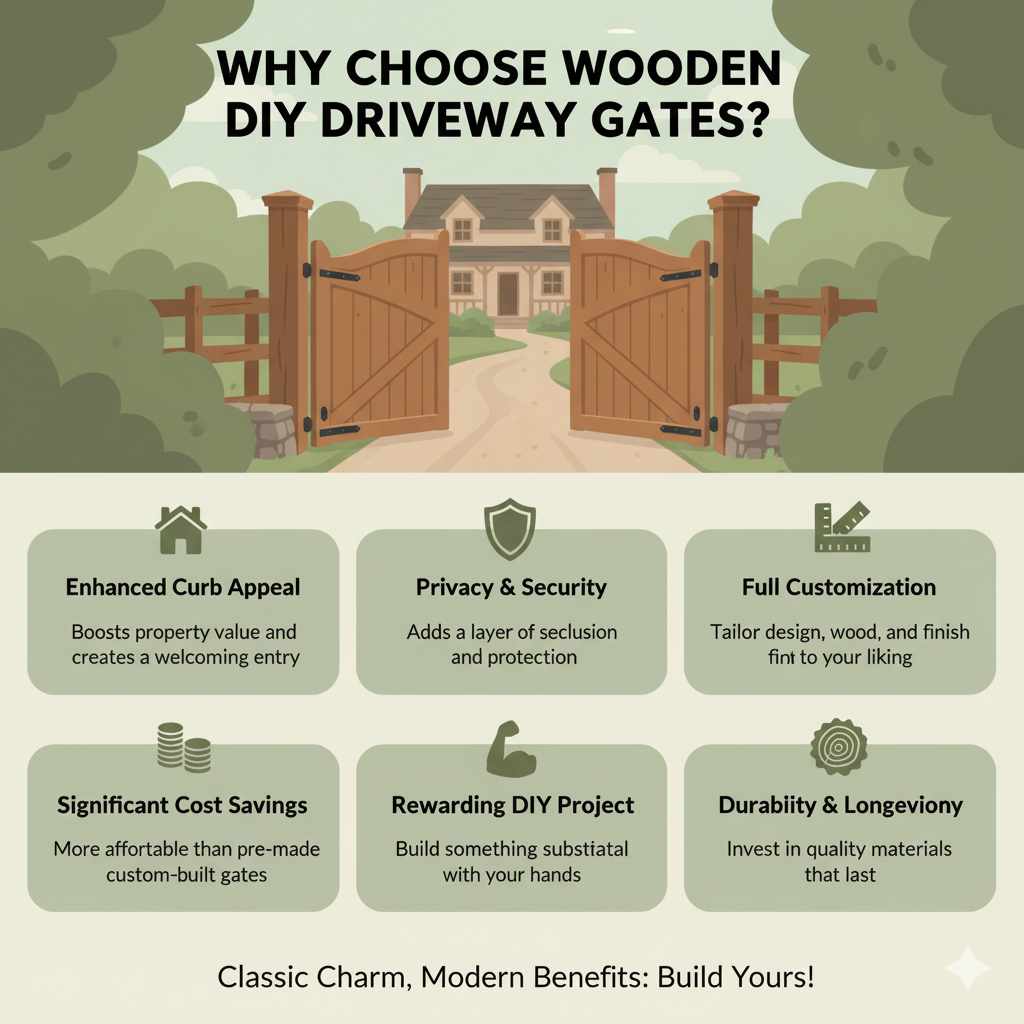
Why Choose Wooden DIY Driveway Gates?
Wooden driveway gates offer a classic and welcoming charm that complements many home styles. They provide a sense of privacy and improved security, while also boosting your property’s curb appeal and potentially its value. When you choose to build them yourself, you gain incredible control over the design, the materials used, and most importantly, the cost. Instead of shelling out a small fortune for pre-made gates, you can invest that money in quality lumber and hardware, ensuring a result that’s both beautiful and built to last. Plus, the satisfaction of creating something so substantial and functional with your own two hands is truly priceless.
Planning Your DIY Wooden Driveway Gates Project
Before we pick up a single tool, let’s lay the groundwork for success. Good planning is the secret ingredient to any great DIY project, especially one as visible as driveway gates. We need to consider aesthetics, functionality, your specific site, and the materials that will best suit your needs.
Assessing Your Needs and Site
First, take a good look at your driveway. How wide is it? What’s the terrain like? Are there any slopes or uneven sections? Understanding these factors will influence the size, design, and even the type of hardware you’ll need. Think about:
- Driveway Width: Measure the exact width of the opening you want to cover. This will determine the size of your gates.
- Gate Swing: Will your gates swing inward (most common) or outward? Consider any obstacles like landscaping, sidewalks, or driveways on the other side.
- Ground Clearance: Account for the natural slope of your driveway. You’ll need enough clearance so the gates don’t drag.
- Local Regulations: In some areas, there might be building codes or homeowner association rules regarding gate height, type, or materials. It’s always wise to check! You can often find information through your local municipality’s building department website.
- Aesthetic Style: What look are you going for? Rustic, modern, traditional? This will guide your wood choice and design.
Choosing Your Wood
The type of wood you select is crucial for durability, appearance, and maintenance. For exterior projects like driveway gates, you need wood that can stand up to the elements. Here are some popular and durable choices:
| Wood Type | Pros | Cons | Best For |
|---|---|---|---|
| Cedar | Naturally rot and insect resistant, lightweight, attractive grain. | Can be more expensive, softer wood so prone to dents. | Those seeking natural beauty and good resistance. |
| Redwood | Excellent rot and insect resistance, stable, beautiful color. | Often the most expensive option, availability can vary. | High-end look, maximum durability against weather. |
| Pressure-Treated Pine | Most affordable, readily available, treated for rot and insect resistance. | Can be prone to warping or cracking if not sealed properly, less aesthetically pleasing natural grain for some. | Budget-conscious projects, maximum protection. |
| Cypress | Good rot and insect resistance, durable, attractive appearance. | Can be more expensive than pine, availability may be limited. | Coastal areas or damp environments. |
No matter which wood you choose, always opt for exterior-grade lumber. For pressure-treated wood, ensure it’s rated for ground contact application if relevant. Proper sealing and regular maintenance will extend the life of any wood.
Essential Tools and Materials
Having the right tools makes the job much smoother and safer. Here’s a list of what you’ll likely need:
Tools:
- Tape Measure: For precise measurements.
- Pencil: For marking cuts.
- Safety Glasses: Always protect your eyes!
- Work Gloves: To protect your hands.
- Circular Saw or Miter Saw: For making straight, accurate cuts. A miter saw is ideal for repeatable cuts at specific angles.
- Drill/Driver: For pre-drilling holes and driving screws.
- Level: Crucial for ensuring your gates are plumb and level.
- Clamps: To hold pieces together while fastening.
- Orbital Sander: For smoothing edges and surfaces.
- Post Hole Digger or Auger: If you need to set new posts.
- Shovel: For backfilling post holes.
- Wheelbarrow: For mixing concrete (if setting posts).
- Speed Square: For marking square cuts and angles.
Materials:
- Lumber: For the gate frames, pickets, and bracing. Your chosen exterior-grade wood.
- Gate Hardware: Hinges, latches, and optional handles. Heavy-duty, galvanized, or black wrought iron hardware works well.
- Gate Posts: Sturdy wooden posts or metal posts, depending on your preference and gate weight.
- Concrete Mix: If setting wooden posts for stability.
- Gravel: For drainage at the bottom of post holes.
- Exterior Wood Screws: Corrosion-resistant screws, often called deck screws.
- Exterior Wood Glue: For added strength at joints.
- Wood Sealer or Stain: To protect the wood and enhance its appearance.
- Sandpaper: Various grits for smoothing.
Step-by-Step Guide to Building Your DIY Wooden Driveway Gates
Let’s get building! This guide will cover a common, sturdy design for a pair of wooden gates. Remember to always measure twice and cut once.
Step 1: Prepare Your Site and Set Posts
If you don’t already have gate posts, you’ll need to set them. This is a critical step for the longevity and functionality of your gates.
- Mark Post Locations: Measure the total width required for your gates and mark the exact center for each post. The space between the posts should be the total gate width minus a small gap for the gate to swing freely.
- Dig Post Holes: Dig holes deep enough to go below the frost line in your area (check local building codes) and wide enough for a concrete footing. A general rule is to dig them about 1/3 the length of the post into the ground. For a 6-foot post, a 2-foot depth is common.
- Add Gravel: Place a few inches of gravel at the bottom of each hole for drainage.
- Place Posts: Position your posts in the holes. Use a ladder or temporary braces to hold them upright.
- Check for Plumb: Use a level to ensure each post is perfectly vertical. This is extremely important.
- Mix and Pour Concrete: Mix concrete according to the manufacturer’s instructions and fill the holes around the posts. Slope the top of the concrete away from the post to allow water to drain.
- Brace and Cure: Brace the posts securely to keep them plumb while the concrete cures. Allow at least 24-48 hours for the concrete to set before proceeding.
If your posts are already in place, ensure they are sturdy, plumb, and at the correct spacing for your gates. You can often find detailed guidance on setting gate posts from reputable DIY sites, such as those provided by lumber associations.
Step 2: Design and Cut Your Gate Components
For a standard, sturdy gate, we’ll build a rectangular frame with diagonal bracing for support. Let’s assume you’re building two gates that meet in the middle, each about 4 feet wide and 5 feet tall.
- Frame Pieces:
- Measure the desired height and width for one gate.
- Cut two vertical pieces (stiles) to your desired height.
- Cut two horizontal pieces (rails) for the top and bottom. These will be the gate width minus the thickness of your two stiles.
- Diagonal Brace:
- Measure the diagonal distance across the back of the gate frame, from the top of one stile to the bottom of the other. This piece will prevent sagging. It’s often placed on the side that will be less visible.
- Consider making this brace form a “Z” shape for extra rigidity if your gate is wide. Cut one long diagonal piece to span from the top outer corner to the bottom inner corner, and then a shorter horizontal piece to connect the middle.
- Pickets or Panels:
- Decide on your design: vertical pickets, horizontal boards, or solid panels.
- Measure and cut your pickets or panels to the desired length. For pickets, you’ll need to calculate the number based on their width and the spacing you want.
Step 3: Assemble the Gate Frames
This is where the gate starts to take shape.
- Lay Out Frame: Lay out your four frame pieces (two stiles, two rails) on a flat surface. Your stiles should be the full height, and the top and bottom rails will fit between them.
- Join Corners: There are several ways to join the frame:
- Butt Joints with Screws: The simplest method. Apply exterior wood glue to the ends of the rails, position them between the stiles, and secure with two exterior wood screws drilled through the stile into the end of the rail. Pre-drilling pilot holes will prevent the wood from splitting.
- Pocket Holes: Using a Kreg Jig or similar tool, drill pocket holes on the ends of your rails and then attach them to the stiles with screws. This creates a very strong and clean joint.
- Mortise and Tenon (Advanced): For maximum strength, but this requires more advanced woodworking skills and tools.
- Attach Diagonal Brace: Position your diagonal brace(s) on the back of the frame. Ensure it runs from the top outside corner to the bottom inside corner to counteract sag. Attach securely with glue and screws.
Step 4: Attach Pickets or Infill Panels
Now, fill in the frame with your chosen design.
- For Pickets:
- Start by attaching the first and last pickets to the top and bottom rails, ensuring they are flush with the outside edges of the frame.
- Use a spacer (a scrap piece of wood of the desired gap width) to ensure consistent spacing between pickets.
- Attach each picket with two screws, one into the top rail and one into the bottom rail.
- For Panels:
- If using horizontal boards or panels, attach them to the inner side of the frame, ensuring they are plumb. You can also attach them to the back of the frame overlapping the rails.
Work your way across the gate, adding all your pickets or panels. Always check for squareness as you go. For wider gates, consider adding an extra vertical support in the middle to attach pickets to, adding structural integrity.
Step 5: Finishing Touches and Hardware Installation
The gates are almost ready to swing!
- Sand: Thoroughly sand all surfaces and edges of your gates. Start with a coarser grit sandpaper (like 80 or 100) to smooth out any rough spots and then move to a finer grit (like 150 or 220) for a smooth finish. This step is vital for a professional look and to prepare the wood for finishing.
- Seal or Stain: Apply your chosen exterior wood sealer or stain. Follow the product’s instructions for application and drying times. This protects the wood from UV rays, moisture, and mildew, greatly extending its life. This is crucial for durability. More information on wood protection can be found from resources like the Forest Products Laboratory.
- Install Hardware:
- Hinges: Decide where you want your hinges to attach to the gate stiles and the posts. For heavy gates, strap hinges are a good choice. Ensure they are robust and rated for exterior use. Use your level to align hinges, and pre-drill pilot holes before screwing them in place.
- Latch: Determine the type of latch you want (a gravity latch, a slide bolt, or a more decorative latch). Position it so the two gates meet securely in the middle.
- Hang Gates: This is often the trickiest part. Carefully lift each gate and attach the hinges to the posts. Adjustments may be necessary to ensure they hang straight and swing freely without binding.
Step 6: Final Adjustments and Maintenance
Once your gates are hung, give them a test swing. Do they open and close smoothly? Do they meet properly in the middle? Make any necessary adjustments to the hinges or latch. Add a gate stop if needed.
Regular maintenance is key for keeping your wooden driveway gates looking great and functioning well for years to come:
- Inspect hinges and fasteners periodically and tighten as needed.
- Clean the gates annually to remove dirt and mildew.
- Reapply sealant or stain every 1–3 years, or as recommended by the product manufacturer.
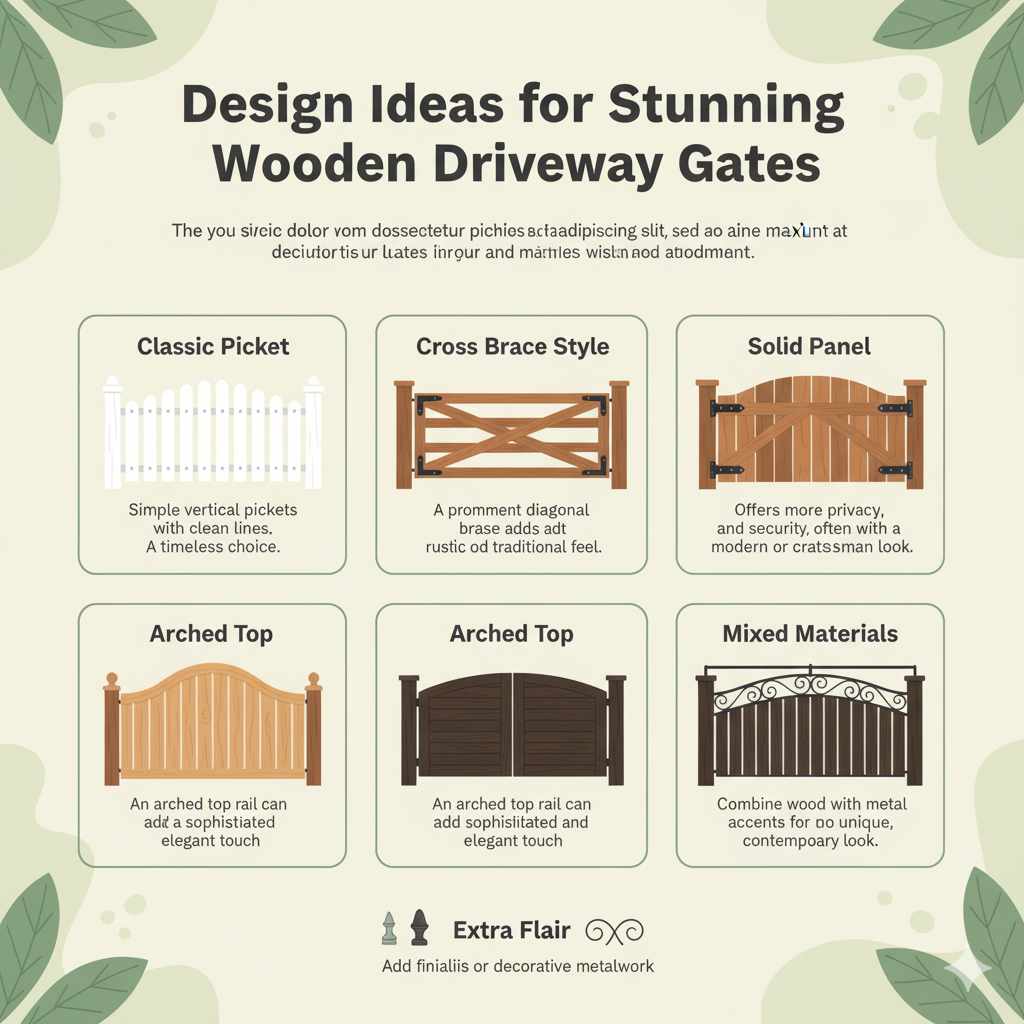
Design Ideas for Stunning Wooden Driveway Gates
The beauty of DIY is personalization! Here are a few design ideas to inspire you:
- Classic Picket: Simple vertical pickets with clean lines. Always a timeless choice.
- Cross Brace Style: A prominent diagonal cross brace adds a rustic or traditional feel.
- Solid Panel: Offers more privacy and security, often with a modern or craftsman look.
- Arched Top: An arched top rail can add a sophisticated and elegant touch.
- Mixed Materials: Combine wood with metal accents for a unique, contemporary look.
Consider adding finials to the tops of pickets or decorative metalwork for extra flair. A well-designed gate can become a true focal point of your home’s exterior.
Common Questions About DIY Wooden Driveway Gates
Q1: How much do DIY wooden driveway gates typically cost?
The cost can vary greatly depending on the size, wood type, and hardware you choose. A pair of DIY wooden gates can range from $200-$800+ for materials, significantly less than pre-fabricated gates which can cost several thousand dollars.
Q2: What is the easiest wood to work with for gates?
Pine is generally the most affordable and easiest to cut and drill. However, cedar and redwood are lighter and easier to handle for larger pieces and offer better natural resistance to rot and insects, making the slight increase in cost worthwhile for durability.
Q3: How do I prevent my wooden gates from sagging?
The most critical element is a properly installed diagonal brace. Ensure it runs from the top outer corner to the bottom inner corner. Using sturdy, good-quality hardware and posts that are set deep and plumb is also essential for overall support.
Q4: What are the best hinges for wooden driveway gates?
For durability and security, heavy-duty strap hinges or T-hinges are recommended, especially for larger or heavier gates. Ensure they are made of galvanized steel, stainless steel, or wrought iron for rust resistance. For a smooth swing, proper alignment during installation is key.
Q5: How long will DIY wooden driveway gates last?
With proper construction using exterior-grade lumber, good hardware, and regular maintenance (sealing, cleaning), your DIY wooden gates can last from 10 to 20 years, sometimes even longer. The lifespan depends heavily on the wood type and the climate.