Can You Stain Over Painted Wood? Essential Guide
Yes, you can stain over painted wood, but it requires careful preparation and the right techniques. Simply applying stain to painted surfaces often results in a splotchy, uneven finish. This guide will walk you through the essential steps to achieve a beautiful, stained look on your previously painted wood projects.
Have you ever looked at a painted piece of furniture or trim and thought, “I wish this had that rich, natural wood grain look?” Or maybe you’ve found a great piece that’s painted, but it just doesn’t match your decor. The good news is, you don’t always have to strip all the paint off! Learning if and how to stain over painted wood is a fantastic skill for any DIYer. It opens up a world of possibilities for refreshing old items and achieving that warm, inviting wood aesthetic. While it’s not as straightforward as staining raw wood, with the right approach, you can get stunning results. Stick around, and I’ll show you exactly how to do it, step by step!
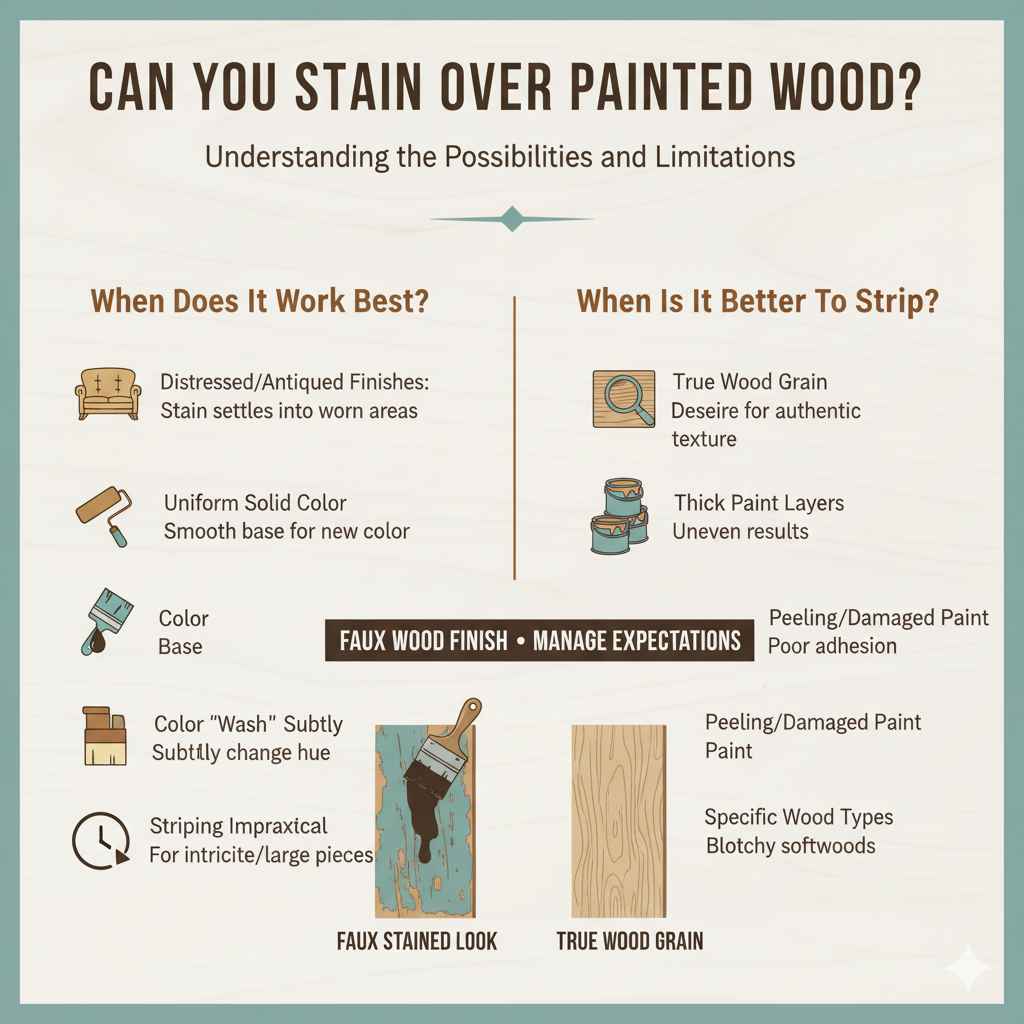
Understanding the Possibilities and Limitations
It’s exciting to think about transforming painted wood into something that looks stained, right? The core idea is to create the illusion of wood grain and depth. However, it’s crucial to understand that you won’t achieve the same deep penetration and natural grain highlight as you would on bare wood. Instead, you’re essentially creating a faux wood finish. This means managing your expectations is key. Some types of paint and some wood species respond better than others. The goal is to make the painted surface mimic stained wood, not to truly reveal the original wood grain.
When Does Staining Over Paint Work Best?
Staining over painted wood works exceedingly well when you’re aiming for a specific look:
- Distressed or Antiqued Finishes: The “stain” can settle into the pre-distressed areas caused by sanding, creating a beautifully aged appearance.
- Uniform, Solid Color Paint: Painting a piece with a solid, even coat of paint before “staining” can create a smooth base for your new color.
- Achieving a Specific Color “Wash”: You can use diluted stain to subtly change the color of the painted surface, giving it a warmer or richer tone.
- When Stripping is Impractical: Sometimes, for very intricate pieces or large areas, completely stripping paint is too time-consuming or difficult.
When Might It Be Better to Strip?
There are definitely times when starting with bare wood is the way to go:
- Desire for True Wood Grain: If your heart is set on seeing the authentic, natural grain of the original wood, you’ll need to strip the paint entirely.
- Thick Layers of Paint: Multiple, thick layers of old paint (especially oil-based) can be very difficult to work over and may lead to uneven results.
- Peeling or Damaged Paint: If the paint is already flaking or severely damaged, it’s a sign that any new finish might not adhere well.
- Specific Wood Types: Some softwoods might absorb stain unevenly even when painted, leading to undesirable blotching.
What You’ll Need: Essential Tools and Materials
Gathering the right supplies is the first step to success. Here’s a checklist of what you’ll want to have on hand for your project. Don’t worry if some items seem unfamiliar; I’ll explain why each is important.
The Shopping List
- Safety Gear: Safety glasses, gloves (nitrile or chemical-resistant are best), and a respirator mask (highly recommended, especially when sanding or using strong chemicals). Your health is paramount!
- Cleaner: A good degreaser or TSP (Trisodium Phosphate) substitute.
- Sanding Tools:
- Orbital sander (optional, but helpful for large areas)
- Sanding sponges (for details and curves)
- Sandpaper in various grits (e.g., 80, 120, 180, 220)
- Tack Cloth: Essential for removing fine dust after sanding.
- Primer: A high-quality stain-blocking primer (your secret weapon for adhesion!).
- “Stain” Product:
- Gel Stain: This is often the best choice for staining over painted wood because it sits on the surface more, giving you control.
- Wood Glaze: A tinted glaze can also work well to add color and depth.
- Water-based or Oil-based Stain: Can be used, but may require more careful application and thinning.
- Application Tools:
- High-quality synthetic bristle brushes (for water-based products)
- Natural bristle brushes (for oil-based products)
- Foam brushes (good for smooth surfaces and less likely to leave bristle marks)
- Clean, lint-free rags (for wiping excess stain/glaze)
- Topcoat/Sealer: Polyurethane (water-based or oil-based, depending on your stain), polycrylic, or lacquer for protection.
- Mineral Spirits or Water: Depending on the type of stain and topcoat you choose, for thinning and cleanup.
- Drop cloths or old newspapers: To protect your work area.
Choosing Your “Stain”
When you’re staining over paint, the type of product you use makes a big difference. Traditional liquid stains are designed to soak into bare wood. For painted surfaces, you need something more forgiving:
| Product Type | Best For | Pros | Cons |
|---|---|---|---|
| Gel Stain | Creating a faux wood grain; achieving a deeper color tone. | Sits on the surface, offering better control; less likely to drip; good adhesion over properly prepped surfaces; rich color. | Can be thicker to work with; may require mineral spirits for thinning. |
| Wood Glaze | Adding a subtle color wash or antiqued effect; softening harsh paint colors. | Easy to control and wipe back; creates a transparent, layered look; water-based options are readily available and easy to clean. | Offers less depth than gel stain; may need multiple coats for darker colors; requires a good topcoat for durability. |
| Traditional Stain (Water/Oil-Based) | When you have a very specific color and can properly thin it. | Wide range of colors; can be thinned to create a wash. | Can be tricky to get an even coat over paint; may lift or react with certain paint finishes; requires extensive surface prep. |
Step-by-Step: Your Guide to Staining Over Painted Wood
Now that you’ve got your supplies, let’s get to the fun part! Remember, patience and good preparation are your best friends here. We’re going to work through this methodically.
Step 1: Cleanliness is Key!
Before you do anything else, your piece needs to be spotless. Paint can hide dirt, grease, and grime, but these contaminants will prevent your new finish from adhering properly. Grab your cleaner and a rag. If you’re using TSP or a TSP substitute, be sure to follow the product’s instructions carefully and wear your protective gear. Rinse thoroughly with clean water and allow the piece to dry completely. A clean surface is a happy surface!
Step 2: The Crucial Sanding Stage
This step is non-negotiable. You need to create a surface that the primer and your new “stain” can grip onto. The goal isn’t to remove all the paint, but rather to scuff it up. This process is called “de-glossing” or creating “tooth.”
- Start with a Medium Grit: Begin with sandpaper in the 100-150 grit range. If the paint is very glossy or smooth, you might even start with 80 grit.
- Sand Lightly and Evenly: You’re just trying to dull the shine. You don’t need to sand down to the bare wood. If you see glossy spots, keep sanding them until they are dull.
- Pay Attention to Details: Use sanding sponges or folded sandpaper to get into corners, crevices, and any decorative details.
- Surface Check: Run your hand over the surface. It should feel slightly rough, not slick and shiny.
- Clean, Clean, Clean! After sanding, dust is your enemy. Use a vacuum cleaner with a brush attachment, then follow up with a dust-free cloth or your tack cloth. You want that surface to be absolutely free of dust.
Step 3: Apply a Stain-Blocking Primer
This is where the magic really starts to happen. A good quality primer is essential for several reasons:
- Adhesion: It creates a solid base that your gel stain or glaze will stick to, preventing peeling and chipping later on.
- Blocking: If there are any dark spots, knots, or imperfections in the original wood that might bleed through, a stain-blocking primer will prevent this.
- Uniformity: It provides a consistent color base, ensuring your “stained” finish looks even across the entire piece.
Apply one or two thin, even coats of a high-quality stain-blocking primer. Use a good brush or roller that won’t leave too many marks. Let each coat dry completely according to the manufacturer’s instructions. Lightly sand with a fine-grit sandpaper (220 grit is usually perfect) after the primer is dry, and then clean with a tack cloth again. This creates an ultra-smooth surface for your next step.
Step 4: Applying Your Chosen “Stain” (Gel Stain or Glaze)
Now for the fun part – adding color and that faux wood look! Remember, we’re using gel stain or glaze because they are designed to work well on non-porous surfaces and offer more control.
Using Gel Stain:
- Stir, Don’t Shake: Gel stain is thick. Stir it gently but thoroughly. Shaking can create bubbles.
- Work in Small Sections: Apply a thin, even layer of gel stain using a good quality brush or rag. Don’t glob it on.
- Wipe Off Excess: Immediately (or according to the product instructions, which can vary), use a clean, lint-free rag to wipe away the excess stain. Wipe with the direction of the wood grain if you can see it, or in the direction you want the grain to appear.
- Build Color Gradually: For a deeper, richer look, allow the first coat to dry completely (this can take 24-48 hours, so read the can!), then apply a second thin coat and wipe off. You can repeat this process to achieve the desired depth of color.
- Creating a Wood Grain Effect: To enhance the wood grain look, you can use a graining tool or even a stiff-bristled brush. Apply the gel stain, and before wiping, gently drag your graining tool or brush through the wet stain to mimic wood grain patterns. Then, wipe away the excess.
Using Wood Glaze:
- Mix if Necessary: Some glazes come ready to use, while others might need to be tinted.
- Apply Thinly: Using a brush or rag, apply the glaze in thin, even strokes over your primed and sanded surface.
- Wipe Back: Immediately use a clean, soft rag to wipe off the excess glaze. Wipe in the direction of the “grain.” If you want a darker or more antiqued look, leave more glaze in crevices or texture areas.
- Experiment: Glaze is very forgiving. You can wipe it back completely if you don’t like the look. Build up color in thin layers, allowing each to dry according to the manufacturer’s instructions if needed.
Pro Tip: If your gel stain or glaze is creating streaks, and you want a more uniform look, you can sometimes thin it slightly with the appropriate solvent (mineral spirits for oil-based, water for water-based) or use a spray bottle with a very fine mist of the solvent to help it blend while wiping. Always test this on an inconspicuous area first!
Step 5: Letting it Cure
Drying time is crucial. Gel stains and glazes need adequate time to dry thoroughly. This is often longer than you might expect, especially in humid conditions. Don’t rush this step! Check the product label for specific drying and curing times. Curing is the process where the finish hardens internally. Applying a topcoat too soon can ruin your finish.
Step 6: Applying a Protective Topcoat
This is the final protective layer. Your “stained” wood needs this to withstand everyday wear and tear.
- Choose Your Topcoat Wisely: Polyurethane, polycrylic, or lacquer are common choices. Polycrylic is generally easier to work with and cleans up with water, making it a great beginner-friendly option, especially for water-based stains/glazes. Oil-based poly is more durable but has stronger fumes and requires mineral spirits for cleanup.
- Light Coats are Best: Apply thin, even coats using a high-quality brush or foam applicator. Avoid overworking the product, which can lead to bubbles or drag marks.
- Allow Drying Time: Let each coat dry completely before applying the next.
- Light Sanding Between Coats: For a super smooth finish, lightly sand between coats with very fine sandpaper (320-400 grit) and clean with a tack cloth. This knocks down any tiny imperfections or dust nibs.
- Number of Coats: Typically, 2-3 coats are sufficient for most furniture pieces. For high-traffic areas like tabletops, you might consider 3-4 coats.
Once the final coat is dry and fully cured (which can take several days to a couple of weeks, depending on the product and environment), your project is ready to be enjoyed!
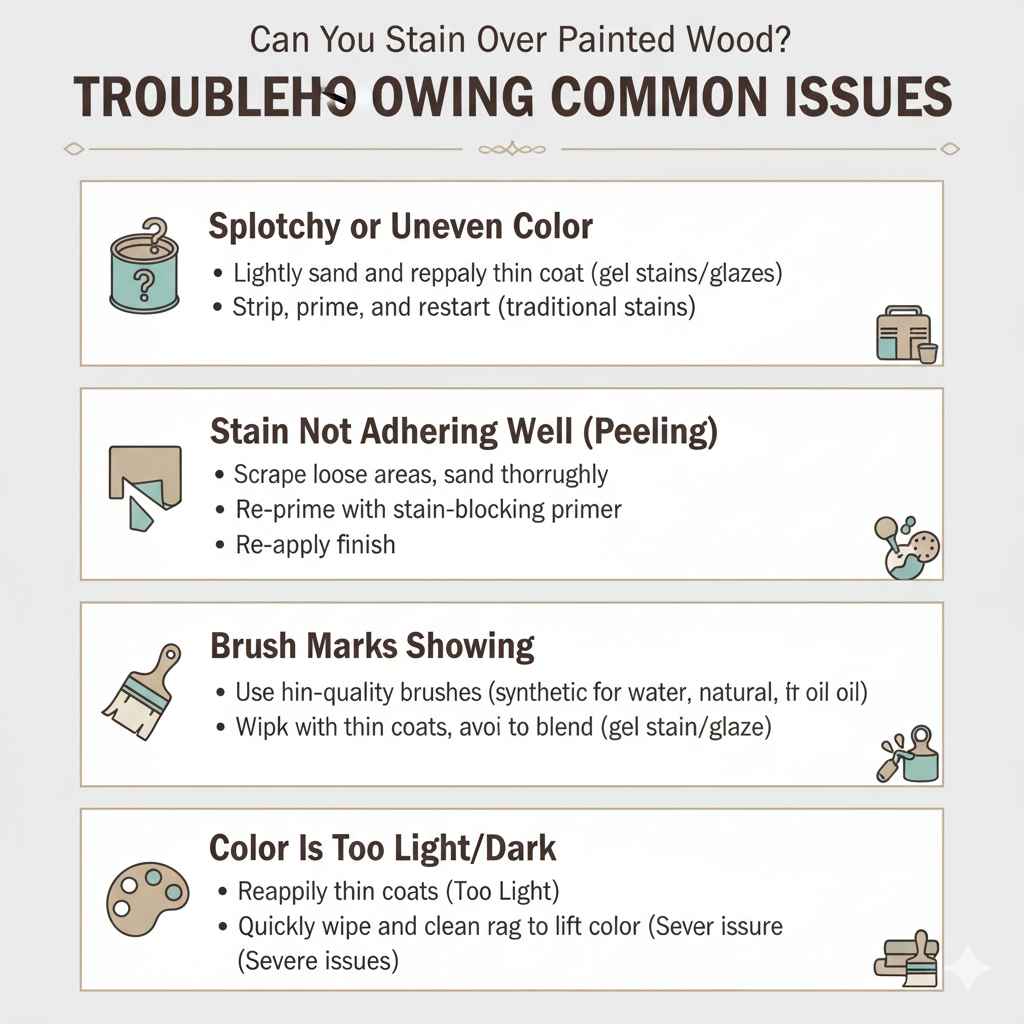
Troubleshooting Common Issues
Even with careful planning, you might run into a hiccup or two. Here are some common problems and how to fix them:
- Splotchy or Uneven Color: This often happens if the surface wasn’t properly prepped, or if the “stain” was applied too thickly without sufficient wiping.
- Solution: For gel stains/glazes, you might be able to lightly sand down the splotchy areas and reapply a thinner coat. For traditional stains, you might need to strip and start with primer. Ensure your primer coat is even.
- “Stain” Not Adhering Well (Peeling): This usually means the primer didn’t stick, or the surface wasn’t clean or sufficiently sanded.
- Solution: This is a tougher fix. You may need to scrape off loose areas, sand thoroughly, re-prime with a stain-blocking primer, and re-apply your finish.
- Brush Marks Showing: This can happen if you use a low-quality brush, or if you overwork the product.
- Solution: Use high-quality synthetic (for water-based) or natural (for oil-based) brushes. Work in thin coats and avoid excessive brushing. For gel stain or glaze, wiping with a rag can often help blend away brush strokes.
- Color is Too Light/Dark:
- Solution: If it’s too light, you can reapply thin coats of gel stain or glaze. If it’s too dark, you may need to work quickly with a clean rag to lift some of the color before it dries, or use a glaze that can be wiped back more easily. For severe issues, you might need to apply a tinted glaze to adjust the tone.
Frequently Asked Questions (FAQ)
Can I stain over latex paint?
Yes, but you must thoroughly clean, sand to create tooth, and use a stain-blocking primer. Latex paint is water-based, and while it adheres reasonably well, proper preparation is crucial for longevity. Gel stain or glaze is highly recommended over latex paint.
Can I stain over oil-based paint?
Yes, with the same preparation steps: thorough cleaning, sanding for adhesion, and a stain-blocking primer. Oil-based paints can be trickier to sand and may require specific cleaners. Always ensure the oil-based paint is fully cured and clean before proceeding.