Can You Put Command Strips On Wood: Essential Guide
Yes, you can put Command Strips on wood, but success depends on the wood’s finish and surface. Properly prepared wood allows Command Strips to adhere well, holding your items securely and damage-free. This guide walks you through ensuring a strong bond every time.
Ever tried to hang something lightweight on a beautiful wooden surface, only to worry about damaging the finish? It’s a common dilemma for DIYers and homeowners! You want to add shelves, decorate with frames, or organize with hooks, but you don’t want to drill holes or use harsh adhesives that could ruin your wood. Command Strips are a fantastic solution, offering damage-free hanging. But can they actually stick to wood? The answer is a resounding yes, with a few important tips to make sure they hold strong. Let’s dive into how to get that secure, worry-free hold on your wooden surfaces!
Here’s what we’ll cover to make sure your Command Strips stick to wood like a charm:
Understanding Wood Surfaces and Adhesion
Choosing the Right Command Strips for Wood
Step-by-Step Guide: Preparing Wood for Command Strips
Tips for a Stronger Hold on Wood
What to Avoid When Using Command Strips on Wood
Troubleshooting Common Issues
Let’s get started on making your home both organized and beautiful, the easy way!
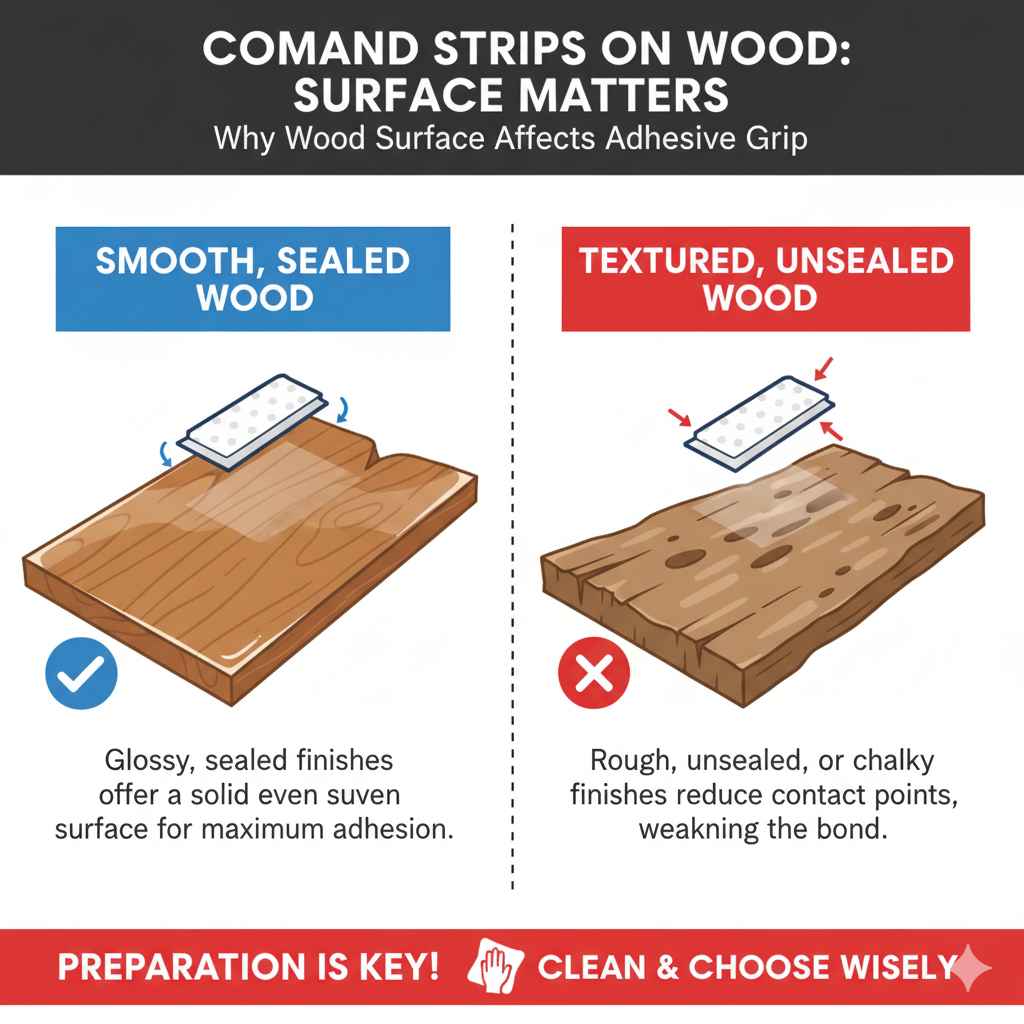
Why Wood Surface Matters for Command Strips
Command Strips work by using a special adhesive designed to stick to smooth, clean surfaces and then release cleanly when removed. Wood, however, comes in many finishes, and its natural texture can affect how well the adhesive grips.
Think of it like trying to stick tape to a polished mirror versus a rough wall. The mirror is smooth, so the tape sticks well. The rough wall has tiny peaks and valleys, making it harder for the tape to get good contact. Wood finishes are similar. A glossy, sealed surface offers a great foundation for Command Strips. But if the wood is unsealed, textured, or painted with a matte or chalky finish, the adhesive might not find enough smooth surface to bond with. This is why preparation is key!
Choosing the Right Command Strips for Wood
3M, the makers of Command Strips, offer a variety of products, and some are better suited for certain weight limits and surfaces. Always check the packaging for the specific weight capacity and recommended surfaces.
For wood, you’ll generally want to look for strips designed for general purpose hanging or heavier items if needed. The main thing is to match the strip’s weight limit to the item you’re hanging. Here’s a quick look at common types:
| Command Strip Type | Ideal For | Weight Capacity (per set of 4 strips) | Notes on Wood Surfaces |
|---|---|---|---|
| Small Clear Strips | Lightweight decorations, photos | 1 lb (0.45 kg) | Best for smooth, sealed wood finishes. |
| Medium Clear/Wire Strips | Small frames, keys, light organizers | 3 lbs (1.3 kg) | Good for finished wood, where a bit more strength is needed. |
| Large/Heavy Duty Strips | Larger frames, shelves, décor | 5-16 lbs (2.2-7.2 kg) | Excellent for most finished wood. Ensure wood can support the item’s weight. |
| Picture Hanging Strips (Velcro-like) | Frames, mirrors, artwork | Up to 20 lbs (9 kg) per set | Very reliable on smooth, finished wood. Offers adjustability. |
Always double-check the package instructions for any specific recommendations or limitations regarding wood surfaces. Some highly textured or unsealed woods might still be a challenge, but usually, with proper prep, you can achieve a great bond.
Step-by-Step Guide: Preparing Wood for Command Strips
Getting Command Strips to stick to wood is all about proper surface preparation. This ensures the adhesive has a clean, smooth surface to create a strong bond.
Step 1: Assess Your Wood Surface
Before you do anything, take a good look at your wood. Is it:
- Smooth and Glossy/Sealed: Like varnished furniture, lacquered shelves, or painted wood with a semi-gloss or gloss finish. These are ideal.
- Matte or Textured: Like unfinished wood, wood with a matte paint finish, or wood with a prominent grain. These will require more careful prep.
- Rough or Unsealed: Like raw lumber or very porous wood. These might not be suitable for Command Strips without significant treatment.
For most common finished wood surfaces in homes – think cabinets, furniture, painted walls with trim – Command Strips are a fantastic option. If your wood is very rough or dusty, it’s likely not a good candidate.
Step 2: Clean the Surface Thoroughly
This is the most crucial step! You need to remove any dust, dirt, grease, or residues that could prevent the Command Strip adhesive from sticking. Use a mild soap and water solution or an isopropyl alcohol (rubbing alcohol) solution. For most finished wood, isopropyl alcohol is often the best choice because it evaporates quickly and leaves no residue.
How to Clean:
- Dip a clean, lint-free cloth into the cleaning solution (water/mild soap or isopropyl alcohol diluted with a little water).
- Gently wipe down the area where you plan to apply the Command Strip.
- Ensure you cover the entire area the strip will touch.
- Avoid using household cleaners that contain lotions or oils, as these can leave a residue.
Step 3: Let the Surface Dry Completely
This is non-negotiable. If you’re using a water-based cleaner, you’ll need to be patient and let the wood dry completely. This might take 30 minutes to an hour or more, depending on humidity. If you’re using isopropyl alcohol, it evaporates much faster, usually within a minute or two.
Why waiting is important: Applying the Command Strip to a damp surface will significantly weaken the adhesive bond. You want that adhesive to make direct contact with the wood and cure properly.
Step 4: Apply the Command Strips
Once the wood is perfectly dry and clean, it’s time to apply the strips. Follow the instructions on the Command Strip packaging carefully.
General Application Steps:
- Peel the protective backing off one side of the Command Strip.
- Stick it firmly to the back of the item you want to hang (or the wall/wood surface itself, depending on the strip type).
- Press down firmly for at least 30 seconds. This helps the adhesive conform to the surface.
- Peel off the other side of the protective backing.
- Carefully align the item with its desired location on the wood surface.
- Press the item firmly against the wood.
- Hold for another 30 seconds to ensure a good bond.
Step 5: Wait Before Hanging the Item
This is another critical step often missed! After applying the strips to your item and sticking it to the wood, you need to let the adhesive set and cure. This allows the adhesive to reach its full bonding strength.
How Long to Wait:
- Most Command Strip packaging recommends waiting at least one hour before hanging the item.
- For heavier items or surfaces where you want extra peace of mind, waiting 24 hours is even better.
This waiting period is vital for achieving the maximum weight-holding capacity. Rushing this step can lead to the item falling.
Tips for a Stronger Hold on Wood Surfaces
Beyond proper cleaning and preparation, a few extra tricks can ensure your Command Strips hold on wood like a champ.
- Use Rubbing Alcohol: As mentioned, isopropyl alcohol (70% or higher) is generally the best cleaner for wood surfaces before applying Command Strips. It cleans effectively and dries quickly without leaving residues that can interfere with adhesion. You can easily find it at any pharmacy or grocery store.
- Test the Surface: If you’re unsure about your wood’s finish, test a small, inconspicuous area first. Apply a small piece of Command Strip, let it cure, and then try to remove it. If it leaves residue or pulls paint/finish, you may need to reconsider.
- Consider the Finish Type: Highly waxed wood or surfaces with a very oily finish might pose a challenge. For these, even thorough cleaning might not be enough for a permanent bond.
- Don’t Overload: Always respect the weight limit indicated on the Command Strip packaging. Trying to hang something too heavy is the quickest way to failure, regardless of the surface.
- Apply Firm, Even Pressure: When pressing the strip onto the wood, ensure you apply steady, even pressure for the full recommended time (usually 30 seconds). This allows the adhesive to make full contact.
- Temperature Matters: For best adhesion, apply Command Strips in a room with moderate temperatures (around 50-85°F or 10-30°C). Extreme cold or heat can affect the adhesive’s performance.
- Consider “Fuzzy” Surfaces: If your wood has a slightly fuzzy or porous surface (even when finished), you might consider applying the Command Strip to the item you’re hanging first, then applying a second Command Strip to the first one, and then sticking that to the wood. This can sometimes create a better bond. However, this adds thickness, so it’s not always ideal.
- Picture Hanging Strips Advantage: For picture frames on wood, 3M Command™ Picture Hanging Strips (the ones that interlock like Velcro) are often exceptionally reliable. They distribute weight well and provide a very secure hold on smooth, finished wood. Learn more about how they work from Command’s official website.
What to Avoid When Using Command Strips on Wood
Just as important as knowing what to do is knowing what not to do. Avoiding these common pitfalls will save you from frustration and potential damage to your wood surfaces.
- Using Harsh Cleaners: Avoid Windex, general multi-surface cleaners, or anything that leaves a greasy or oily residue. These will prevent the Command Strip from sticking. Stick to mild soap and water or, preferably, isopropyl alcohol.
- Applying to Dirty or Greasy Surfaces: Even if the wood looks clean, invisible grease or dust can be the culprit behind a failed application. Don’t skip the cleaning step, no matter how tempting.
- Applying to Damp Wood: Water is the enemy of adhesive! Ensure the surface is bone dry before applying the strips. This may require extra patience on humid days or if you used a water-based cleaner.
- Not Waiting Long Enough: This is a big one! The adhesive needs time to cure and reach its full strength. Impatience here can lead to the item falling and potentially damaging both the item and the wood. Always wait at least an hour, and ideally 24 hours for heavier items.
- Using on Unfinished or Highly Textured Wood: Command Strips are designed for smooth, painted, or sealed surfaces. Applying them to raw, unsealed, or heavily textured wood will likely result in a weak bond or the strip pulling away bits of the wood itself upon removal.
- Overestimating the Weight Limit: It’s tempting to push the limits, but Command Strips have a maximum weight capacity for a reason. Exceeding it will likely cause the strip to fail. Always choose a strip rated for more than the weight of your item by a good margin.
- Applying to Wood Finishes That Peel: If your wood has a delicate finish that tends to peel or flake easily, Command Strips (and their removal) might exacerbate this.
Troubleshooting Common Issues with Command Strips on Wood
Even with the best intentions, sometimes things don’t go perfectly. Here are common issues and how to fix them:
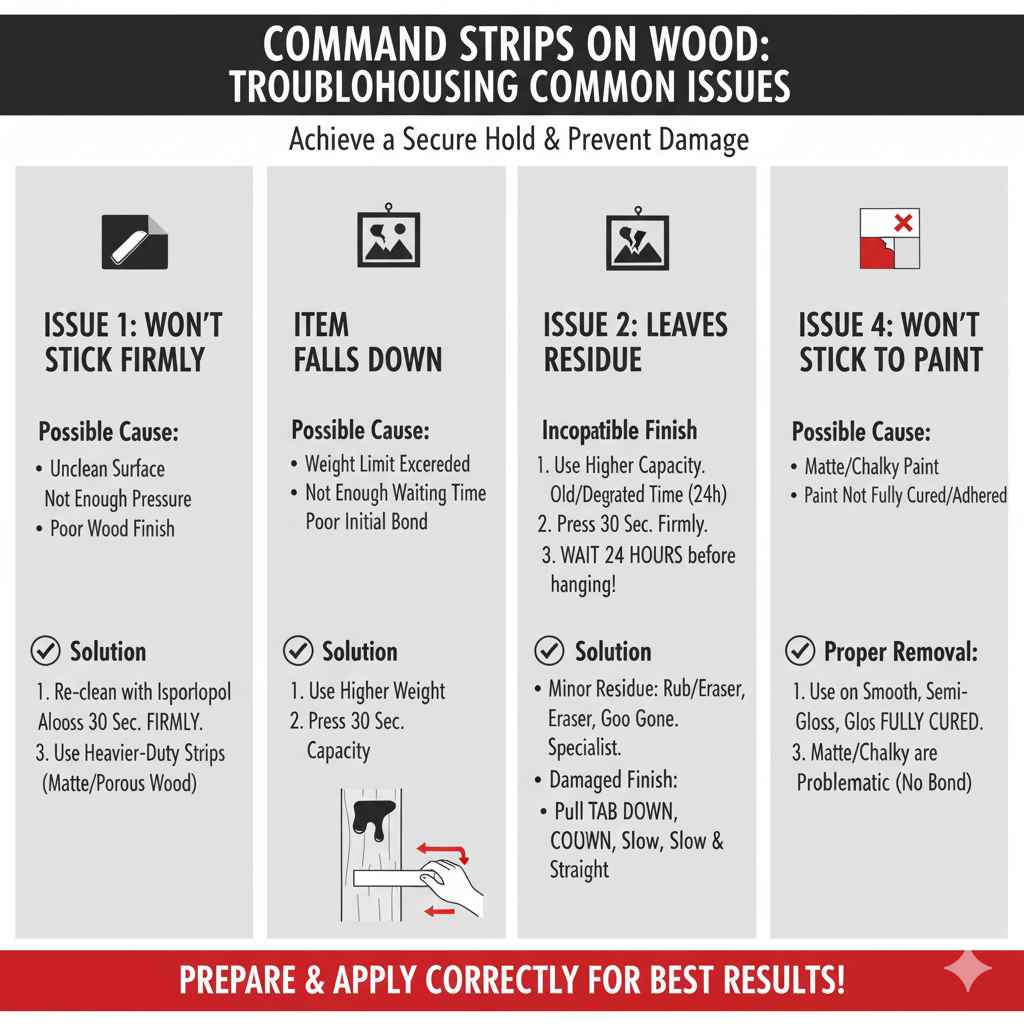
Issue 1: Command Strips Don’t Seem to Stick Firmly
Possible Cause: Surface wasn’t clean enough, not enough pressure applied, or wood finish isn’t ideal.
Solution:
- Carefully remove the strip.
- Re-clean the wood surface thoroughly with isopropyl alcohol and let it dry completely.
- Ensure you are pressing the strip firmly for the full 30 seconds.
- If the wood finish is very matte or slightly porous, the bond might naturally be weaker. Consider using a heavier-duty strip or exploring alternative mounting methods if the item is critical.
Issue 2: Item Falls Down After a While
Possible Cause: Weight limit exceeded, not enough waiting time, or a poor initial bond.
Solution:
- Retrieve the fallen item and any components.
- Inspect the wood surface for damage.
- Re-clean the wood surface with isopropyl alcohol.
- Use a Command Strip with a higher weight capacity.
- Ensure you press firmly for 30 seconds on both sides of the strip application.
- Crucially, wait at least 24 hours before re-hanging the item.
Issue 3: Command Strip Leaves Residue on Wood
Possible Cause: Incompatible wood finish, old or degraded Command Strips, or improper removal.
Solution:
- For Minor Residue: Try gently rubbing the residue with your finger or a clean eraser. If that doesn’t work, try a small amount of Goo Gone (test in an inconspicuous spot first as it can affect some finishes) or isopropyl alcohol. For some residue, warm water and a bit of gentle scrubbing can work.
- For Major Issues or Damaged Finish: If the finish is damaged, you might need to consult a furniture repair specialist. For future applications, test a small area first or consider alternative mounting.
- Proper Removal Technique: Always pull the tab straight down, slowly and steadily, keeping the tab parallel to the wall. Never pull the strip away from the surface at an angle, as this can damage the finish.
Issue 4: Command Strips Won’t Stick to Painted Wood
Possible Cause: Matte or chalky paint finish, or paint is not fully cured/adhered to the wall.
Solution: Command Strips work best on smooth, semi-gloss, or gloss paint. Matte or “flat” paints have a porous texture that prevents a strong bond. Chalky finishes are particularly problematic. If your paint is older and potentially loose, the strip might pull paint off. For best results, ensure your paint is a smoother finish and has fully cured. If you have a matte finish, Command Strips might not be the best option. You can learn more about surface preparation for painting from resources like This Old House, which highlights the importance of smooth surfaces.
Frequently Asked Questions (FAQ)
Q1: Can I use Command Strips on unfinished wood? Generally, no. Unfinished wood is porous and often rough, meaning Command Strips won’t have a smooth surface to adhere to. The adhesive can also soak into the wood fibers, making removal extremely difficult and likely damaging the wood. For unfinished wood, consider sanding, sealing, and then applying the strips, or opt for nails or screws.
Q2: Will Command Strips damage the stain on my wood furniture?
If the stain is properly sealed with a varnish or polyurethane, Command Strips should not damage it. However, if the stain is the only finish, or if the sealant is weak, there’s a small risk. Always clean with isopropyl alcohol and test in an inconspicuous spot first. Proper removal technique is also crucial.
Q3: Can I put Command Strips on wood paneling?
Yes, as long as the wood paneling has a smooth, sealed finish (like varnish, lacquer, or a glossy/semi-gloss paint). If the paneling is unsealed, textured, or has a matte finish, it might not hold well. Clean the surface thoroughly with isopropyl alcohol before application.
Q4: What if my wood has a natural oil finish? Natural oil finishes can sometimes be tricky because oils can migrate to the surface over time, interfering with adhesives. Clean the area extremely well with isopropyl alcohol. If the oil is deeply penetrated, you might need to reapply the oil finish to the area and allow it to cure completely before attempting to use Command Strips. For very oily finishes, other mounting methods might be more reliable.