9 Table Saw Blade: Essential Guide
Choosing the right 9-inch table saw blade is crucial for clean cuts, safety, and efficiency. This essential guide breaks down blade types, tooth counts, materials, and key features, empowering beginners to select the perfect blade for any woodworking task.
Hey fellow woodworkers! If you’ve just gotten your hands on a table saw or are looking to upgrade your current setup, you might be wondering about all those different blades out there. It’s easy to get lost with all the jargon and options. But don’t worry, picking the right 9-inch table saw blade doesn’t have to be complicated. With a little guidance, you’ll be making precise, smooth cuts in no time, feeling confident with every pass. Let’s dive in and demystify the world of table saw blades!
Understanding Your 9-Inch Table Saw Blade: Why It Matters
Your table saw is a powerhouse tool, but its true potential is unlocked by the blade you attach to it. A 9-inch table saw blade is the most common size for contractor and some benchtop saws, making it a versatile choice for home workshops. The right blade can mean the difference between frustrating splintering and beautiful, crisp edges. It impacts not just the finish of your project but also how safely and easily you can make cuts.
Think of your blade as the business end of your saw. It’s doing all the hard work, slicing through wood. Therefore, selecting the correct blade for the material you’re cutting and the type of cut you need to make is fundamentally important. This guide will simplify that choice, covering everything from tooth count to specialized blades, so you can buy with confidence and cut with precision.
The Anatomy of a Table Saw Blade
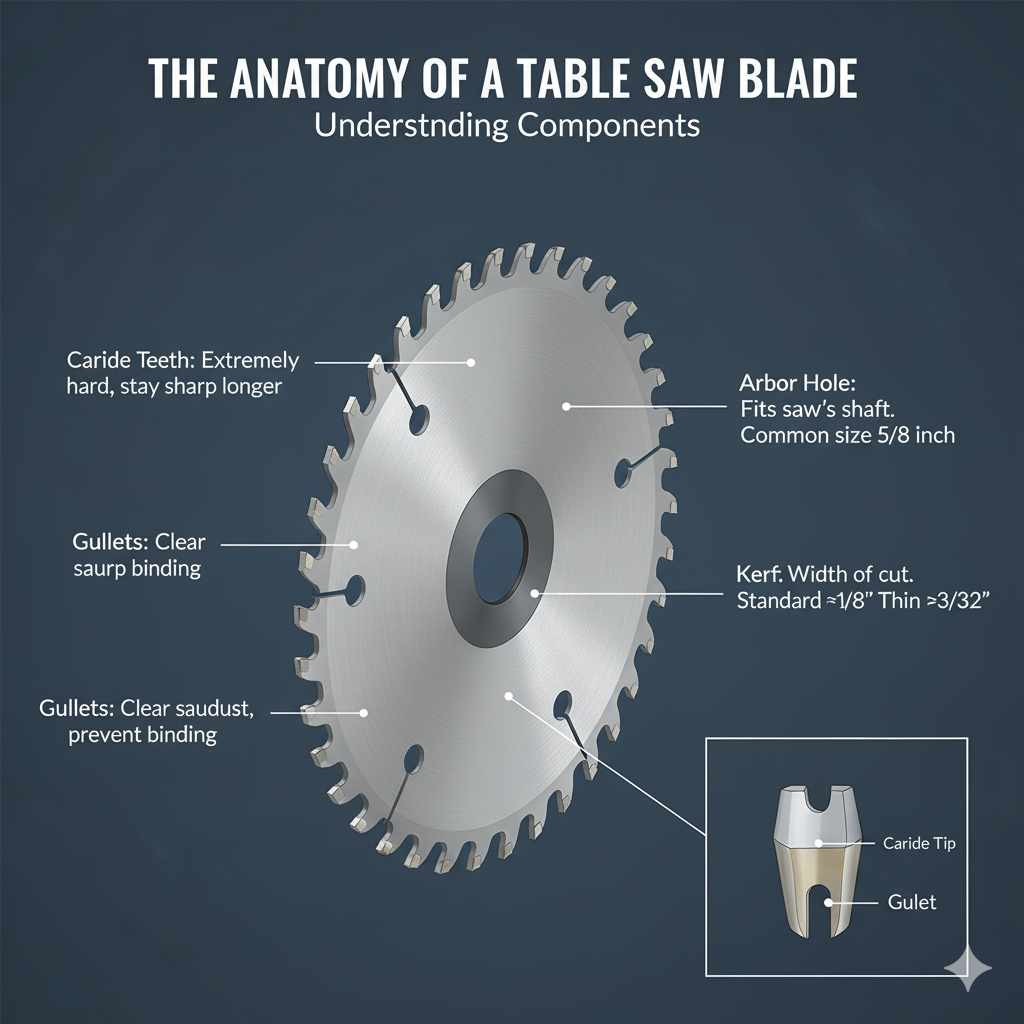
Before we pick a blade, let’s understand what makes one up. A standard 9-inch table saw blade is a circular disk with teeth along its outer edge. Several key components determine its performance:
- Carbide Teeth: These are the most common type of teeth. Tungsten carbide is extremely hard, allowing the teeth to stay sharp for much longer than plain steel.
- Kerf: This is the width of the cut the blade makes. Blades come in standard kerf (about 1/8 inch) and thin kerf (about 3/32 inch). Thin kerf blades require less power from your saw and produce less waste wood, but might not be as rigid.
- Arbor Hole: This is the center hole that fits onto your table saw’s arbor (the shaft that holds the blade). The most common size is 5/8 inch, but it’s always good to check your saw’s specifications.
- Gullets: These are the spaces between the teeth. They help to clear sawdust away from the cut, preventing the blade from binding.
Choosing the Right 9-Inch Table Saw Blade: Key Factors
When you’re standing in front of a wall of blades, it can feel overwhelming. However, focusing on a few key factors will quickly narrow down your choices. We’ll break down the most important considerations:
1. Tooth Count: The More Teeth, The Smoother the Cut?
This is often the first thing people notice about a blade, and it’s a crucial factor in determining the type of cut you’ll get. Generally, more teeth mean a smoother, cleaner cut, but it also requires more power from your saw and can generate more heat.
- Low Tooth Count (e.g., 24-30 teeth): These blades are designed for aggressive, fast cutting. They are excellent for rip cuts (cutting with the grain of the wood) in smaller pieces of lumber or construction-grade lumber where speed is prioritized over a super-fine finish.
- Medium Tooth Count (e.g., 40-50 teeth): This is the sweet spot for general-purpose cutting. A 40-tooth blade is a fantastic all-arounder, capable of handling both rip cuts and crosscuts (cutting across the grain) reasonably well. It offers a good balance between cut speed and finish quality.
- High Tooth Count (e.g., 60-80 teeth): Blades with more teeth are ideal for producing exceptionally smooth finishes, especially on plywood, veneers, and hardwoods. They excel at crosscuts where a clean edge is paramount to avoid tear-out. However, they cut slower and require more power.
For beginners, a 40-tooth combination blade is usually the best starting point. It’s versatile enough to handle a wide range of tasks you’ll likely encounter when starting out.
2. Blade Material & Coatings
The material of the blade and any coatings it has can significantly impact its durability, sharpness, and performance.
- Carbide-Tipped Blades: As mentioned, these are the standard. High-quality blades use C2 or C3 micrograin carbide for better edge retention.
- Anti-Stick Coatings: Some blades feature special coatings (like Teflon or similar) that reduce friction and prevent resin from the wood from sticking to the blade. This helps the blade run cooler and cleaner, leading to smoother cuts and extending its lifespan.
- Expansion Slots: These small slots cut into the blade body help to dissipate heat generated during cutting. They also prevent the blade from warping, especially during long cutting sessions.
3. Tooth Shape & Grind
The geometry of the teeth also plays a vital role. Different tooth shapes are optimized for different types of cuts and materials.
- Flat Top Grind (FTG): These teeth have a flat cutting surface and are best for aggressive rip cuts. They leave a rougher edge.
- High Alternate Top Grind (Hi-ATB): The teeth alternate between a high bevel and a standard bevel. This is common on general-purpose and plywood blades, offering a good balance for both rip and crosscuts.
- Alternate Top Bevel (ATB): Each tooth is ground with a bevel, alternating from left to right. This is excellent for cleaner crosscuts and general woodworking.
- Combination Blades: These blades often feature a mix of tooth styles, perhaps groups of ATB teeth followed by FTG teeth, designed to perform well for both ripping and crosscutting.
For beginners, an ATB or a combination blade with ATB teeth will provide the most versatility for general woodworking tasks.
Types of 9-Inch Table Saw Blades
Beyond tooth count and shape, blades are specialized for specific tasks. Knowing these will help you choose the perfect blade for your needs:
1. Rip Blades
Best For: Cutting wood with the grain (rip cuts).
Characteristics: These blades have a lower tooth count (typically 20-30 teeth) with larger gullets. The teeth are usually shaped for aggressive, fast material removal. They are designed to power through lumber along the grain without bogging down the saw.
Pros: Fast cutting, efficient material removal, good for rough lumber.
Cons: Can leave a rougher edge, not ideal for crosscuts or fine finish work.
2. Crosscut Blades
Best For: Cutting wood across the grain (crosscuts).
Characteristics: These blades have a higher tooth count (typically 60+ teeth) with smaller gullets. The teeth are often ground with a steep Alternate Top Bevel (ATB) or Triple Chip Grind (TCG) to produce a clean, splinter-free edge. They minimize tear-out, which is common when cutting across the grain.
Pros: Extremely clean, smooth cuts, minimal tear-out on crosscuts.
Cons: Slower cutting, can generate more heat, not ideal for ripping long boards.
3. Combination Blades
Best For: General-purpose cutting, handling both rip and crosscuts.
Characteristics: As the name suggests, these blades are designed to do a bit of everything. They typically feature a medium tooth count (40-50 teeth) and a mix of tooth grinds (often ATB) to achieve a balance between cutting speed and cut quality. A common configuration is groups of 4-5 ATB teeth followed by a raker tooth.
Pros: Versatile, good for most common woodworking tasks, requires only one blade for various jobs.
Cons: Not as specialized as dedicated rip or crosscut blades, so the cut quality might not be the absolute best for either task but is very good overall.
Beginner Recommendation: Always start with a 40-tooth combination blade. It’s the workhorse for most DIY projects.
4. Plywood / Sheet Good Blades
Best For: Cutting plywood, MDF, melamine, and other sheet goods.
Characteristics: These blades have a very high tooth count (80+ teeth) and are specifically designed to prevent chipping and tear-out on the delicate veneers and layers of sheet materials. They often feature a Triple Chip Grind (TCG) where two teeth are ground flat, followed by a chamfered tooth; this provides a shearing action that slices through the material cleanly.
Pros: Produces very clean cuts on sheet goods, significantly reduces chipping.
Cons: Slow cutting speed, requires more power, not suitable for solid lumber.
5. Specialty Blades
Beyond these common types, you’ll also find blades for specific tasks:
- Dado Blades: These aren’t single blades but a stack of blades and chippers used to cut wide grooves (dadoes or rabbets) in wood. You’ll need a special arbour nut for these.
- Metal Cutting Blades: Specifically designed with very high tooth counts and unique tooth geometry to cut various metals. Use with extreme caution and proper safety gear.
Table: Comparing Table Saw Blade Types
Here’s a quick comparison to help you visualize the differences:
| Blade Type | Typical Tooth Count | Best For | Cut Quality | Cutting Speed | Power Requirement |
|---|---|---|---|---|---|
| Rip Blade | 20-30 | Rip cuts in solid lumber | Fair to Good (rougher edge) | Fast | Low to Medium |
| Crosscut Blade | 60+ | Crosscuts, fine finish | Excellent (smooth, clean) | Slow | Medium to High |
| Combination Blade | 40-50 | General purpose (rip & crosscuts) | Good to Very Good | Medium | Medium |
| Plywood/Sheet Goods Blade | 80+ | Plywood, MDF, Melamine | Excellent (minimal chipping) | Slow | Medium |
Blade Features That Make a Difference
Once you’ve decided on the blade type, look for these additional features:
- Laser-Cut Expansion Slots: As mentioned, these help manage heat and prevent warping.
- Anti-Vibration Slots: These are often filled with a polymer material and help dampen vibration. Less vibration means a smoother cut, less noise, and longer blade and saw life.
- Blade Body Material: Look for blades made from high-quality steel that won’t easily warp. Some are plated for corrosion resistance.
- Carbide Quality: For carbide-tipped blades, look for C3 or C4 micrograin carbide, which offers superior hardness and edge retention.
Safety First: Always!
Working with a table saw and its blades requires respect for safety. Here are some absolute must-dos:
- Read Your Saw’s Manual: Always familiarize yourself with your specific table saw’s operation and safety features. The Occupational Safety and Health Administration (OSHA) has detailed regulations for machinery safety, including woodworking equipment, which can offer valuable insights into best practices.
- Use the Riving Knife: This is a crucial safety device that follows the blade path. It prevents kickback by keeping the kerf open after the wood has passed the blade. Ensure it’s correctly installed and aligned with your blade.
- Always Use the Blade Guard: The guard protects you from accidentally touching the spinning blade and helps contain dust and debris.
- Use Push Sticks and Push Blocks: Never reach over the blade. Use push sticks and push blocks to guide your material through the cut, keeping your hands a safe distance away.
- Wear Safety Glasses: Always wear a good pair of safety glasses or a full face shield to protect your eyes from flying debris.
- Use Hearing Protection: Table saws can be loud. Protect your hearing with earplugs or earmuffs.
- Ensure Proper Blade Installation: Make sure the blade is installed with the teeth pointing in the direction of rotation (usually indicated by an arrow on the blade). Ensure the arbor nut is snug but not overtightened.
- Never Stand Directly in-Line with the Blade: If kickback occurs, the wood can be violently thrown back towards you. Position yourself to the side of the blade’s path.
Maintaining Your Table Saw Blades
A sharp, clean blade cuts better, safer, and with less effort. Maintenance is key:
- Cleaning: Resin build-up acts like glue and dulls the blade. Use a specialized blade cleaner or a strong solvent like denatured alcohol to remove pitch. Let it soak, then scrub with a stiff brush (don’t use wire brushes on carbide teeth as they can damage them).
- Sharpening: Carbide-tipped blades can usually be sharpened multiple times. For best results, have them professionally sharpened. Look for local sharpening services that specialize in saw blades. Sometimes, DIY sharpening kits are available, but they require practice and precision.
- Storage: Store blades flat in a dry place, ideally in their original protective sleeves or blade cases to prevent damage and keep them clean.

Tips for Beginners Getting Started with New Blades
You’ve bought your blade, now what?
- Start with the Recommended Blade: As mentioned, a 40-tooth combination blade is your best friend when starting. Get comfortable with it.
- Test Cuts are Your Friend: Before cutting into your project piece, make a test cut on a scrap piece of the same material. This helps you dial in fence settings and check the cut quality.
- Listen to Your Saw: If your saw is struggling to push through the wood, the blade might be dull, or you might be pushing too fast. Ease up on the feed rate.
- Don’t Over-Process: Trying to make a rip cut with a 80-tooth plywood blade will be slow and frustrating. Use the right tool for the job.
- Practice Feed Rates: For smooth cuts, try to maintain a consistent feed rate. Too fast leads to tear-out and burning; too slow can cause the wood to burn as the teeth spend too long in contact.
When to Replace Your 9-Inch Table Saw Blade
Even with good maintenance, blades don’t last forever. Here are signs it’s time for a new one:
- Visible Damage: Chipped, broken, or bent teeth are a clear sign.
- Burning Wood: If your cuts consistently start to burn, even with a clean blade and proper feed rate, it’s likely dull.
- Increased Tear-Out: If you’re experiencing significantly more splintering, especially on crosscuts or plywood.
- Louder Operation: A dull or damaged blade can cause the saw to vibrate more and sound rougher.
- Difficulty Cutting: If you have to force the wood through the saw, even with a sharp blade, it’s time for a replacement.
Investing in quality blades will pay off in better results and a more enjoyable woodworking experience. For an idea of blade life, a good quality combination blade might last anywhere from 50 to 150 hours of use depending on the wood type and frequency of sharpening.
Frequently Asked Questions (FAQ)
Q1: What is the most common 9-inch table saw blade for beginners?
A1: For beginners, a 40-tooth combination blade is the most recommended. It offers a great balance for both rip cuts (cutting with the grain) and crosscuts (cutting across the grain), making it versatile for a wide range of projects.