10 Easy DIY Table Saw Dust Collection Ideas
Dust collection is essential for a clean workshop. It also protects your health.
Working with a table saw creates a lot of dust. This can be dangerous and messy. Luckily, there are simple DIY solutions. You don’t need expensive equipment to manage dust. With some creativity and basic tools, you can create effective dust collection systems.
These ideas are easy to implement and budget-friendly. Whether you’re a beginner or a seasoned woodworker, these tips will help you keep your workspace clean. Dive in and discover how you can improve your dust collection with these easy DIY ideas.
Credit: www.danpattison.com
Introduction To Table Saw Dust Collection
Table saws are essential tools for woodworking projects. However, they generate a lot of dust. Effective dust collection is key to maintaining a clean and safe workspace.
When I first started woodworking, I underestimated the mess my table saw would make. The dust quickly became overwhelming. This led me to explore various dust collection methods.
In this blog post, we’ll discuss 10 easy DIY table saw dust collection ideas. Let’s start by understanding the importance of dust collection.
Importance Of Dust Collection
Dust collection is more than just keeping your workspace clean. It also protects your equipment from dust damage. Dust can clog motors and reduce the efficiency of your tools.
Have you noticed your saw’s performance dropping? Dust buildup might be the culprit. Keeping your tools dust-free ensures they last longer and work better.
Moreover, a clean workspace boosts productivity. You spend less time cleaning and more time creating. This helps you complete projects faster and with better results.
Health And Safety Benefits
Woodworking dust isn’t just a nuisance—it can be dangerous. Breathing in fine dust particles can harm your lungs. This can lead to respiratory issues over time.
Using a dust collection system reduces the amount of airborne dust. This makes your workspace safer. It also helps you avoid health problems in the long run.
Think about the long hours you spend in your workshop. Isn’t it worth investing in your health and safety? A good dust collection system can make a big difference.
In the next sections, we’ll explore practical and easy DIY dust collection ideas. Get ready to transform your woodworking experience!
Basic Dust Collection Setup
Discover 10 easy DIY table saw dust collection ideas to keep your workspace clean. Simple setups ensure efficient dust management while sawing.
If you are diving into woodworking, you know that managing dust is crucial. A basic dust collection setup can significantly improve your workspace. Not only does it keep your area clean, but it also protects your health by reducing airborne particles. Let’s look at how you can create an efficient dust collection system for your table saw.
Essential Tools And Materials
To get started with your basic dust collection setup, you’ll need a few essential items. A shop vacuum is a must-have. It’s the heart of your dust collection system. You’ll also need a dust separator. This device helps to collect larger particles before they reach your vacuum, prolonging its life. Flexible dust collection hoses are vital. They connect your table saw to the vacuum and separator. Lastly, don’t forget hose clamps. These ensure a tight fit between hoses and equipment.
Step-by-step Instructions
1. Position Your Shop Vacuum Place your shop vacuum near your table saw. Ensure it’s easily accessible and has enough power to handle the dust collection.
2. Attach the Dust Separator Connect the dust separator to the shop vacuum. Use the flexible hose for this connection. Make sure it’s secured tightly with hose clamps.
3. Connect the Dust Hose to Your Table Saw Attach one end of the hose to your table saw’s dust port. Secure it with a hose clamp. Connect the other end to the dust separator.
4. Check for Leaks Turn on the vacuum and check for any leaks in the system. Ensure all connections are tight and secure. A leaky setup is inefficient and won’t collect dust properly.
5. Test the System Run your table saw with the dust collection system active. Observe how well it collects the dust. Make adjustments as needed to improve performance. Building this basic setup is straightforward and effective. It keeps your workspace cleaner and healthier. Have you tried any of these steps before? What was your experience? Share your thoughts in the comments below!
Using A Shop Vacuum
Using a shop vacuum is a practical solution for collecting dust from your table saw. It is cost-effective and easy to set up. This method helps keep your workspace clean and safe from harmful dust particles.
Connecting To Your Table Saw
Start by connecting the shop vacuum to your table saw. Most table saws have a dust port. Use an appropriate adapter to fit the vacuum hose. Ensure the connection is tight to prevent air leaks. Secure the hose with clamps if necessary. This step ensures efficient dust collection.
Optimizing Performance
To optimize performance, use a high-quality filter in your shop vacuum. A HEPA filter is ideal for capturing fine dust. Clean the filter regularly to maintain suction power. Empty the vacuum bin frequently. This prevents clogs and ensures consistent performance.
Consider using a dust separator. It helps remove larger debris before it reaches the vacuum. This keeps the filter cleaner for longer. Position the vacuum close to the table saw. This reduces the length of the hose and improves suction.
By following these steps, you can enhance your dust collection system. Your workshop will stay cleaner and safer. Plus, your tools will perform better without dust interference.
Creating A Dust Hood
Build a dust hood to keep your workspace clean. Easy to make and helps capture sawdust efficiently. One of the best DIY table saw dust collection ideas.
Creating a Dust Hood When working with a table saw, controlling dust is crucial for both your health and the cleanliness of your workspace. One effective method is to create a dust hood. This simple DIY project can significantly reduce the amount of dust that escapes into your workshop, making your environment safer and tidier.
Materials Needed
To build a dust hood, gather the following materials: –
Plywood or MDF: These materials are sturdy and easy to work with. –
PVC pipe: Useful for connecting the dust hood to a vacuum or dust collection system. –
Dust collection port: Ensures efficient dust capture. –
Screws and brackets: Secure the hood to your table saw. –
Weather stripping: Creates a seal to prevent dust from escaping.
Construction Tips
Start by measuring the dimensions of your table saw to ensure a perfect fit for the dust hood. Cut the plywood or MDF into panels that will form the sides and top of the hood. Make sure the panels are tall enough to cover the saw blade fully. Attach the panels using screws and brackets. Ensure the structure is sturdy and well-supported. Install the PVC pipe and dust collection port. Position them in a way that maximizes dust capture. Use weather stripping around the edges to seal gaps.
This will prevent dust from escaping and improve the efficiency of your hood. Have you ever considered how much dust your table saw produces? Creating a dust hood can make a significant difference. It’s a straightforward project that requires minimal tools and materials but offers substantial benefits. Give it a try, and enjoy a cleaner, healthier workspace!
Installing A Dust Port
Installing a dust port on your table saw can significantly reduce the mess. It helps in maintaining a clean workspace and ensures your safety. This simple DIY project can be done with minimal tools and effort. Let’s dive into the details.
Choosing The Right Port
First, select a port that fits your saw. Measure the size of your saw’s dust outlet. Common sizes include 2.5 inches and 4 inches. Ensure the port you choose matches or adapts to this size. Look for durable materials. Plastic ports are light and easy to install.
Installation Process
Begin by turning off and unplugging your table saw. Safety first. Next, mark the location where you’ll attach the dust port. Use a pencil for clear markings. Drill pilot holes at the marked spots. This makes it easier to screw in the port.
Attach the port using screws. Ensure it is tightly secured. Connect a hose to the dust port. The hose should lead to your dust collection system or a shop vacuum. Ensure the connection is snug to prevent leaks.
Finally, test the setup. Turn on your saw and check the suction. Adjust as needed to ensure optimal dust collection.
Building An Enclosure
Building an enclosure for your table saw can help contain dust and debris. It keeps your workspace cleaner and safer. This simple project can make a big difference. Below, you’ll find design ideas and construction steps to build your own enclosure.
Design Ideas
Consider the size of your table saw. Measure the height, width, and depth. Plan for extra space around the saw. This allows for better airflow and easier access. Think about the materials you will use. Plywood is a good choice. It is sturdy and easy to work with. Look at your workshop layout. Choose a location for the enclosure. Make sure it does not obstruct movement.
Construction Steps
First, gather your materials. You will need plywood, screws, and hinges. Cut the plywood to your measured dimensions. Next, assemble the frame. Use screws to attach the pieces. Ensure the structure is stable. Attach the plywood panels to the frame. Leave an opening for the saw blade and motor. Install a door or access panel. This allows you to reach the saw for adjustments.
Add weather stripping to the edges. This helps contain dust inside the enclosure. Finally, connect a dust collection hose. Place it near the saw blade. This will capture most of the dust produced.
Using A Cyclone Separator
Are you tired of the sawdust mess in your workshop? Installing a cyclone separator could be the solution you’ve been searching for. This easy DIY project helps keep your space clean by efficiently collecting dust and debris. Let’s dive into how it works and how you can install one in your workshop.
How It Works
A cyclone separator uses centrifugal force to separate dust particles from the air. As dust-laden air enters the separator, it spins rapidly. The heavier dust particles are flung outwards to the walls of the container and fall into a collection bin.
This leaves cleaner air to continue on its way, significantly reducing the amount of dust that reaches your vacuum or dust collector. The result? Your filters stay cleaner for longer, and your vacuum’s suction power remains strong. It’s a win-win for any DIY enthusiast.
Installation Guide
Ready to install your cyclone separator? Here’s a simple guide to get you started.
- Gather Your Materials: You’ll need a cyclone separator kit, a collection bin, and some basic tools like a drill and screws.
- Attach the Cyclone Separator: Secure the cyclone separator to the lid of your collection bin. Make sure it’s sealed tightly to prevent leaks.
- Connect to Your Vacuum: Attach one hose from your table saw to the inlet of the cyclone separator. Then, connect another hose from the outlet of the separator to your shop vacuum.
- Test the Setup: Turn on your vacuum and table saw. Check for any leaks and ensure dust is being collected in the bin.
It’s that simple! With a cyclone separator, you’ll spend less time cleaning and more time creating. Give it a try and see the difference for yourself. Have you tried any other dust collection methods that worked well for you? Share your experiences in the comments!
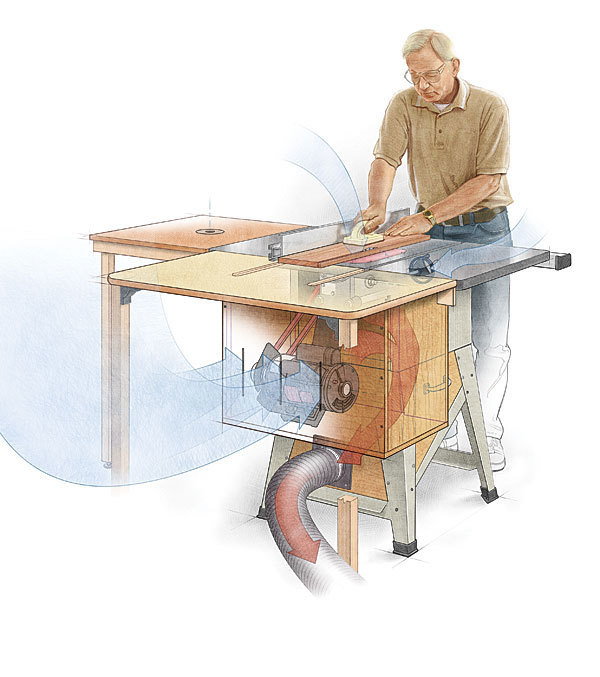
Credit: www.finewoodworking.com
Making A Dust Collection Box
Crafting a dust collection box can help keep your workspace clean. Discover 10 easy DIY table saw dust collection ideas. These solutions are simple and effective for maintaining a dust-free environment.
Creating a dust collection box for your table saw is one of the most effective ways to keep your workspace clean and safe. It can save you from hours of cleanup and protect your lungs from harmful particles. Plus, it’s a fun and straightforward DIY project that you can tackle over a weekend.
Materials And Tools
To start, you’ll need a few essential materials and tools. – Materials: – Plywood (1/2 inch thick) – Wood screws – Wood glue – Dust port fitting – Foam weather stripping – Tools: – Table saw – Drill – Screwdriver – Measuring tape – Pencil Having these items ready will ensure a smooth assembly process.
Assembly Instructions
Begin by measuring your table saw’s base. Cut the plywood pieces to fit the dimensions, ensuring you have a top, bottom, and four sides. Next, attach the sides to the bottom using wood screws and wood glue. Make sure everything is aligned correctly. Then, add the top piece but don’t screw it in just yet. This will be removable for easy clean-up. Install the dust port fitting on one of the sides. Use the drill to make a hole for the port, then screw it in place.
Finally, apply foam weather stripping around the edges where the top piece meets the sides. This will create a seal to prevent dust from escaping. Have you ever thought about how much easier your life could be with a dust collection box? Give it a try and see the difference it makes in your workshop. Keep your workspace clean, and your lungs will thank you!
Employing A Ceiling-mounted Collector
If you’re tired of dealing with sawdust scattered everywhere in your workshop, employing a ceiling-mounted collector can be a game-changer. This method elevates your dust collection efforts, literally, by suspending the collector from the ceiling. It not only saves valuable floor space but also ensures that the dust is efficiently captured right at the source.
Benefits Of Ceiling Mounts
Ceiling mounts are a boon for small workshops where space is at a premium. By keeping the floor clear, you can move around more freely and utilize the space for other essential tools or workbenches.
An elevated collector also tends to capture more dust as it leverages gravity. Sawdust naturally rises and spreads, and a ceiling-mounted unit can intercept this airborne debris more effectively. This means a cleaner and healthier work environment for you.
Additionally, ceiling mounts can be more stable and secure. Mounted units are less likely to be knocked over or obstruct your workflow. This setup can enhance your productivity and maintain safety standards in your workspace.
Installation Tips
First, choose a suitable location on your ceiling, ideally above your table saw. This positioning will ensure that dust is captured immediately as it is generated. Make sure the area is easily accessible for maintenance purposes.
Use sturdy brackets and mounts that can support the weight of your dust collector. Secure them into ceiling joists or beams to ensure stability. Safety is paramount, so double-check that all fittings are tight and secure.
Consider the power source. Ensure that the collector can be plugged in easily without trailing wires across your workspace. Use cable management solutions to keep wires tidy and out of the way.
Have you ever thought about the noise level? Mounting the collector on the ceiling can sometimes amplify the sound. Use vibration dampeners or isolators to minimize noise and ensure a more pleasant working environment.
Lastly, test the system before you start using it regularly. Run your table saw and check if the dust is being effectively collected. Make any necessary adjustments to improve efficiency.
Employing a ceiling-mounted collector is a practical and efficient way to manage dust in your workshop. It keeps your workspace clean, saves floor space, and enhances your overall productivity. Have you tried any other creative dust collection solutions? Share your experiences in the comments!
Maintaining Your Dust Collection System
Discover 10 simple DIY ideas to keep your table saw dust collection system efficient. These tips ensure a clean workspace and improve air quality. Keep your tools dust-free with these easy solutions.
Maintaining Your Dust Collection System A well-maintained dust collection system is essential for keeping your workspace clean and your tools in great shape. Regular upkeep not only extends the life of your equipment but also ensures a healthier working environment. Let’s dive into some practical steps for maintaining your dust collection system.
Regular Cleaning
Regular cleaning is crucial for any dust collection system. Dust buildup can clog filters and reduce efficiency. Aim to clean your system at least once a month. Use a shop vac to remove debris from the collection bin and filters. Check the hoses for any blockages. A clean system works more efficiently and lasts longer.
Troubleshooting Common Issues
Common issues can arise even with regular maintenance. For example, you might notice a drop in suction power. This could be due to a clogged hose or a full collection bin. Inspect the system for any visible blockages. Clean or replace filters if needed. Sometimes, the issue might be as simple as a loose connection. Tighten all connections to ensure optimal performance. Maintaining your dust collection system doesn’t have to be a hassle.
With regular cleaning and troubleshooting, you can keep your workspace dust-free and your tools in top condition. Have you had any unexpected challenges with your dust collection system? Share your experiences and solutions in the comments!
Conclusion And Final Tips
As you wrap up your journey in creating a dust-free workspace with these 10 easy DIY table saw dust collection ideas, it’s time to reflect on what you’ve learned and gather a few final tips. Whether you’re a seasoned woodworker or just starting out, the importance of maintaining a clean and safe environment cannot be overstated.
Use the insights from this blog post to enhance your woodworking experience, ensuring efficiency and health.
Summarizing Key Points
To keep your workspace clean, start with simple solutions like attaching a shop vacuum to your table saw. This is an easy and effective way to capture dust directly at the source.
Consider building a dust hood or shroud around your saw blade. It helps in containing dust and directing it towards your vacuum system.
A downdraft table can be a great addition to your workshop. It pulls dust away from your work area, ensuring a cleaner environment.
Installing a dust collection port on your table saw is another excellent idea. It allows you to connect various dust collection systems easily.
Remember to regularly clean and maintain your dust collection system. This ensures optimal performance and longevity of your equipment.
Additional Resources
If you need more detailed instructions or visual aids, check out woodworking forums and YouTube channels. Many experienced woodworkers share their tips and tricks there.
Consider investing in woodworking books and magazines. They often feature detailed guides on setting up and maintaining dust collection systems.
Join local woodworking clubs or online communities. Engaging with other woodworkers can provide you with valuable insights and support.
For those looking to upgrade their tools, many manufacturers offer dust collection accessories specifically designed for table saws. Check their websites or contact customer support for recommendations.
Don’t hesitate to reach out to professionals if you encounter challenges. Sometimes, a quick consultation can save you time and effort.
What have been your most effective dust collection techniques? Share your experiences and help fellow woodworkers achieve a cleaner, healthier workspace.
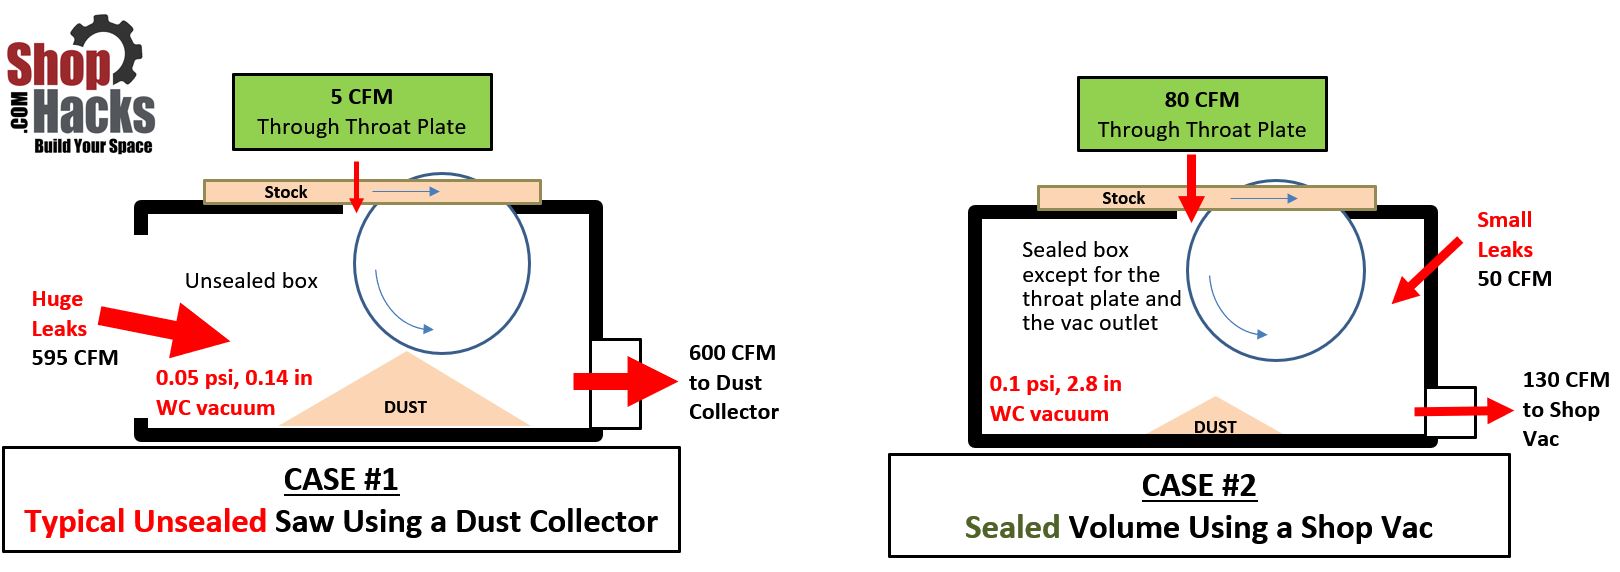
Credit: www.shophacks.com
Frequently Asked Questions
How Do You Make A Homemade Dust Collector?
To make a homemade dust collector, attach a shop vac to a cyclone separator using a hose. Secure both to a sturdy base.
How To Make A Dust Bag For A Table Saw?
Cut fabric to fit the table saw’s dust port. Sew edges together, leaving an opening. Attach with a clamp.
Can I Use Pvc Pipe For Dust Collection?
Yes, you can use PVC pipe for dust collection. Ensure proper grounding to prevent static buildup and reduce fire hazards.
Can You Use Any Vacuum As A Dust Extractor?
No, not all vacuums can be used as dust extractors. Use a vacuum designed specifically for dust extraction.
Conclusion
Creating a dust-free workspace is easy with these DIY table saw ideas. Each tip helps you keep your workshop clean and safe. Start with simple solutions and then try more advanced ones. You will see a big difference in dust control.