DIY Corn Hole Boards: Proven Essential Design
Build your own sturdy, regulation-size DIY corn hole boards with this easy-to-follow guide. We cover essential design elements, simple steps, and common beginner tips to help you craft a fantastic set for backyard fun. Get ready to play!
Playing corn hole is a blast! Gathering with friends and family, tossing bags, and cheering for a good shot – it’s a classic backyard game. But what if you want a set that’s just right, feels solid, and looks great? Building your own DIY corn hole boards is more achievable than you think. Many beginners worry about getting the measurements wrong or ending up with wobbly boards. Don’t let that stop you! We’re going to walk through the proven essential design elements and simple steps to create awesome corn hole boards that you’ll be proud of.
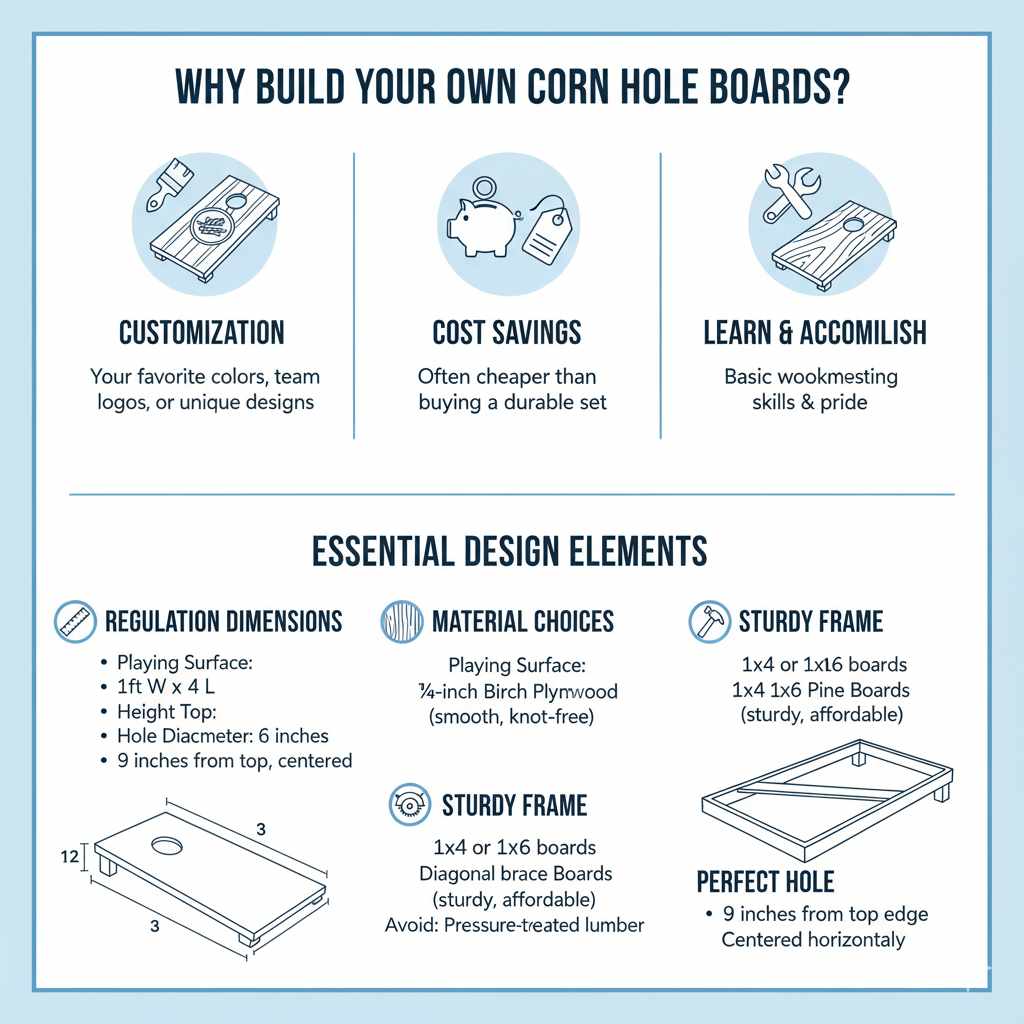
Why Build Your Own Corn Hole Boards?
Buying corn hole boards can be surprisingly expensive, especially for a set that’s durable and has a smooth playing surface. Plus, when you build them yourself, you get to customize them! Think about your favorite colors, team logos, or fun designs. Beyond the fun factor, building is a fantastic way to learn basic woodworking. You’ll use common tools, practice measuring and cutting, and feel a real sense of accomplishment when you’re done. It’s a rewarding project that results in something you can use for years of fun.
Essential Design Elements for Great Corn Hole Boards
Before we grab our tools, let’s talk about what makes a good corn hole board. These aren’t just random pieces of wood; they have specific dimensions and features that ensure fair play and durability. Sticking to these guidelines will make your DIY project a success.
Regulation Board Dimensions
The Sporting Goods Manufacturers Association (SGMA) and the American Cornhole Association (ACA) outline standard regulations. Following these ensures your boards are playable in official tournaments and, more importantly, function perfectly for your backyard games.
Playing Surface: 2 feet wide by 4 feet long.
Height at Top Edge: 3 inches from the ground.
Height at Bottom Edge: 12 inches from the ground.
Hole Diameter: 6 inches.
Hole Placement: 9 inches from the top edge and centered side-to-side.
These dimensions are crucial for the ballistics of the bags and the overall challenge of the game.
Material Choices for Durability and Playability
The type of wood you choose significantly impacts your boards’ longevity and how well the bags slide.
Playing Surface: A smooth, knot-free surface is key.
¾-inch Birch Plywood: This is a popular choice. It’s relatively inexpensive, smooth, and stable. Look for sanded birch plywood for the best playing surface.
¾-inch Cabinet-Grade Poplar or Pine Plywood: Also good options. Ensure they are furniture-grade or cabinet-grade for a smoother finish.
Frame (Scrap Wood or Dimensional Lumber):
1×4 or 1×6 Pine Boards: These are common and easy to work with for the frame. Pine is affordable and readily available.
Scrap Wood: You can often use leftover lumber from other projects. Just ensure it’s straight and free of major defects.
Avoid using pressure-treated lumber for the playing surface, as it can leach chemicals and may not provide a smooth, consistent slide.
The Importance of a Sturdy Frame
A strong frame is the backbone of your corn hole boards. It keeps the playing surface flat and prevents bowing over time. It also provides the angled support to bring the back of the board up to the regulation height.
Construction: The frame is typically built from 1×4 or 1×6 boards that surround the plywood top on all four sides.
Support: Diagonal braces or cross-braces inside the frame can add extra rigidity, especially for larger boards.
Angle: The back legs are assembled at an angle to achieve that 12-inch height at the back and 3-inch height at the front.
The Perfect Hole: Size and Placement
The hole is where the magic happens (or doesn’t!). Its size and placement are critical for gameplay.
Diameter: A 6-inch diameter hole is standard. This is large enough for bags to go through but still requires some accuracy.
Placement: Centered horizontally and 9 inches down from the top edge of the plywood playing surface. This ensures a consistent toss distance and angle.
Tools and Materials You’ll Need
Gathering your supplies before you start makes the building process much smoother. Here’s a basic list to get you prepared.
Essential Tools
Safety Gear: Safety glasses and work gloves are a must!
Measuring Tape: For accurate measurements.
Pencil: For marking cuts.
Saw:
Circular Saw or Miter Saw: For cutting lumber to length.
Jigsaw: Essential for cutting the 6-inch hole.
Drill/Driver: For pre-drilling holes and driving screws.
Clamps: To hold pieces together while you work.
Sander & Sandpaper: For smoothing surfaces (orbital sander is ideal).
Speed Square or Carpenter’s Square: To ensure cuts and joins are square.
Hole Saw (6-inch diameter): The easiest way to cut a clean circle for the hole. If you don’t have one, a jigsaw can work, but it takes more care.
Materials List (for one board)
Playing Surface:
1 piece of ¾-inch birch plywood, cut to 24 inches x 48 inches.
Frame:
2 pieces of 1×4 lumber, cut to 24 inches long.
2 pieces of 1×4 lumber, cut to 45 inches long. (Note: These will overlap the ends of the 24-inch pieces).
Legs:
2 pieces of 1×4 lumber, cut to 12 inches long.
2 pieces of 1×4 lumber, cut to 14 inches long.
Scrap Wood: For cleats that attach the legs to the frame.
Screws: 1 ¼-inch exterior wood screws.
Wood Glue: For extra strong joints.
Paint/Stain/Sealant: For finishing your boards.
Cutting List Summary
Here’s a quick reference for the wood pieces you’ll need for one frame and leg set.
| Part | Quantity | Dimensions (L x W x T) | Notes |
|---|---|---|---|
| Playing Top | 1 | 48″ x 24″ x ¾” | ¾-inch plywood, sanded smooth |
| Frame (Sides) | 2 | 48″ x 3.5″ x ¾” | Cut from 1×4 lumber |
| Frame (Ends) | 2 | 21″ x 3.5″ x ¾” | Cut from 1×4 lumber (fits inside sides) |
| Legs (Long) | 2 | 12″ x 3.5″ x ¾” | Cut from 1×4 lumber |
| Legs (Short) | 2 | ~10″ x 3.5″ x ¾” | Will be angled, adjust based on frame |
| Cleats | 4 | ~3.5″ x 3.5″ x ¾” | Small blocks for leg attachment |
Note: The frame end dimensions (21″) account for the thickness of the side boards and are designed to fit snugly inside the sides to create a 24″ width. The short leg length is approximate and might need adjustment after assembling the frame.
Step-by-Step Guide to Building Your DIY Corn Hole Boards
Let’s get building! Remember to always prioritize safety. Wear your safety glasses whenever you’re cutting or drilling.
Step 1: Cut Your Plywood Top
1. Take your ¾-inch plywood sheet.
2. Measure and mark a piece that is exactly 48 inches long and 24 inches wide.
3. Carefully cut the plywood to these dimensions. A circular saw guided by a straight edge or a table saw will give you the cleanest cuts.
4. Lightly sand the edges to remove any splinters.
Step 2: Prepare and Assemble the Frame
1. Cut your 1×4 lumber. You’ll need two pieces at 48 inches for the long sides and two pieces at 21 inches for the ends. These end pieces will fit inside the long side pieces to create a 24-inch width.
2. If you want stronger joints, bevel the edges of the end pieces so they fit snugly against the long sides. This is optional for a beginner build.
3. Apply a thin bead of wood glue to the ends of the 21-inch frame pieces.
4. Position one 21-inch piece between the two 48-inch pieces, flush with the end of one 48-inch piece. Clamp it in place.
5. Pre-drill pilot holes through the long side piece into the end piece.
6. Drive 2-3 screws through the side into the end piece.
7. Repeat this process for the other end. You should now have a rectangular frame measuring 48 inches by about 22.5 inches (the actual width depends on the exact thickness of your 1x4s, but the outside dimension will be 24 inches).
8. Dry-fit the plywood top onto the frame. It should sit flush. If not, you may need to trim the plywood slightly or adjust your frame.
Step 3: Attach the Plywood Top to the Frame
1. Place the plywood top onto the assembled frame, ensuring it’s centered and the edges are flush.
2. Apply a thin bead of wood glue around the top edge of the frame.
3. Pre-drill pilot holes through the plywood into the frame every 6-8 inches. This prevents the wood from splitting.
4. Use your 1 ¼-inch screws to attach the plywood to the frame. Drive the screws flush or slightly below the surface.
Step 4: Cut the Hole for the Corn Hole
1. Measure 9 inches down from the top edge of the plywood and mark the center point horizontally (which will be 12 inches from each side edge).
2. Using a 6-inch hole saw: Attach it to your drill and carefully drill through the plywood at your marked center point. This is the easiest and cleanest method.
3. Using a Jigsaw: If you don’t have a hole saw, drill a pilot hole large enough to insert your jigsaw blade inside the circle you want to cut. Draw your 6-inch circle. Carefully cut along the line, moving slowly and steadily. Sand the edges smooth afterwards.
4. Safety First! Ensure the board is stable and well-supported before cutting. The wood chips can fly.
Step 5: Prepare and Attach the Legs
This is where we create the crucial angle and height.
1. Cut the Legs: You’ll need two 12-inch legs (back legs) and you’ll need to cut two shorter legs, typically around 10-11 inches. The exact length of the shorter legs (front legs) depends on the angle you want. A good starting point is to cut them 2 inches shorter than the back leg.
2. Create the Angle: On each leg, you’ll need to cut an angle on the top so it meets the frame flush. Measure the distance from the top edge of the frame down to where the bottom of the leg will rest. For the 12-inch legs (back legs), their top edge will sit against the frame, and the bottom will be 12 inches off the ground. For the shorter legs, they’ll sit at an angle to achieve the 3-inch height at the front.
A simple way to do this: Place a 12-inch leg against the back of the frame. Mark the angle it would need to be cut at the top to sit flush. Cut this angle on both 12-inch legs.
Place a shorter leg (e.g., 10 inches) against the front of the frame. Mark the angle it needs to sit flush. Cut this angle on both shorter legs.
3. Attach Legs to Frame: You’ll attach the legs to the inside of the frame.
Cleats: Cut four small blocks of wood (about 3.5 inches by 3.5 inches) from scrap lumber. These will act as cleats to help attach the legs securely.
Positioning: For the back legs, align the top of the 12-inch leg with the top of the frame, set in about 2 inches from the side edge. Put a cleat on either side of the leg, flush with its top edge, and screw it to the frame. Then, screw the leg into the cleats.
For the front legs, position them similarly, ensuring they are angled to bring the front of the board to the 3-inch height. Use cleats, again screwing them to the frame, then securing the leg to the cleats, and finally screwing through the frame into the leg.
Alternative Leg Attachment: You can also attach legs by screwing directly through the frame into the leg, but cleats add significant strength.
4. Test the Height: Once both legs are attached, stand the board up. The back should be 12 inches high at the top edge, and the front should be 3 inches high. Adjust the angle or length of the front legs if needed.
Step 6: Sand and Finish Your Boards
This is where your boards go from functional to beautiful!
1. Thorough Sanding: Sand all surfaces, especially the playing top, to a smooth finish. Start with medium-grit sandpaper (e.g., 120 grit) and finish with fine-grit (e.g., 220 grit). Pay attention to the edges and the inside of the hole.
2. Clean: Wipe off all dust with a tack cloth or a damp rag.
3. Paint or Stain: Now you can get creative!
Paint: Use exterior-grade paint for durability. Consider a primer first. You can paint them solid colors, create patterns, or even paint logos.
Stain: Apply a wood stain to bring out the natural grain before sealing.
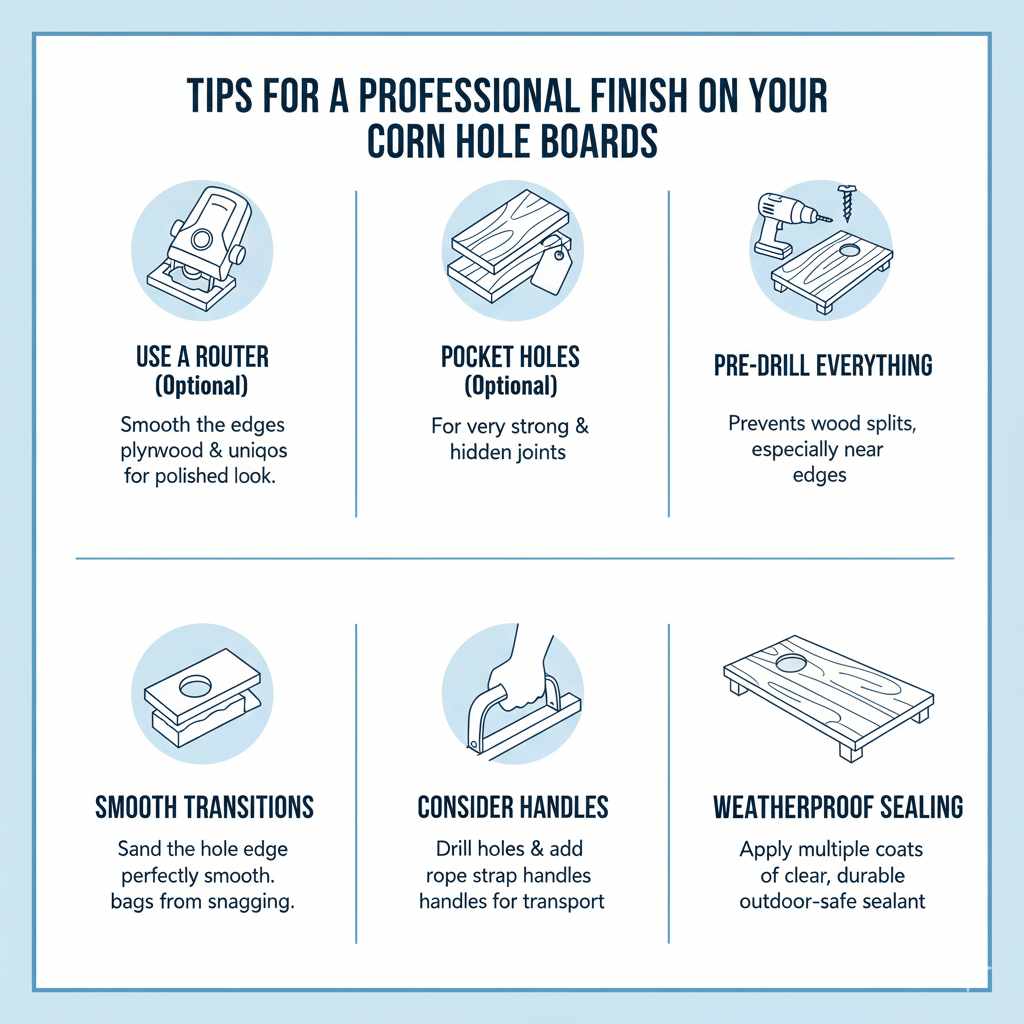
4. Sealant: Once your paint or stain is dry, apply at least two coats of a clear, durable sealant. A polyurethane or spar urethane designed for outdoor use is ideal. This protects the wood from moisture and wear. Make sure to sand lightly between coats for a super smooth finish.
Tips for a Professional Finish
Use a Router (Optional): A router with a roundover bit can smooth the edges of the plywood top and frame for a more polished look and feel.
Pocket Holes: For very strong and hidden joints on the frame, consider using a pocket hole jig.
Pre-Drill Everything: This is a small step that saves a lot of hassle by preventing wood splits, especially when working near the edges of boards.
Smooth Transitions: Ensure the hole is sanded perfectly smooth. Bags can snag on rough edges.
Consider Handles: For easier transport, you can add rope or strap handles to the sides of your boards by drilling holes and threading them through.
Understanding the Play and Rules
While building is fun, knowing how to play is essential! Here are the basics according to the ACA rules.
Objective: Toss bean bags into the hole on the opponent’s board or onto the board.
Scoring:
3 points for a bag that lands in the hole.
1 point for a bag that lands on the board and stays there (not touching the ground).
0 points for a bag that hits the ground before landing on the board.
Bags hanging off the edge and touching the ground get 0 points.
Gameplay: Teams of two, with players on opposite boards. Players take turns tossing bags. For example, one player on Team A tosses their two bags, then the player on the opposite board on Team B tosses their two bags.
Game End: The first team to reach 21 points wins. However, you must win by 2 points.
For more detailed rules, you can check out the official American Cornhole Association rulebook on their website. It’s a great resource for ensuring fair play.
Frequently Asked Questions About DIY Corn Hole Boards
Q1: What kind of wood is best for corn hole boards?
A1: For the playing surface, ¾-inch birch or poplar plywood is highly recommended due to its smoothness and stability. For the frame and legs, standard pine 1x4s work very well and are easy to find.
Q2: How do I make the playing surface really smooth?
A2: Start with sanded plywood. After assembly, sand the entire surface thoroughly with progressively finer grits of sandpaper (e.g., 120, 150, 220). A smooth finish ensures bags slide well.
Q3: How do I cut the hole in the board?
A3: The easiest way is to use a 6-inch diameter hole saw attached to your drill. If you don’t have one, you can use a jigsaw, but it requires more care to get a smooth, round cut. Always sand the edges of the hole well.