
Cutting Edge Wood: Stunning & Essential Tools
Cutting edge wood projects start with recognizing the right tools. From ensuring precise cuts to shaping intricate designs, mastering essential woodworking tools is the key to transforming raw lumber into stunning pieces. This guide will introduce you to fundamental tools, helping you choose wisely and use them safely for beautiful results every time.
Hello there, fellow woodworkers! Ever looked at a beautiful wooden furniture piece and wondered how it was made? Or maybe you’ve got a fantastic DIY idea but feel a bit lost about where to start with the tools. It’s a common feeling for beginners! Working with wood can seem daunting, especially when you see all sorts of specialized equipment. But the truth is, you don’t need a workshop overflowing with fancy gadgets to create something amazing. The magic happens with just a few well-chosen, essential tools and a willingness to learn.
I’m Md Meraj, and over the years, I’ve found that the right starter set of tools can build confidence and lead to some truly stunning projects. We’re going to break down the must-have tools that will help you make precise, clean cuts and start bringing your woodworking visions to life safely and effectively.
Your Essential Toolkit for Cutting Edge Wood
Creating impressive woodworking projects, especially those involving precise cuts and shaping, relies on having the right tools in your hands. For beginners, the sheer variety of woodworking tools can be overwhelming. However, focusing on the essentials will equip you to tackle most introductory projects with confidence and safety. These are the foundational tools that allow you to shape wood, make clean cuts, and assemble your creations. Let’s explore the “cutting edge” equipment that will be your best friends in the workshop.
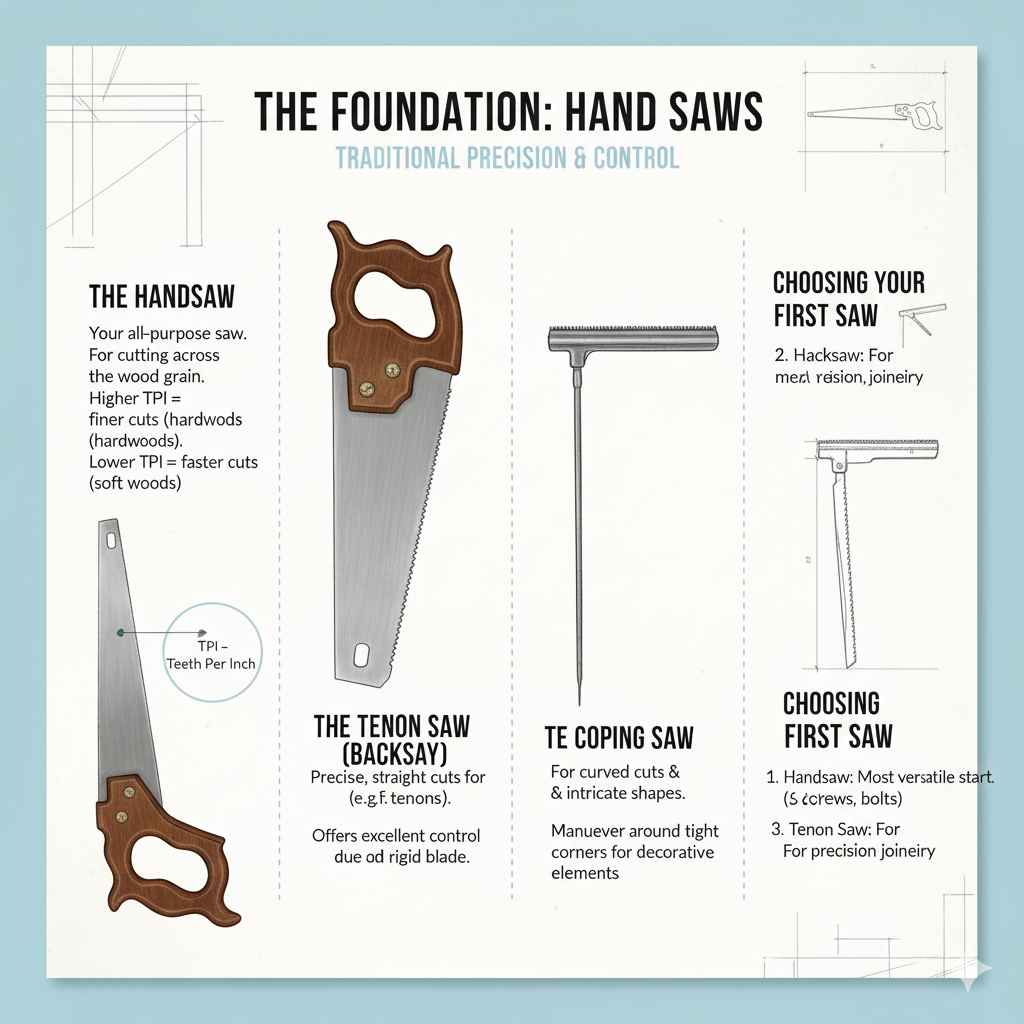
The Foundation: Hand Saws
Before the age of power, hand saws were the workhorses of woodworking. Even today, they remain incredibly useful for their precision, control, and portability. They’re perfect for smaller jobs, making intricate cuts, or when working in spaces where power tools aren’t feasible.
The Handsaw: This is your all-purpose saw. It’s designed for cutting across the wood grain. Look for one with a comfortable handle and a blade that feels sturdy. The teeth count (TPI – Teeth Per Inch) is important: a higher TPI means finer cuts suitable for hardwoods, while a lower TPI is better for faster cuts in softer woods.
The Tenon Saw (or Backsaw): Characterized by its stiffening rib (the “back”) along the top of the blade, this saw is designed for making precise, straight cuts, especially when cutting tenons for joinery. It offers excellent control due to its rigidity.
The Coping Saw: This is your tool for curved cuts and intricate shapes. It uses a very thin blade held under tension, allowing you to easily maneuver around tight corners and create decorative elements.
Choosing Your First Saw: For a beginner, a good quality handsaw is the most versatile starting point. As you progress and your projects demand more precision, consider adding a hacksaw for metal (useful for cutting screws or small bolts) and a tenon saw.
The Precision Powerhouses: Power Saws
Power saws dramatically speed up your work and allow for larger, more complex cuts with consistent accuracy. While they require more caution and understanding of safety protocols, they are indispensable for any serious woodworker.
Circular Saw
The circular saw is often the first power saw a beginner acquires. It’s incredibly versatile, capable of making straight cuts in large sheets of plywood, dimensional lumber, and planks.
How it works: A circular blade spins at high speed, cutting through the wood. You guide the saw along a marked line.
Why it’s essential: It makes quick work of rip cuts (cutting along the grain) and crosscuts (cutting across the grain). With a guide or fence, it can achieve very straight lines.
Beginner Tip: Always use a sharp blade suited for the type of wood you’re cutting. Practice on scrap wood first. Always wear safety glasses and hearing protection. For very straight cuts, consider using a straight edge or clamp a level to the wood to guide the saw.
Safety First: Never force the saw. Let the blade do the work. Keep your fingers away from the blade path. Ensure the blade guard is working correctly. Familiarize yourself with OSHA standards for portable circular saw safety.
Jigsaw
The jigsaw is the master of curves and intricate shapes. If you need to cut out a circle, a rounded corner, or a complex pattern, the jigsaw is your go-to tool.
How it works: An oscillating blade moves up and down, allowing for precise control around corners.
Why it’s essential: It excels at making curved cuts that a circular saw cannot. It’s also great for making plunge cuts (starting a cut in the middle of a piece of wood without a pilot hole).
Beginner Tip: Use the correct blade for your material. Thicker blades are for straighter, faster cuts, while thinner blades are for curves. Slow and steady wins the race with a jigsaw while following your marked lines.
Safety: Always secure your workpiece firmly. Keep blades sharp for cleaner cuts and less effort.
Miter Saw (Chop Saw)
A miter saw is your best friend for making accurate crosscuts and angled (miter) cuts. It’s especially useful for projects requiring multiple pieces to be cut at the same angle, like picture frames or trim work.
How it works: The saw head pivots left or right to create angled cuts. Many have adjustable bevel settings to cut angles through the thickness of the wood.
Why it’s essential: It provides incredible accuracy and repeatability for angled cuts, making joinery much easier and cleaner.
Beginner Tip: Learn how to set the angle precisely. Always ensure the material is held firmly against the fence. Don’t try to cut pieces that are too wide for the saw.
Safety: Always keep hands clear of the blade’s path. Ensure the material is fully supported.
Table Saw
The table saw is often considered the heart of a woodworking shop. It’s a powerful machine for making accurate rips (along the grain) and crosscuts, and with the right attachments, it can perform many other operations.
How it works: A circular saw blade protrudes through a flat tabletop. The wood is fed into the blade.
Why it’s essential: Offers unparalleled accuracy and repeatability for long rip cuts and precise crosscuts.
Beginner Topic of Caution: Table saws are powerful and require the most respect and safety training among common power tools. It’s highly recommended to get hands-on instruction before operating one. If you’re just starting, it might be a tool to learn about and aspire to, rather than immediately purchase.
Safety: Always use a push stick for rip cuts. Never reach over the blade. Ensure the blade guard and riving knife are properly installed and functional. Read up on table saw safety best practices.
Essential Measuring and Marking Tools
Accuracy in woodworking starts with precise measurements and clear markings. Without them, even the best sawing skills will lead to misaligned parts and frustrating projects.
Tape Measure: A standard tape measure is fundamental for any project, from rough measurements to fine adjustments. Look for one with clear markings and a lockable mechanism.
Combination Square: This versatile tool is invaluable for marking 90-degree and 45-degree angles, checking for squareness, and also acts as a short ruler.
Pencil/Marking Knife: A sharpened carpenter’s pencil is good for most general marking. For more precision, especially where you want a very fine line that won’t blow out when cut, a marking knife is excellent.
Chalk Line: For marking long, straight lines on larger pieces of lumber or sheet goods, a chalk line is a quick and effective tool.
Fastening Tools: Beyond Cutting
While this guide focuses on cutting, it’s worth mentioning that holding your wood together is crucial, and that often involves tools beyond the saw.
Clamps: You’ll need various types of clamps to hold pieces together while glue dries or to secure wood for cutting. Bar clamps, C-clamps, and pipe clamps are common.
Screwdrivers/Drill/Driver: Essential for driving screws, which are common fasteners. A good cordless drill/driver is a must-have in any workshop.
Tool Comparison: Cutting Saws for Beginners
To help you decide which cutting tools might be best for your initial foray into woodworking, here’s a comparison table of the most common and beginner-friendly saws:
| Tool | Primary Use | Beginner Friendliness | Typical Cost (Entry Level) | Pros | Cons |
|---|---|---|---|---|---|
| Handsaw | General purpose cutting, crosscuts, fine detail work. | Very High | $20 – $50 | Affordable, portable, quiet, great control for small tasks. | Slow for large cuts, requires physical effort, less precise for long industrial-style lumber. |
| Jigsaw | Curved cuts, intricate shapes, plunge cuts. | High | $50 – $150 | Excellent for curves, can make internal cuts, relatively safe. | Less accurate for long straight cuts, can wander on thick material, can leave rough edges. |
| Circular Saw | Straight cuts (rip and crosscuts) in sheet goods and lumber. | Medium | $70 – $200 | Fast, powerful, versatile for straight cuts, portable. | Requires practice for straightness, potential for kickback, needs dust collection. |
| Miter Saw | Accurate crosscuts and angled cuts. | Medium | $100 – $300 | Highly accurate for angles, repeatable cuts, fast. | Less portable, limited to crosscuts and miters, requires space. |
| Table Saw | Rip cuts, crosscuts, dadoes, specialized joinery. | Low (Requires significant training) | $200 – $1000+ | Most versatile for accurate straight cuts, efficient for production. | Most dangerous if misused, not portable, requires substantial space and safety awareness. |
Safety First: Always Protect Yourself
Woodworking is incredibly rewarding, but safety must always be your top priority. Just like wearing the right safety gear when using power tools, understanding how to cut wood safely is paramount to preventing accidents and injuries.
Read the Manual: Every tool comes with an owner’s manual. Take the time to read and understand its specific safety guidelines before you even plug it in or pick it up.
Wear Appropriate Gear:
Safety Glasses: Always wear ANSI-approved safety glasses or a full face shield to protect your eyes from flying debris.
Hearing Protection: Power tools can be loud. Use earplugs or earmuffs to prevent hearing damage.
Dust Mask/Respirator: Wood dust can be harmful to your lungs. Wear a dust mask, especially when sanding or cutting MDF.
Apparel: Avoid loose clothing, jewelry, or anything that could get caught in a tool. Wear sturdy, closed-toe shoes.
Keep Your Workspace Clean: A cluttered workshop is a dangerous workshop. Keep floors clear of sawdust and scrap wood. Ensure good lighting.
Secure Your Work: Always clamp down your workpiece firmly before cutting. Never try to hold a piece of wood with one hand while cutting with a power tool.
Know Your Tools: Understand the function of each part of your tool, especially safety features like blade guards and riving knives.
Sharp Blades are Safer: Counterintuitively, dull blades are more dangerous. They require more force, increasing the risk of slippage and kickback. Keep your blades sharp.
Take Breaks: Fatigue leads to mistakes. If you’re tired, step away from the tools for a while.
For more in-depth information on safety practices, the Woodworking Handbook is an excellent resource.

Beyond the Cut: Finishing Your Projects
Once you’ve made those precise cuts and assembled your project, the “cutting edge” often extends to the finishing touches. This is where you turn functional items into stunning pieces.
Sanding: Smooth out rough edges and surfaces. Start with a coarser grit sandpaper and move to finer grits for a smooth finish.
Staining: Apply stain to enhance the wood’s natural grain and color.
* Finishing: Seal and protect the wood with varnish, polyurethane, oil, or wax. This not only adds durability but also a beautiful sheen.
Common Beginner Questions About Cutting Wood
Here are some frequently asked questions from aspiring woodworkers regarding cutting tools and techniques.
Q1: What’s the single most important tool for a beginner who wants to cut wood?
A1: For general-purpose cutting and entry-level projects, a good quality handsaw and a tape measure are the most fundamental. If you’re ready for power, a circular saw or jigsaw would be excellent starting points.
Q2: How can I make sure my cuts are straight with a circular saw?
A2: Use a T-square or a metal straight edge clamped securely to your wood as a guide for the saw base. Practice on scrap pieces first to get a feel for controlling the saw.
Q3: Is it safe to use power tools for the first time alone?
A3: While you can learn to use them safely alone, it’s highly recommended to seek in-person guidance from an experienced woodworker for your first few sessions with any significant power tool, especially a table saw or miter saw. Always prioritize understanding the safety features and potential hazards.
Q4: What type of wood is easiest for beginners to cut?
A4: Softwoods like pine or fir are generally easier to cut than dense hardwoods. They require less force and are more forgiving with blade sharpness.
Q5: Do I need a lot of expensive tools to make nice wooden items?
A5: Absolutely not! Many beautiful and functional items can be made with just a few essential hand tools. As you gain experience and tackle more complex projects, you can gradually add more specialized tools. Focus on quality over quantity for your first few tools.
Q6: How often should I sharpen my saw blades?
A6: For handsaws, sharpening is an occasional skill. For power saws, it depends on usage. You’ll know a blade is dull if you have to force the cut, if it splinters the wood excessively, or if you hear the motor straining. For most hobbyists, replacing a dull blade is often more practical than sharpening for certain types of saws.
Q7: What is “kickback” and how do I prevent it with a circular saw or table saw?
A7: Kickback is when the saw blade or teeth suddenly catch the wood and violently throw the wood back towards the operator. It’s a common cause of serious injury. To prevent it: always use sharp blades, ensure the wood is properly supported and not pinching the blade, use a riving knife or blade guard where applicable, and never force the saw. Always stand to the side of the blade’s path, not directly behind it.
Conclusion
Embarking on a woodworking journey opens up a world of creativity and practical skill-building. You’ve seen that creating “cutting edge wood” projects isn’t about possessing a vast array of fancy tools, but about understanding and mastering a few essential ones. From the satisfying precision of a handsaw to the speed and capability of power tools like the circular saw or jigsaw, each tool plays a vital role. Remember to always prioritize safety, keep your workspace tidy, and never stop learning. As you gain confidence, you’ll discover which tools best suit your style and projects. So, gather your essential tools, respect them, use them wisely, and get ready to transform raw wood into stunning, functional pieces you’ll be proud to call your own. Happy woodworking!