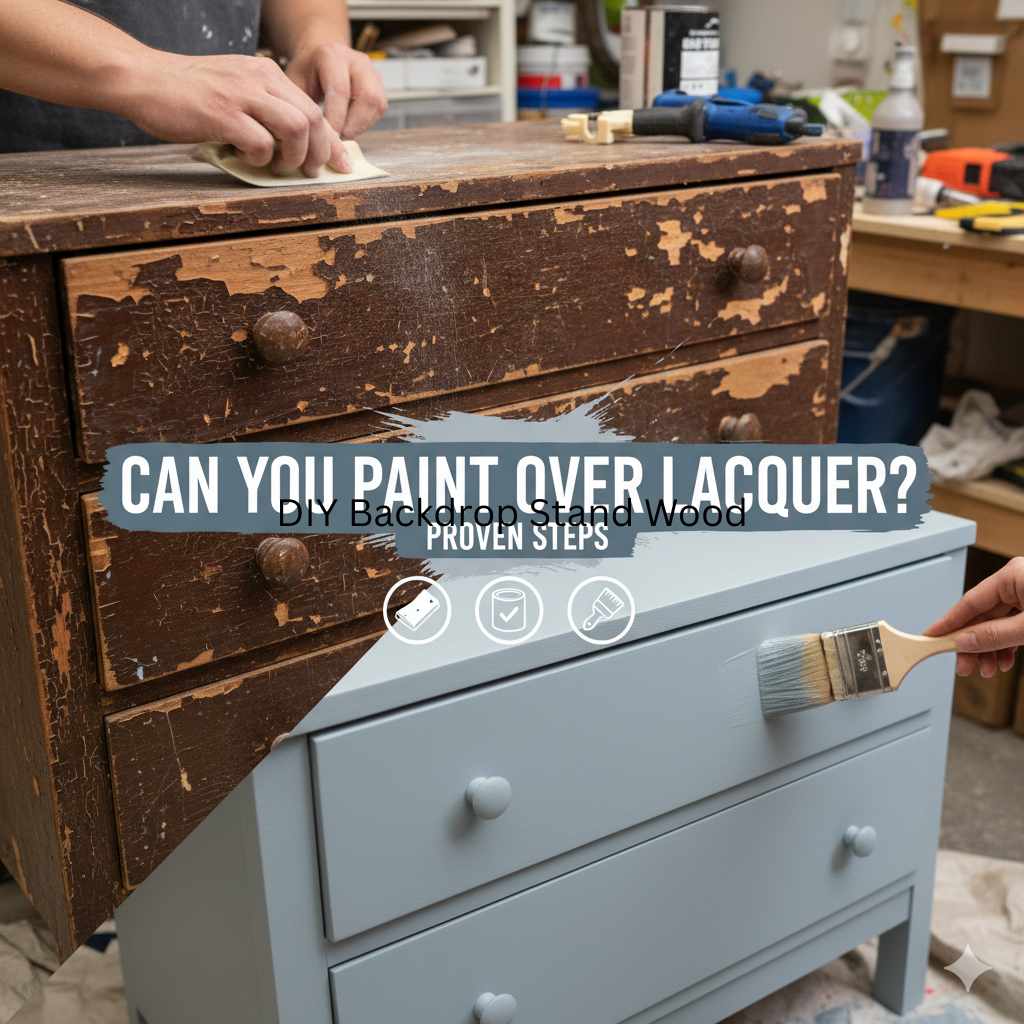
Can You Paint Over Polyurethane: Essential Guide
Yes, you absolutely can paint over polyurethane, but it requires proper preparation to ensure a smooth, durable finish. Skipping these steps will likely lead to peeling, chipping, or an uneven surface that you’ll regret later. This guide will walk you through everything you need to know to successfully paint over polyurethane, transforming your furniture or decor with confidence.
Hello DIYers! Md Meraj here. Ever look at a piece of furniture with a tired, glossy polyurethane finish and think, “I wish I could give this a fresh new look with paint?” You’re not alone! Polyurethane is a fantastic protective coating, but it can sometimes feel like a barrier to updating your decor. Many beginners worry that once polyurethane is on, it’s there forever, making painting impossible. But I’m here to tell you that’s a myth! With the right approach, painting over polyurethane is totally achievable and can breathe new life into your favorite pieces. Let’s dive into how to get it done right.
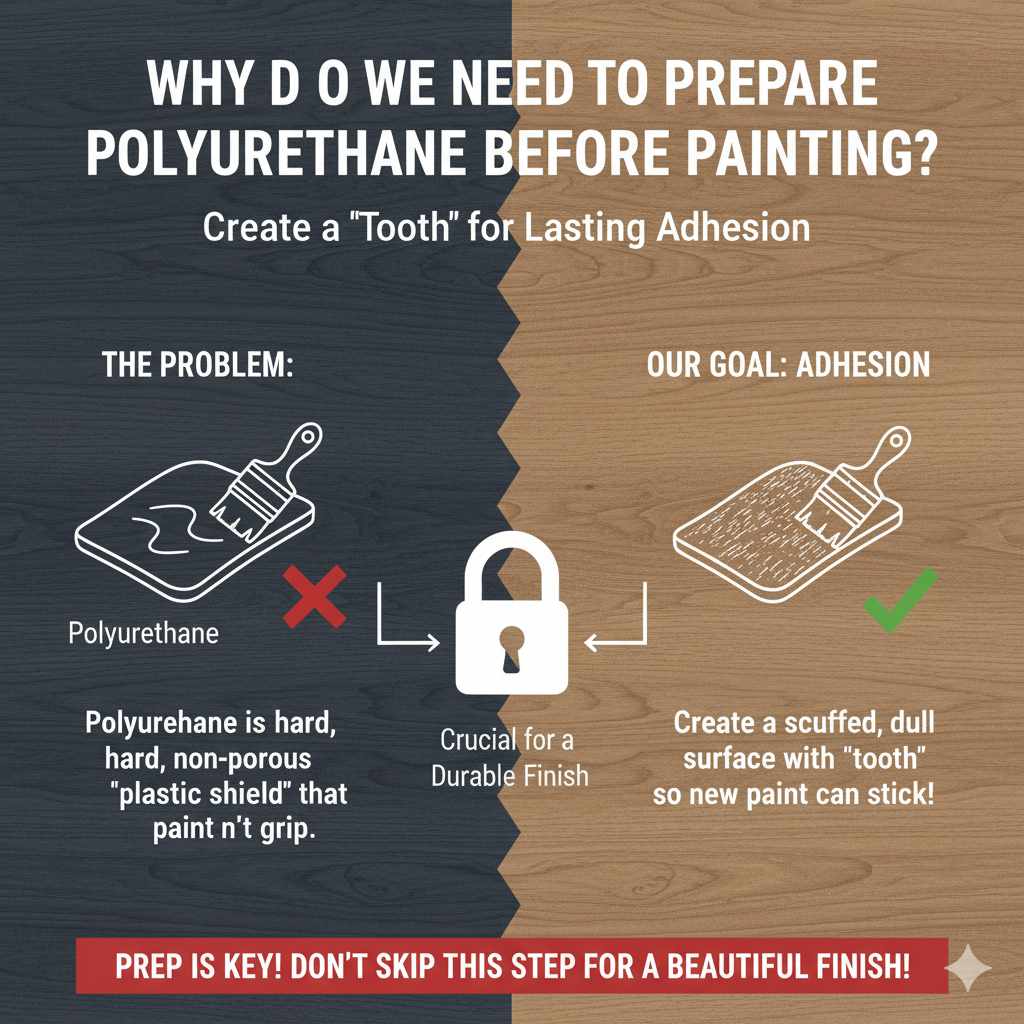
Why Do We Need to Prepare Polyurethane Before Painting?
Polyurethane creates a hard, non-porous surface. Think of it like a plastic shield for your wood. Paint, by its nature, needs something to grip onto – tiny little imperfections or pores in the surface. Without those, paint just sits on top, waiting to slide off. That’s why simply slapping a coat of paint directly onto a polyurethane-finished surface is a recipe for disaster. It’s like trying to glue a sticker onto a perfectly smooth, wet window – it just won’t stick well.
The goal is to create a surface that’s not too smooth, so the new paint has something to adhere to, ensuring a lasting, beautiful finish. It’s all about creating that crucial “tooth” for the paint to grab. We’ll achieve this through a few simple, manageable steps.
Can You Paint Over Oil-Based Polyurethane vs. Water-Based Polyurethane?
This is a great question, and the answer is yes, you can paint over both oil-based and water-based polyurethane. The preparation steps are largely the same for both, though there might be slight differences in how they interact with certain primers or paints. However, for most DIY projects, focusing on the core preparation steps will yield excellent results regardless of the polyurethane type.
- Oil-Based Polyurethane: Tends to be more durable and offers a warmer amber tone over time. It can sometimes be more prone to yellowing.
- Water-Based Polyurethane: Dries clear, doesn’t yellow, and is generally easier to clean up. It might be slightly less durable than oil-based.
The critical takeaway is that the surface characteristics – smoothness and lack of adhesion – are the challenges you face with either type. Our preparation methods will address these directly.
Essential Tools and Materials You’ll Need
Before we get our hands dirty, let’s gather our supplies. Having everything ready makes the process smooth and enjoyable. Don’t worry if you don’t have everything; most of these items are readily available at your local hardware or home improvement store and are staples for any DIYer.
For Surface Preparation:
- Safety Glasses: Protect your eyes from dust and debris.
- Gloves: Protect your hands from chemicals and dust.
- Dust Mask or Respirator: Essential for protecting your lungs when sanding. A good respirator is especially recommended for fine dust particles.
- Clean, Lint-Free Cloths or Tack Cloths: For wiping away dust. Tack cloths are amazing for picking up even the finest dust particles.
- Scrub Brush or Sponge: For cleaning the surface.
- Mild Soap (like dish soap) and Water: For a thorough cleaning.
- Mineral Spirits (optional, for oil-based poly): To help degrease the surface if needed.
- Sanding Sponges or Sandpaper: Use fine-grit options like 150-grit and finish with 220-grit. Sanding sponges are great for getting into nooks and crannies.
- Orbital Sander (optional): Speeds up the sanding process on larger, flat areas.
For Painting:
- Good Quality Primer: An adhesion-promoting primer is key. Look for primers specifically designed for slick surfaces or that state they bond well to glossy finishes.
- Paint: Choose the type of paint that best suits your project (e.g., latex, acrylic, enamel).
- Paint Brushes: High-quality synthetic brushes for latex/acrylic paints, and natural bristles for oil-based paints.
- Paint Rollers: Foam rollers for smooth finishes on flat surfaces, or short-nap rollers for a bit more texture.
- Painter’s Tape: For masking off areas you don’t want to paint.
- Drop Cloths: To protect your work area from paint splatters.
Step-by-Step Guide to Painting Over Polyurethane
Now for the main event! Following these steps carefully will give you the best chance for a beautiful, long-lasting painted finish. Remember, patience and thoroughness are your best friends here.
| Step | Action | Why it’s Important | Tips for Success |
|---|---|---|---|
| 1 | Clean the Surface | Removes dirt, grease, and grime that can interfere with adhesion. | Use mild soap and water. For oil-based polyurethane, you might use a light wipe-down with mineral spirits after cleaning to ensure all oily residues are gone. Rinse thoroughly and let it dry completely. |
| 2 | Lightly Sand the Surface | Creates a “tooth” or rough texture for the primer and paint to adhere to. | Start with 150-grit sandpaper or a medium-grit sanding sponge. Don’t try to remove the polyurethane; just scuff the surface. Move to 220-grit sandpaper for a smoother finish. If using an orbital sander, use light pressure. For detailed areas, use a sanding sponge or fine-grit sandpaper wrapped around a block. |
| 3 | Wipe Away Sanding Dust | Ensures no dust particles are left to create bumps or imperfections in your new paint job. | Use a slightly damp lint-free cloth or a tack cloth. Go over the entire piece, ensuring all dust is removed. Repeat until no dust is visible on the cloth. Ensure the surface is completely dry before moving on. |
| 4 | Apply an Adhesion-Promoting Primer | This is the most crucial step for ensuring paint sticks to the slick polyurethane surface. | Choose a high-quality primer specifically designed for slick surfaces or excellent adhesion (e.g., Kilz Adhesion, Zinsser B-I-N). Apply a thin, even coat. Avoid thick application as it can lead to drips. Let it dry completely according to the manufacturer’s instructions. You might need two coats for full coverage, especially if the original finish is dark. |
| 5 | Lightly Sand the Primer (Optional but Recommended) | Smooths out any imperfections in the primer coat for a flawless finish. | After the primer is fully dry, use very fine-grit sandpaper (220-grit or higher) or a fine sanding sponge. Sand very lightly, just enough to knock down any brush marks or slight imperfections. Wipe away dust again with a tack cloth. |
| 6 | Apply Your Topcoat Paint | This is where your piece gets its new color and look! | Apply your chosen paint in thin, even coats. Most projects benefit from at least two coats. Allow each coat to dry thoroughly before applying the next. Follow the paint manufacturer’s recommendations for recoat times. Consider using a high-quality brush or roller for the best results. |
| 7 | Allow for Proper Curing Time | Paint needs time to harden completely, not just dry to the touch, for maximum durability. | Patience is key! While paint may feel dry in a few hours, it can take days or even weeks to fully cure. Avoid heavy use or cleaning of the painted surface during this period to prevent damage. Refer to your paint’s specifications for curing times. |
Choosing the Right Primer: Your Secret Weapon
I can’t stress enough how important primer is in this process. It acts as a bridge between the slick polyurethane and your new paint. Not all primers are created equal when it comes to sticking to glossy or non-porous surfaces. Look for specific keywords on the can:
- “Bonds to slick surfaces”
- “Adhesion promoter”
- “For glossy surfaces”
- “Stain blocking” (often good for adhesion too)
Popular choices that work well include:
- Zinsser B-I-N Primer
- Krylon Max Build primer with Fusion Technology
- Kilz Adhesion Interior Latex Primer
Always read the product label carefully to ensure it’s suitable for your specific project and surface type. A little extra effort in selecting the right primer saves a lot of headaches down the road.
Paint Types That Work Well Over Prepared Polyurethane
Once you have a well-primed surface, most quality paints will work beautifully. Your choice will depend on the look you want and the durability needed for the item.
Latex or Acrylic Paints
These are very popular for furniture and home decor. They are water-based, making cleanup easy, and they dry relatively quickly with low odor. They come in an endless array of colors and finishes (matte, satin, semi-gloss, gloss).
- Pros: Easy to use, quick drying, low VOCs, lots of color options, good for most interior projects.
- Cons: Can be less durable than oil-based paints if not properly applied and cured, might chip more easily on high-impact surfaces without good prep.
Oil-Based Enamels
These paints offer a very hard, durable finish that’s resistant to chipping and scratching. They have a beautiful leveling quality, often resulting in a very smooth, professional-looking finish. However, they require mineral spirits for cleanup and have a stronger odor.
- Pros: Extremely durable, excellent adhesion, smooth finish, great for high-wear items.
- Cons: Strong odor, requires mineral spirits for cleanup, longer drying times, can yellow over time (especially the white/lighter colors).
Specialty Paints
There are also paints like chalk paint or mineral paints that are designed to adhere to a variety of surfaces with minimal prep. While some might claim you can paint directly over polyurethane with them, I always recommend at least a light scuff-sand and a coat of their specific recommended primer or sealer for the best long-term results, especially if the piece will see a lot of use.
My Recommendation for Beginners: I usually steer beginners towards high-quality latex or acrylic paints. They are forgiving, easy to work with, and offer fantastic results when combined with the proper priming steps. Ensure you give the primer ample time to cure as per its instructions before painting.
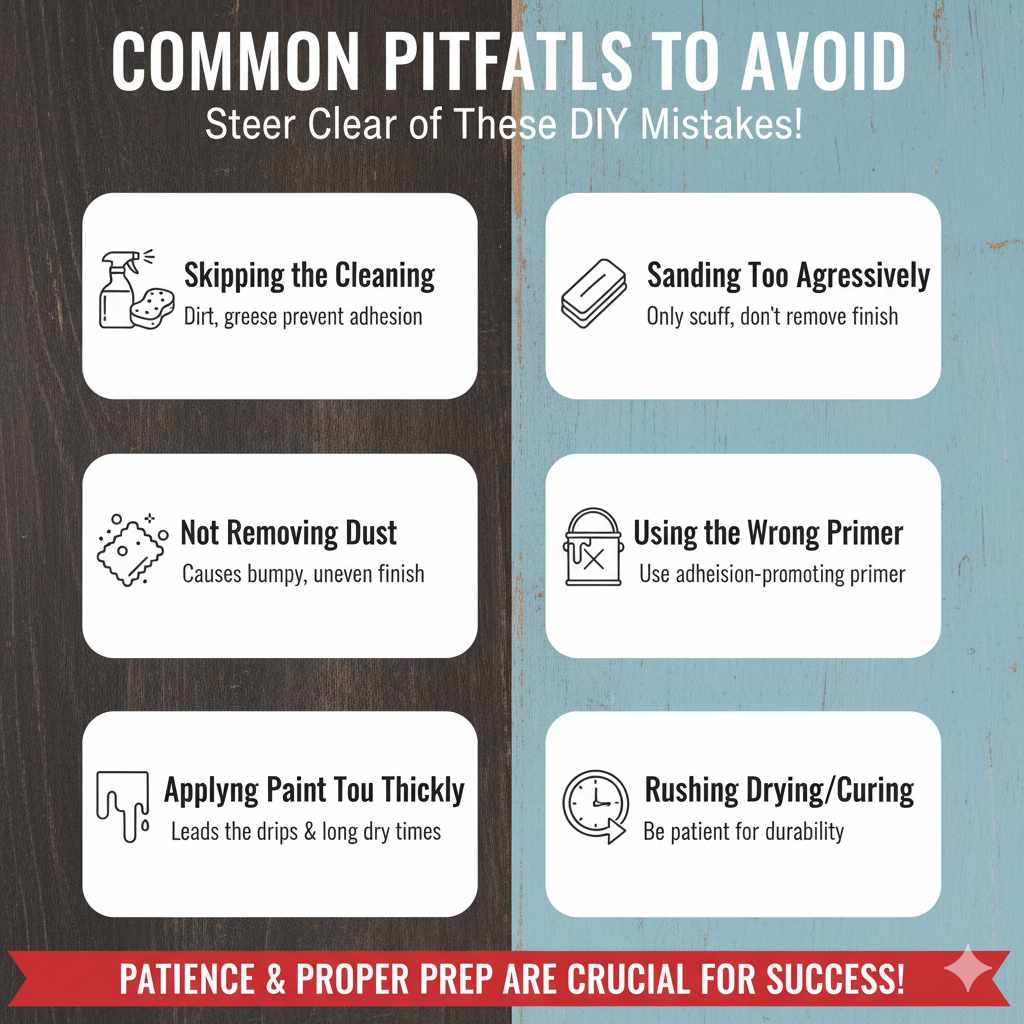
Common Pitfalls to Avoid
Even with the best intentions, a few common mistakes can derail your project. Knowing these ahead of time can help you steer clear of them.
- Skipping the Cleaning: Any dirt or grease will prevent the primer and paint from sticking.
- Sanding Too Aggressively: You don’t need to remove the old finish. Just scuffing it is enough. Over-sanding can damage the wood or the underlying finish layers, making adhesion weaker in some spots and potentially revealing the bare wood, which complicates things.
- Not Removing Dust Thoroughly: This is a major cause of a bumpy or uneven finish. A tack cloth is your best friend here!
- Using the Wrong Primer: A standard drywall primer won’t grip a glossy surface well. Always use an adhesion-promoting primer.
- Applying Paint Too Thickly: Thin, even coats are always better. Thick coats lead to drips, runs, and longer drying times.
- Rushing the Drying/Curing Process: Paint needs time to dry between coats and even longer to cure fully for maximum durability. Be patient!
A well-prepared surface and proper application are the secrets to a professional-looking paint job that lasts.
Frequently Asked Questions (FAQ)
Q1: How do I know if my furniture has polyurethane on it?
Polyurethane typically provides a hard, clear, or slightly amber sheen. It’s often found on wood furniture, cabinets, and floors. If the finish feels very smooth, hard, and somewhat plastic-like, and you can’t easily scratch it with your fingernail, it’s likely polyurethane or a similar durable varnish. If it feels waxy, soft, or is easily scratched, it might be furniture wax or oil without a topcoat.
Q2: Can I paint over varnished wood?
Yes, you can paint over most types of varnish, including polyurethane. The process is very similar: clean, scuff-sand to create adhesion, dust off, prime with an adhesion-promoting primer, and then paint. The key is always proper surface preparation to ensure the paint sticks well.
Q3: What grit sandpaper is best for scuff-sanding polyurethane?
For scuff-sanding polyurethane to prepare it for painting, a medium-fine grit is ideal. Start with 150-grit sandpaper or a medium-grit sanding sponge to dull the shine and create “tooth.” Then, consider following up with 220-grit sandpaper for a smoother finish before priming. You aren’t trying to remove the polyurethane, just to make its surface rough enough for primer to adhere.
Q4: Do I need to seal the paint after painting over polyurethane?
If you used a good quality paint (like an acrylic enamel or an oil-based enamel) and applied multiple durable coats, a separate topcoat might not be strictly necessary, especially for decorative items. However, for high-traffic pieces like tabletops, chairs, or cabinet doors, applying a water-based polyurethane or a durable varnish over the dried and cured paint can add an extra layer of protection and significantly extend the life of your painted finish. Ensure the paint is fully cured before applying a new topcoat.
Q5: My paint is chipping after applying it over polyurethane; what went wrong?
This almost always points to an issue with surface preparation or the primer. The most likely culprits are:
- The surface wasn’t cleaned thoroughly, leaving grease or dirt.
- The surface wasn’t sanded enough to create proper adhesion for the primer.
- The wrong type of primer was used – a standard primer won’t stick well to slick polyurethane. An adhesion-promoting primer is essential.
- The paint was applied too thickly, or the coats weren’t allowed to dry adequately between application.
- The original polyurethane finish was damaged or peeling, and the prep didn’t address that.
The fix often involves removing the failing paint, re-prepping the surface properly, and starting again with the correct primer.
Q6: Can I paint directly over polyurethane without sanding?
While some specialty paints claim to offer direct adhesion, it’s generally not recommended for a long-lasting, durable finish. Even a light scuff-sand creates microscopic grooves that the primer and paint can lock into. Painting directly over a slick, un-sanded polyurethane surface is very likely to result in paint that peels or chips off over time, especially with use. Proper preparation is key to success.
Conclusion
So there you have it! Painting over polyurethane is entirely achievable with the right know-how. It’s not a magical shortcut, but a deliberate process of cleaning, lightly abrading, priming, and painting. By taking the time to prepare your surface properly, you’re setting yourself up for a beautiful, durable painted finish that you’ll be proud of for years to come. Whether you’re refreshing an old dresser, updating kitchen cabinets, or transforming a beloved side table, these steps will help you achieve professional-looking results as a beginner. Embrace the process, enjoy the transformation, and happy painting!